Do you stick the glazing on first then put the droplights on the back?
I'm considering leaving mine off altogether, can't see it making much difference.
I like the little additions you have made, thinking of doing something similar myself just not as much, maybe a few seat covers etc.
Steven
Improving a kitbuild
-
Steven.T

- Fireman

- Posts: 410
- Joined: Sun Mar 13, 2011 5:56 pm
- Location: Stockton
-
laalratty
-
MDLR
The easy way is to put a length of coffee stirrer in the side / floor joint - it's actually easier to do this before assembly, gluing it above the "line x mm above the bottom of the side" like wot Ivan tells you to draw to act as a guide. Having something to glue up against make the whole assembly of the box easier, and once is the box IS assembled, you can add another length under the windows for the glazing to sit on.laalratty:66557 wrote:Tackled the windows yesterday afternoon, got them to stick eventually although I wouldn't like to put too much pressure on them. Having said that, the glazing is of much better quality compared to IP kits of pre laser cut days and sticks much better. So I'm sure you can imagine what the old stuff was like. Sticking it into recesses and holding with an inner panel would be a very good idea, although quite a bit of work.
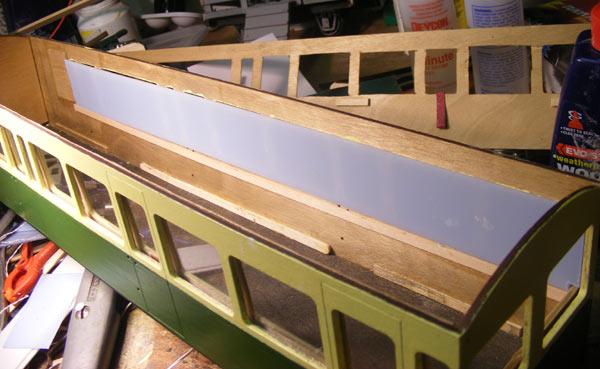
like this.
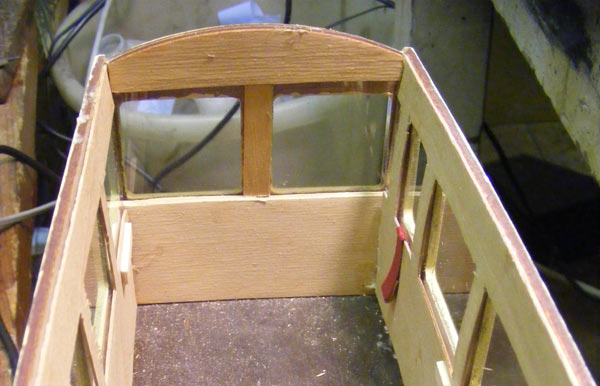
......... and this is what it looks like with the glazing in place.
-
Keith S
- Driver

- Posts: 1668
- Joined: Thu Feb 24, 2011 11:44 pm
- Location: Canada
On the IP guards' van I'm building, I've decided to cut out the windows to fit into the frames rather than gluing a strip of glazing to the inside to cover all the windows like I did with the Gladstone coach. Granted, the van only has four little windows, so it's not as time-consuming as a coach would be. I put the glazing strip behind the window and then scribe the outline with a very sharp knife, then I cut out the plastic and file to fit the window opening. I admit I probably wouldn't have the patience to try this on a passenger coach.
Here's one of the windows in the guards' van:

I guess you can't see the actual plastic, but it's inside that wood frame on the right.
I've also been busy making an interior. Not having ever sen a real guard's van, this is a bit of a flight of fancy, but I imagine there would be a stove, which I have made out of a drinking straw, a plastic thread bobbin, and a bottle cap, and some little bench seats. I'm going to put a little desk in the final corner and some packages of freight on the floor in the middle, and some flags in a rack on the wall.

Sorry if this is considered a "thread hijack", but it IS an IP kit and I am "improving" it.
Here's one of the windows in the guards' van:
I guess you can't see the actual plastic, but it's inside that wood frame on the right.
I've also been busy making an interior. Not having ever sen a real guard's van, this is a bit of a flight of fancy, but I imagine there would be a stove, which I have made out of a drinking straw, a plastic thread bobbin, and a bottle cap, and some little bench seats. I'm going to put a little desk in the final corner and some packages of freight on the floor in the middle, and some flags in a rack on the wall.
Sorry if this is considered a "thread hijack", but it IS an IP kit and I am "improving" it.
-
Narrow Minded
-
GTB
- Driver
- Posts: 1719
- Joined: Sat Mar 05, 2011 2:46 pm
- Location: Australia
I use clear silicone bathroom caulk to hold glazing in place. Takes a while to set, but it sticks to anything.laalratty:66557 wrote:Tackled the windows yesterday afternoon, got them to stick eventually although I wouldn't like to put too much pressure on them.
It's a mongrel to clean up, but if you are careful and keep it off your fingers, it should stay where it's put and if used sparingly, it won't squeeze out over the window.
What sort of window material does Ivan supply? If it's the usual thin flexible 'shirt box' plastic beloved of kit makers, I'd replace it with thin Perpex, or use the thickest Evergreen clear polystyrene sheet (0.030" I think).
CD cases are also a cheap source of clear plastic for windows that stays flat, but not easy to cut cleanly, as it shatters at the drop of a hat (or a saw).
Regards,
Graeme
-
Keith S
- Driver
- Posts: 1668
- Joined: Thu Feb 24, 2011 11:44 pm
- Location: Canada
THe plastic Ivan supplies is just under a millimeter thick and has blue protective film on both sides. It says "Extrudierte Copolyesterplatten" on it. I suppose it's a polyester judging by that last word.
It's very clear, and it snaps nicely along a score line, but it is softer and more flexible than a CD case.
It's very clear, and it snaps nicely along a score line, but it is softer and more flexible than a CD case.
-
GTB
- Driver
- Posts: 1719
- Joined: Sat Mar 05, 2011 2:46 pm
- Location: Australia
Ta.Keith S:66609 wrote:THe plastic Ivan supplies is just under a millimeter thick and has blue protective film on both sides. It says "Extrudierte Copolyesterplatten" on it. I suppose it's a polyester judging by that last word.
I know the stuff but have never used it, as my Perspex supply is 20+ years old and will outlive me at the rate I use it.
Bayer make it under the 'Vivak' name and there are probably other suppliers. It's PETG, one of the polyester family, related to the plastic used for soft drink bottles.
Much better than the acetate sheet usually supplied with models and not as brittle as acrylics(Perspex). The IP kits that I've built don't come with window material, so I wasn't sure what was supplied.
Graeme
-
laalratty
Well that was quite a frantic day of work...
From a fairly complete body that still needed a few bits adding, the coach is now runnerble and will be making its debut at the PTLR tommorow

After checking that the steps had glued properly from yesterday it was out with the trusty roof jig. The roof went on suprisingly well, just a couple of bits that needed re-sticking, alas these bits needed re-sticking a few times before they could be convinced to grab. The used superglue, its the only thing I've found that glues the plasticard to the wood quickly enough

The roofed body

Close up of the modified droplight, in half open position. These were done a few days ago
By this evening....

...the carriage was complete! Well, pretty much, some painting needed doing. The roof was done in railmatch "roof dirt" and dried nice and quickly. I had also attached the axleguards with wheels and couplings, and given the frames and buferbeams a coat of black. The coach is stood next to the directors saloon for comparison. It is a bit taller but slightly narrower (excluding the duckets

Meanwhile, I've started on the next one. I've added interior planking this time
From a fairly complete body that still needed a few bits adding, the coach is now runnerble and will be making its debut at the PTLR tommorow
After checking that the steps had glued properly from yesterday it was out with the trusty roof jig. The roof went on suprisingly well, just a couple of bits that needed re-sticking, alas these bits needed re-sticking a few times before they could be convinced to grab. The used superglue, its the only thing I've found that glues the plasticard to the wood quickly enough
The roofed body
Close up of the modified droplight, in half open position. These were done a few days ago
By this evening....
...the carriage was complete! Well, pretty much, some painting needed doing. The roof was done in railmatch "roof dirt" and dried nice and quickly. I had also attached the axleguards with wheels and couplings, and given the frames and buferbeams a coat of black. The coach is stood next to the directors saloon for comparison. It is a bit taller but slightly narrower (excluding the duckets
Meanwhile, I've started on the next one. I've added interior planking this time
-
Steven.T
- Fireman
- Posts: 410
- Joined: Sun Mar 13, 2011 5:56 pm
- Location: Stockton
-
laalratty
After a good weekend with the carriage works (fitted round outdoor civil engineering work as well) the second carriage gas reached the paint shop

Note the first class compartment, I'm thinking that this carriage with a brakevan would make a good winter train...

Close up of the first class compartment. I have a few details to add in here, such as luggage racks

Third class compartments, note the horizontal planking on the floor and divider. This does make quite an improvement.
The carriage is in the middle of priming at the moment, hopefully ready for painting in a week or two.
Note the first class compartment, I'm thinking that this carriage with a brakevan would make a good winter train...
Close up of the first class compartment. I have a few details to add in here, such as luggage racks
Third class compartments, note the horizontal planking on the floor and divider. This does make quite an improvement.
The carriage is in the middle of priming at the moment, hopefully ready for painting in a week or two.
-
laalratty
Wow, 4 months after the last post and I've finally come back to this to report that the third carriage of the rake was complete structually today, just needing some final painting. Meanwhile the bogie coach from the post above exited the paint shop a full 3 1/2 months after it went in, I think that may be a new record  and shows what uni and exams do to model time (although the grades did really show drastically slowing down was worth it). The rake will be entering service at the next ANLR steamup on Sunday hopefully making an excellent birthday present for my uncle
and shows what uni and exams do to model time (although the grades did really show drastically slowing down was worth it). The rake will be entering service at the next ANLR steamup on Sunday hopefully making an excellent birthday present for my uncle-
SapperAnt
Yes please!!!MDLR:66494 wrote:They did, but they were all rotten. A pattern has been made to reproduce the drillings in the new seats. The work of restoration is coming on steadily - there's been a lot of work done on the underframe, the partition is back where it should be, the sliding doors slide and a start has been made on the exterior planking. This is all happening about a mile from me - pictures, anyone??
(runs & hides)

-
laalratty

Tah-dah! The completed rake and it looks quite nice if I do say so myself. For the steamup tommorrow the Directors Saloon will also be added to make a four car rake
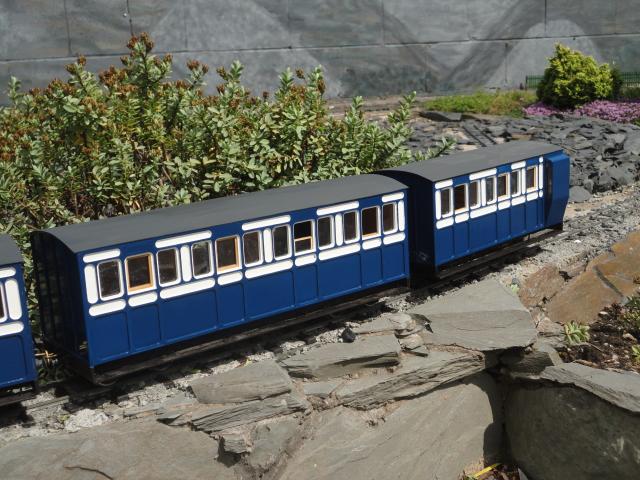
The two recently completed carriages. The other four wheel brake has the same interior detailing as the earlier one, except that the middle compartment is first class instead of third, just to make it different. Not fitted yet is door handles etc, I'll leave it up to uncle as to whether he wants to buy brass ones from Brandbright
-
LMS-Jools

-
sstjc

- Fireman
- Posts: 442
- Joined: Mon Dec 22, 2008 10:47 am
- Location: Faversham Kent
- Contact:
-
laalratty


Who is online
Users browsing this forum: No registered users and 12 guests