Roundhouse Billy Kit

Discussion of Live Steam locomotives should be located here
User avatar
Chris Cairns
Driver
Driver
Posts: 2372
Joined: Mon Oct 29, 2007 7:25 pm
Location: Glasgow, Scotland

Roundhouse Billy Kit

Post by Chris Cairns » Sun Dec 14, 2014 8:07 am

A couple of years ago I started trying to build up my live steam roster away from the original Mamod/MSS collection towards the more serious contenders for Garden Railway running.

Having added a Regner Lumber Jack, and an Accucraft Edrig & Ragleth to my roster, a Roundhouse locomotive had eluded me so far. These tend to be in the 'Luxury Car' price range of the Garden Railway market, whether brand new or 2nd hand via eBay or the reputable dealers, and being unemployed then (now retired) I could not justify those prices.

Being an active member of the Ayrshire Railway Preservation Group with a predominant Andrew Barclay collection, I've been tempted towards the AB based Roundhouse products, and whilst a couple of nice Argyll/Atlantic's have appeared recently they do not really fit in with my predominant industrial range of rolling stock.

So a plan was tentatively hatched around acquiring a manual Billy kit initially, running it in manual first then upgrading to radio control, and possibly ultimately converting to a coal fired Riverdale Elke. With the last of my endowment policies (remember those!) maturing this month there was going to be enough surplus after paying for my steam railway holiday to Sri Lanka next month to get this Billy project off the ground.

At a previous running day of our 16mm NGM group I happened to mention my ambitious Billy plan only for it to transpire that a fellow member had a stalled Billy kit lying idle. I told him to let me know if he wished to sell it, and at his running day last weekend I left with a toolbox & 4 partly assembled Billy kits.

For those that are not aware Roundhouse put together 3 or 4 kits for some of their locomotives which allows one to start building whilst spreading the costs over time by buying 1 kit at a time.

The 3 main kits (chassis, boiler & body) are supplied in very strong cardboard boxes

Image

which contain a printed set of illustrated instructions (mine date from 2004 in B&W but the latest versions have coloured illustrations making identifying specific items better)

Image

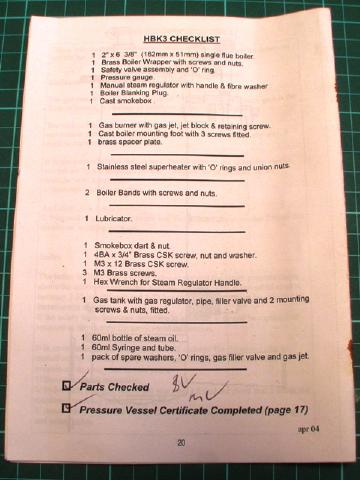
and the back of those instructions has a checklist of all the components supplied in the kit which Roundhouse have checked off, and it is the first thing you should do prior to starting the kit
Image

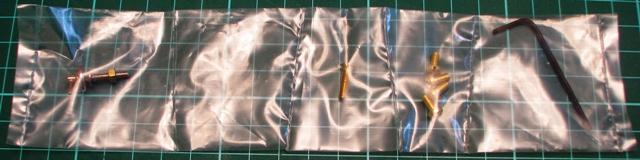
Many of the components have been sealed in plastic pockets, which is a time consuming process during manufacture (I have experience of using this process from my early retail sales days)
Image

So on to the first kit you would build with the Billy.

HBK1 Billy Chassis Kit

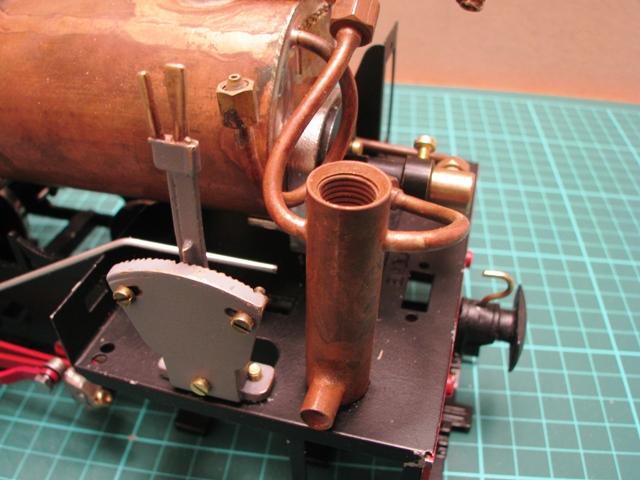
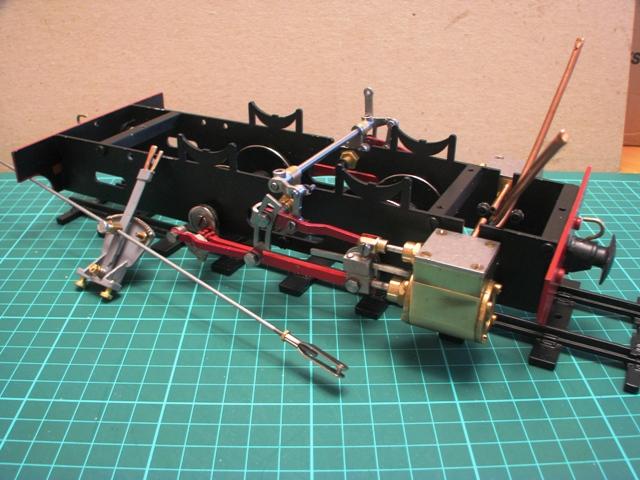
The previous owner had completed a large proportion of this kit. I only had to flip over a return crank so it did not foul the connecting rod, then add the weigh shaft & lifting arms/links, followed by setting up the valve timing. The exhaust pipes need bending to their final shape (and I need to allow for the possible eventual fit of an exhaust 'T' piece here with the Riverdale Elke), and the superheater pipe needs fitting as well so it will be easiest to remove one of the cylinders to complete those tasks.
Image

This kit came with the nice brass cast reverser lever arm & quadrant so those will need painting up prior to fitting to the completed cab floor. The supplied reverser rod is just a plain push rod with fitted clevis so this will need to be bent to the required shape so it does not foul the side tank (this is not in the instructions) - comparing this rod with the reverser rod supplied in the R/C Fitting Kit shows the required bend will be around the end of the threaded portion so I'll need to be careful here.

Image

It will be some time before the next kit (boiler) has been completed so I'm looking into how to run this chassis on air (Topic to be raised in Help Me section shortly).

HBK2 Billy Boiler Kit

The previous owner had painted the boiler wrapper & safety valve cover, plus had a very nice replacement chimney turned by another member of our Group who mainly scratch builds his locomotives.

Image

For the Riverdale Elke conversion it is best to have an opening smoke box door. Roundhouse silver solder the door to the smoke box casting so when ordering one for a Riverdale conversion you ask for it to be supplied with a loose door. I have read elsewhere online of others de-soldering this door, but it is then a time consuming cleaning up the residual solder. Something to discuss with our Group's experts - do I de-solder the door now or just buy another casting on converting to a Riverdale Elke later? Once I've decided the smoke box, chimney, visible parts of the boiler plus the fittings at the rear will all need painting.

After temporarily fitting the gas tank, boiler mounting foot and burner in place, I used a piece of soft wire to work out the required bends required on the gas pipe. Gas jet has been cleaned, coffee filter paper placed behind, and jet sealed into the holder. All these fittings now need painting black to blend in with the cab.

Image

So a far bit of painting to do first, and once all of the above are fitted the lubricator pipework will need bending to the required shape.

Image

HBK5 Billy Body Kit

The previous owner has made a start with this kit. The cab floor has been shaped & painted, the hinge has been fitted to the cab roof which is painted, and the main body has been formed and soldered up, with just a few fittings remaining to be soldered in place.

Image

However this kit is not required for the initial running so my focus will be on completing the chassis & boiler kits for now.

HBK12 Billy R/C Fittings Only Kit

The previous owner was going to R/C this locomotive so the battery box has been formed & painted. This kit will remain in storage until I decide to convert the locomotive from manual running later.

Chris Cairns

kandnwlr

Post by kandnwlr » Sun Dec 14, 2014 8:48 am

Can´t wait to see the rest of the story :D

User avatar
tom_tom_go
Driver
Driver
Posts: 4824
Joined: Wed Feb 23, 2011 3:08 am
Location: Kent, UK
Contact:

Post by tom_tom_go » Sun Dec 14, 2014 3:59 pm

What a deal you have there Chris :)

If you decide to convert to a Riverdale boiler later on you will need to remove the cylinders to get the exhaust/inlet tee's on.

Big Jim

Post by Big Jim » Sun Dec 14, 2014 6:54 pm

Looks very good Chris. Yours seems to be the newer version. Bending the reversing lever is not a problem at all, I cheated with mine and bent it in situ. If you do make a hash of it the rods can be acquired very cheaply from a R/C supplier.
One little issue I have found with mine is that the rear of the cab hand rail knobs can foul the reverser and cause the body not to fit quite right.

User avatar
Chris Cairns
Driver
Driver
Posts: 2372
Joined: Mon Oct 29, 2007 7:25 pm
Location: Glasgow, Scotland

Post by Chris Cairns » Mon Dec 15, 2014 1:57 pm

tom_tom_go wrote:What a deal you have there Chris
It was only when I got it home and emptied all the boxes out to see if it was all there that I realised I had indeed got a bargain.
tom_tom_go wrote:If you decide to convert to a Riverdale boiler later on you will need to remove the cylinders to get the exhaust/inlet tee's on
I've read everything on the Riverdale website, including the Garden Rail articles on building an Elke, plus reviewing a lot of Riverdale builds online including your 'Smokey Sophie' so I'm aware of the exhaust T piece requirement. Given how long this kit appears to have been left idle I think it is best to remove both cylinders so that the exhaust pipes can be annealed and bent to the required shape leaving enough of a straight piece to allow for future cutting & fitting of the Riverdale exhaust T piece.
Big Jim wrote:Yours seems to be the newer version.
The gas tank was tested in Nov 2003 & the boiler in Dec 2003, with the Certificate signed Apr 2004 so it is not that new, but does have the later style cylinders. It is interesting that the instructions supplied with my kit, plus the current instructions online, still refer to fitting the reverser rod with a starlock washer to the lifting arm. I'm very familiar with these push rods from my other R/C experience and indeed have a pack of these push rods from fitting R/C to my Ragleth as you cannot buy them singly anymore.

Thanks for the tip regarding the handrails. I'm considering repositioning the bottom handrail knob and fitting longer handrails as the current ones just look too short to me.

Chris Cairns

User avatar
Keith S
Driver
Driver
Posts: 1668
Joined: Thu Feb 24, 2011 11:44 pm
Location: Canada

Post by Keith S » Mon Dec 15, 2014 2:07 pm

It has the later style cylinders but the nice, earlier style reversing lever. Good deal.

User avatar
Peter Butler
Driver
Driver
Posts: 5726
Joined: Sun Sep 09, 2012 10:33 pm
Location: West Wales

Post by Peter Butler » Mon Dec 15, 2014 5:41 pm

Chris Cairns:106379 wrote: I'm considering repositioning the bottom handrail knob and fitting longer handrails as the current ones just look too short to me.

Chris Cairns
Agreed Chris.... and this is what it will look like with extended handrails

Image
The best things in life are free.... so why am I doing this?

User avatar
Chris Cairns
Driver
Driver
Posts: 2372
Joined: Mon Oct 29, 2007 7:25 pm
Location: Glasgow, Scotland

Post by Chris Cairns » Wed Dec 17, 2014 6:19 pm

Those look more prototypical Peter. Have you used rivets to fill in the original bottom holes?

I like your colour matched cylinder covers - might have to copy that enhancement idea.

Chris Cairns

User avatar
Peter Butler
Driver
Driver
Posts: 5726
Joined: Sun Sep 09, 2012 10:33 pm
Location: West Wales

Post by Peter Butler » Wed Dec 17, 2014 7:04 pm

The original holes were filled with round headed brass pins/nails with the shanks cut short and secured with epoxy (as I recall!) but I'm sure solder could be used and leave no marks at all.
The Roundhouse cylinder covers do look improved with colour matching and the lining helps too!
The best things in life are free.... so why am I doing this?

mikewakefielduk@btinterne

Post by mikewakefielduk@btinterne » Wed Dec 17, 2014 7:47 pm

A good project you've got there Chris. Everything should go together a bit easier than the Telford.

Mike
Last edited by mikewakefielduk@btinterne on Sun Dec 28, 2014 1:30 pm, edited 1 time in total.

Joe

Post by Joe » Sun Dec 28, 2014 12:03 pm

Very nice chris, and saves alot of money compared with RTR, nice 1

User avatar
Chris Cairns
Driver
Driver
Posts: 2372
Joined: Mon Oct 29, 2007 7:25 pm
Location: Glasgow, Scotland

Post by Chris Cairns » Mon Feb 16, 2015 6:19 pm

This kit has sat idle since just before Xmas as I prepared for the festive season & my railway tour to Sri Lanka last month. Our 16mm Group had an indoor chat day last weekend so I wanted to get more of the pipework bent in order to show the previous owner my progress so far, although ironically my ongoing head cold decided otherwise so I missed the meeting.

Whilst fitting some components to work out where the pipes needing bending something was not right. Turned out that 2 of the chassis spacers had been misplaced with the tapped spacer being fitted at the rear rather than the front.

As seen above I had already bent the gas pipe to the required shape, but what is not obvious in the instruction diagrams is this pipe actually goes down the side of the boiler towards the rear so needed another curved bend introduced so it sits clear of the boiler.

Image

To bend the exhaust pipes whilst allowing sufficient length for subsequent fitting of the Riverdale Elke 'T' piece I decided to remove the cylinders, remove the exhaust pipes, anneal them as they have sat for over 10 years, then bend to required shape. I also bent the superheater pipe but found this harder to get a nice bend like the copper piping so the pipe ended up slightly higher than ideal. After a few expletives & some scraped paint I finally got the superheater pipe fitted whilst allowing the slotted burner to fit in front of the male union fitting on the end of the superheater pipe.

Image

With the smokebox & boiler fitted I bent the lubricator to superheater pipe. The fibre washer on the regulator housing needs trimming down so the housing will end up at the right angle then I can shape the remaining lubricator to regulator pipe. This will require the pressure gauge syphon pipe to be bent out of the way as well.

Image

Also bent the reverser rod to the required shape so it operates just clear of the left side tank bottom. This could really benefit from the use of a shorter clevis.

Image

Chris Cairns

Big Jim

Post by Big Jim » Mon Feb 16, 2015 9:34 pm

Nice progress there Chris.
Any idea of a livery yet?
It is interesting to see the slight differences between your later Billy kit and my earlier one.

User avatar
Chris Cairns
Driver
Driver
Posts: 2372
Joined: Mon Oct 29, 2007 7:25 pm
Location: Glasgow, Scotland

Post by Chris Cairns » Tue Feb 17, 2015 6:31 pm

Hi Jim,

Painting is not one of my stronger skills so I'll be sticking with plain green for now. The previous owner advised me he used Rover Brooklands Green on the boiler wrapper & safety valve cover so I need to get a can of that.

The initial plan is to run it without the body kit fitted (just the cab floor), and after scraping some paint off the bottom of the boiler wrapper where it rubbed against the front of the cab floor whilst trying to manhandle the gas burner slot behind the superheater pipe male union fitting I'll probably leave the wrapper & boiler bands off as well for the initial running.

Need to get my shopping list with Roundhouse sorted out before the Peterborough show. Some cylinder covers, probably the buffer beam overlays, and if I can find Keith S's posting the spring castings he used to detail the plain ones on the chassis. For the Riverdale Elke conversion I'll need a new smokebox with the smokebox door not soldered on, and currently considering whether a tender kit would be beneficial for the coal firing as well.

Chris Cairns

User avatar
Peter Butler
Driver
Driver
Posts: 5726
Joined: Sun Sep 09, 2012 10:33 pm
Location: West Wales

Post by Peter Butler » Tue Feb 17, 2015 7:16 pm

When I rebuilt my Billy I added cylinder covers and buffer beam overlays which I think improve the appearance ... hex bolts look so much better than the original slotted screws too!

Image
Image

Springs are available from 'Model Earth' which can be found with the 'Busybodies' figures site from Rob Bennett. They are cast brass and look the part.

Image

Hope this helps....
The best things in life are free.... so why am I doing this?

User avatar
Keith S
Driver
Driver
Posts: 1668
Joined: Thu Feb 24, 2011 11:44 pm
Location: Canada

Post by Keith S » Tue Feb 17, 2015 8:35 pm

For the spring details on mine, I rang Roundhouse and asked them if I could buy a set of the white-metal journal-box castings they use on the tender kit. I then cut the springs off these and glued them to the spring outline on the loco frame. I had to bend them a little so they fit the silhouette on the frame.

Then however I decided to buy the running board detail from Locoworks, which comes with a set of built-up springs which look even nicer. If you look in the photograph here, you can see the front springs are the new ones, and the rear ones under the side tanks are still the old ones from Roundhouse.


Image

User avatar
Chris Cairns
Driver
Driver
Posts: 2372
Joined: Mon Oct 29, 2007 7:25 pm
Location: Glasgow, Scotland

Post by Chris Cairns » Tue Feb 17, 2015 11:50 pm

Peter,

I agree. Unpainted cylinder covers (as posted earlier I'm going to copy your method of painting them the same as the main body colour) & painted buffer beam overlays are now on my shopping list. I assume those are the Talisman 7/8ths Loco springs & hangers which to me look a little too big for the Billy. By the way Simon now has his own website - http://www.modelearth.net/

I used one size smaller hex head 6BA bolts on my Mamod Thomas Telford build and these look much better than the traditional brass cheesehead 6BA screws. So I'll slowly be replacing the cheesehead buffer beam screws on my other locos when time & resources permit.

Keith,

Thank you for confirming what you used. I did manage to find the relevant posting from a few years ago after some searching. The William tender kit is no longer available but I'm assuming the white metal castings on the George tender kit are very similar. The Locolines bling is very nice, but having bought 3 locomotives in the last few months plus ordered a Riverdale Elke boiler kit I do need to watch my budget for now.

Chris Cairns

Big Jim

Post by Big Jim » Wed Feb 18, 2015 12:19 am

Hi Chris,
Watch the paint code of the Rover Brooklands Green as I think there are three shades of it. No probs if you are spraying the whole loco but if you are trying to match colours you may have an issue. Might be worth taking the painted bit to a paint factors an matching it with a colour chip.

User avatar
Chris Cairns
Driver
Driver
Posts: 2372
Joined: Mon Oct 29, 2007 7:25 pm
Location: Glasgow, Scotland

Post by Chris Cairns » Wed Feb 25, 2015 11:52 pm

Thanks for the warning Jim. The previous owner used a Halfords Rover Brooklands Green which of course is not actually one of the 3 proper shades!

Got the final pipework bent so now I can make a start at getting the remaining components painted once I've cleared out a backlog of rolling stock kits in the 'paint shop'.

Image

I suspect the lubricator pipework will need tweaking again particularly if I manage to get one of the one legged BusyBodies clip on Roundhouse driver figures.

Image

Chris Cairns

MDLR

Post by MDLR » Wed Feb 25, 2015 11:57 pm

Chris Cairns:108555 wrote:I suspect the lubricator pipework will need tweaking again particularly if I manage to get one of the one legged BusyBodies clip on Roundhouse driver figures.
Mine's called Arfur....................... because there's only half of him!

Post Reply

Who is online

Users browsing this forum: No registered users and 36 guests