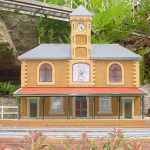
Yr Hen Felin & Yr Orsaf Newydd
-
Peter Butler

- Driver

- Posts: 5671
- Joined: Sun Sep 09, 2012 10:33 pm
- Location: West Wales
Re: Yr Hen Felin & Yr Orsaf Newydd
Lovely finish Phil, even better with some lining I think.
The best things in life are free.... so why am I doing this?
-
ge_rik

- Administrator

- Posts: 7768
- Joined: Sun Oct 25, 2009 10:20 pm
- Location: Cheshire
- Contact:
Re: Yr Hen Felin & Yr Orsaf Newydd
Looks splendid. Top notch!!
Rik
Rik
-
gregh
- Trainee Driver

- Posts: 615
- Joined: Sun Apr 01, 2018 5:44 am
- Location: Sydney, Australia
- Contact:
Re: Yr Hen Felin & Yr Orsaf Newydd
Oh, those poor drivers in the open cab in the snow.
Beautiful modelling.
Beautiful modelling.
Greg from downunder.
The Sandstone & Termite's website: http://www.trainweb.org/SaTR/satr.htm
The Sandstone & Termite's website: http://www.trainweb.org/SaTR/satr.htm
-
Trevor Thompson
- Driver
- Posts: 1157
- Joined: Fri Oct 05, 2018 6:30 pm
- Location: South West Wales
Re: Yr Hen Felin & Yr Orsaf Newydd
Wow - you had "snow" or something like it!
Trevor
Trevor
-
gilfachphil
- Fireman

- Posts: 429
- Joined: Sun Nov 24, 2019 11:00 am
- Location: West Wales
Re: Yr Hen Felin & Yr Orsaf Newydd
It was mostly hail but still made a decent white layer! Living within 1/2 a mile of the sea if we have any covering here I tend to not attempt to go out, it can be much thicker a couple of miles inland where the main roads start!
-
gilfachphil
- Fireman
- Posts: 429
- Joined: Sun Nov 24, 2019 11:00 am
- Location: West Wales
Re: Yr Hen Felin & Yr Orsaf Newydd
The next project is a Brandbright PS9 Ffestiniog Workman's coach. A friend presented me with all of the laser cut plywood parts. He did not have the wheels, axle boxes or buffers, them having got separated from the body parts. He had given me a box of 16mm bits some time ago so I rummaged there but nothing suited.
I glued the solebars to the floor, one side at a time, clamping to a granite worktop saver to get the floor flat, then added the drawbeam at each end.
Attention then turned to the sides and ends. Each side is made up of four layers of ply, the ends only two layers. Construction should be easiest if the outside walls were painted before assembly and the interior and droplight frames similarly. All pieces were first treated with a coat of MDF primer, this seals and raises the grain. Once dry they were lightly sanded with fine abrasive.
Here they are drying:-
There are lots!
The exterior was sprayed with two coats of red oxide primer and the interiors given two coats of pine varnish (I have a very old tin half used. It has become very gloopy so I guess I should get some new stuff ere too long!).
I then glued the inner two layers together, the inner of the two having cutouts for the glazing which was also present, and the two outer layers.
A picture which may be confusing:-
I really should have left the varnish a bit longer to dry more thoroughly I realised having set up this arrangement of many clamps!
to be continued
Phil
I glued the solebars to the floor, one side at a time, clamping to a granite worktop saver to get the floor flat, then added the drawbeam at each end.
Attention then turned to the sides and ends. Each side is made up of four layers of ply, the ends only two layers. Construction should be easiest if the outside walls were painted before assembly and the interior and droplight frames similarly. All pieces were first treated with a coat of MDF primer, this seals and raises the grain. Once dry they were lightly sanded with fine abrasive.
Here they are drying:-
- IMG_4667.jpeg (1.45 MiB) Viewed 16883 times
The exterior was sprayed with two coats of red oxide primer and the interiors given two coats of pine varnish (I have a very old tin half used. It has become very gloopy so I guess I should get some new stuff ere too long!).
I then glued the inner two layers together, the inner of the two having cutouts for the glazing which was also present, and the two outer layers.
A picture which may be confusing:-
- IMG_4671.jpeg (3.37 MiB) Viewed 16883 times
to be continued
Phil
-
gilfachphil
- Fireman
- Posts: 429
- Joined: Sun Nov 24, 2019 11:00 am
- Location: West Wales
Re: Yr Hen Felin & Yr Orsaf Newydd
Having removed the longer clamps and blocks of hardwood it becomes easier to see:-
Inside above showing glazing reveals.
Once the clamps were all removed the outsides were loose, the insides adhering to the granite. Luckily they came loose fairly easily and only one had picked up a trace of grey primer, most of which will be under the seats. I really should clean off the granite slab before doing this sort of thing again and not use it as a painting surface!
I spent ages looking at the Brandbright website to see what the axle boxes were like, they don't seem to stock the curly spoked wheels so I also spent time perusing Peter Binnie's site. I tend to use his couplings on most of my stock and have some in hand, there were some axleboxes in my bits box but nothing that worked for this coach nor any curly spoked wheels, I found some straight ones, nor suitable axles.
I ordered three styles of axle boxes (£4 for eight of each), three lengths of axles and curly spoked wheels. They came this morning so experimentation soon followed to see what would work:-
These worked well with the 52mm axles and curly spoked wheels. They may not be right to prototype but once the underside is painted black and the coach is on the track it will be perfectly acceptable to me.
More anon.
Phil
- IMG_4672.jpeg (2.59 MiB) Viewed 16883 times
Once the clamps were all removed the outsides were loose, the insides adhering to the granite. Luckily they came loose fairly easily and only one had picked up a trace of grey primer, most of which will be under the seats. I really should clean off the granite slab before doing this sort of thing again and not use it as a painting surface!
- IMG_4673.jpeg (3.18 MiB) Viewed 16883 times
I ordered three styles of axle boxes (£4 for eight of each), three lengths of axles and curly spoked wheels. They came this morning so experimentation soon followed to see what would work:-
- IMG_4675.jpeg (2.4 MiB) Viewed 16883 times
More anon.
Phil
-
Peter Butler
- Driver
- Posts: 5671
- Joined: Sun Sep 09, 2012 10:33 pm
- Location: West Wales
Re: Yr Hen Felin & Yr Orsaf Newydd
So that's where all the clamps went!
Nice work Phil, neat and tidy.
Nice work Phil, neat and tidy.
The best things in life are free.... so why am I doing this?
-
ge_rik
- Administrator
- Posts: 7768
- Joined: Sun Oct 25, 2009 10:20 pm
- Location: Cheshire
- Contact:
Re: Yr Hen Felin & Yr Orsaf Newydd
You call that snow? .....This is what we had....
- IMG_20241119_080626_618.jpg (1.2 MiB) Viewed 16871 times
Rik
-
Trevor Thompson
- Driver
- Posts: 1157
- Joined: Fri Oct 05, 2018 6:30 pm
- Location: South West Wales
Re: Yr Hen Felin & Yr Orsaf Newydd
-
gilfachphil
- Fireman
- Posts: 429
- Joined: Sun Nov 24, 2019 11:00 am
- Location: West Wales
Re: Yr Hen Felin & Yr Orsaf Newydd
Things have calmed down here today after Bert seems to have finished with this area so a brief interlude between showers to give Bakewell a longer test run with a freight train.
Phil
Phil
-
ge_rik
- Administrator
- Posts: 7768
- Joined: Sun Oct 25, 2009 10:20 pm
- Location: Cheshire
- Contact:
Re: Yr Hen Felin & Yr Orsaf Newydd
Great looking train. Preferred the speed in the first video.
Rik
Rik
-
gilfachphil
- Fireman
- Posts: 429
- Joined: Sun Nov 24, 2019 11:00 am
- Location: West Wales
Re: Yr Hen Felin & Yr Orsaf Newydd
Thanks Rick,
I see what you mean! I had wound the controller up a little after the first longer video was shot. Next time.
Phil
I see what you mean! I had wound the controller up a little after the first longer video was shot. Next time.
Phil
-
gilfachphil
- Fireman
- Posts: 429
- Joined: Sun Nov 24, 2019 11:00 am
- Location: West Wales
Re: Yr Hen Felin & Yr Orsaf Newydd
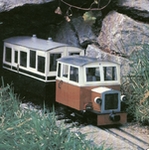
The workman's coach progresses:-
The glazing was added to the inner sandwich using a little canopy glue to hold it in place and then wood glue was used to join the two sandwiches. Once set I added the seats to the sides as it would be difficult to do with the body assembled. At the ends I just added the support in case some adjustment is needed to the seat once the body is assembled. The middle seat has also been glued in place.
The observant will notice I cleaned the granite slab!
Phil
- IMG_4683.jpeg (3.5 MiB) Viewed 16693 times
The glazing was added to the inner sandwich using a little canopy glue to hold it in place and then wood glue was used to join the two sandwiches. Once set I added the seats to the sides as it would be difficult to do with the body assembled. At the ends I just added the support in case some adjustment is needed to the seat once the body is assembled. The middle seat has also been glued in place.
The observant will notice I cleaned the granite slab!
Phil
-
philipy

- Moderator
- Posts: 5929
- Joined: Sun Jan 30, 2011 3:00 pm
- Location: South Northants
Re: Yr Hen Felin & Yr Orsaf Newydd
Actually, that was the first thing I noticed!
However, the coach build looks to be coming on well.
Philip
-
gilfachphil
- Fireman
- Posts: 429
- Joined: Sun Nov 24, 2019 11:00 am
- Location: West Wales
Re: Yr Hen Felin & Yr Orsaf Newydd
A test assembly of the body onto the floor showed that the end seats slotted nicely in between the side ones so they were glued in place, it being easier to do so before further assembly:-
Phil
- IMG_4686.jpeg (2.67 MiB) Viewed 16489 times
-
gilfachphil
- Fireman
- Posts: 429
- Joined: Sun Nov 24, 2019 11:00 am
- Location: West Wales
Re: Yr Hen Felin & Yr Orsaf Newydd
I'm sure you can imagine the gluing together of the four sides. I used Deluxe Materials Speed Bond which is easy to apply tidily and sets fast and held together with rubber bands and a couple of cramps as necessary.
I added the four roof supports and then the first layer of the roof, which I trimmed slightly in width as the second layer forms a marginally bigger diameter curve. Lots of rubber bands (must collect some more from the postie) including two longitudinally which were necessary to hold the end curve down firmly:-
as you can see I masked the windows before adding the roof which seemed easier. The blue masking tape was exactly the right width!
In adding the second layer of the roof I used woodworking glue for longer open time. There was just enough overhand to use bulldog clips to keep the two layers tightly together. The rubber bands at the ends were necessary to hold the roof in place as the clips were added, and the longitudinal ones to ensure a close seam at the ends:-
a couple more coats of red primer before painting the roof with masonry paint (B&Q sampler), the chassis was painted black before gluing the axleboxes in place. Other finishing touches are shown in the finished coach. I found two Brandbright handles in my bits box, my friend must have given them to me some time ago.
Posing outside this morning:-
Phil
I added the four roof supports and then the first layer of the roof, which I trimmed slightly in width as the second layer forms a marginally bigger diameter curve. Lots of rubber bands (must collect some more from the postie) including two longitudinally which were necessary to hold the end curve down firmly:-
- IMG_4697.jpeg (1.32 MiB) Viewed 15412 times
In adding the second layer of the roof I used woodworking glue for longer open time. There was just enough overhand to use bulldog clips to keep the two layers tightly together. The rubber bands at the ends were necessary to hold the roof in place as the clips were added, and the longitudinal ones to ensure a close seam at the ends:-
- IMG_4703.jpeg (2.41 MiB) Viewed 15412 times
Posing outside this morning:-
- IMG_4711.jpeg (1.77 MiB) Viewed 15412 times
Phil
-
FWLR
- Driver
- Posts: 4588
- Joined: Sat Aug 05, 2017 9:45 am
- Location: Preston, Lancashire, UK
Re: Yr Hen Felin & Yr Orsaf Newydd
Nice that Phil 
ROD
Life is so easy when I run my trains.


https://gardenrails.org/forum/viewtopic ... 41&t=11364
https://www.youtube.com/@fairywoodlightrailway
Life is so easy when I run my trains.


https://gardenrails.org/forum/viewtopic ... 41&t=11364
https://www.youtube.com/@fairywoodlightrailway
-
philipy
- Moderator
- Posts: 5929
- Joined: Sun Jan 30, 2011 3:00 pm
- Location: South Northants
Re: Yr Hen Felin & Yr Orsaf Newydd
As Rod says, that does look nice.
I'm a great one for adding interior detail to things, but with windows that small it does seem a wee bit pointless putting seats in this one!
I'm a great one for adding interior detail to things, but with windows that small it does seem a wee bit pointless putting seats in this one!
Philip
-
Peter Butler
- Driver
- Posts: 5671
- Joined: Sun Sep 09, 2012 10:33 pm
- Location: West Wales
Re: Yr Hen Felin & Yr Orsaf Newydd
That's a nice looking van, a useful addition to your fleet.
The best things in life are free.... so why am I doing this?
Who is online
Users browsing this forum: No registered users and 19 guests