Page 3 of 187
Posted: Sun Apr 07, 2013 8:39 pm
by Lner fan Sam
Wow that's looking great Peter!
Posted: Mon Apr 08, 2013 7:42 pm
by Peter Butler
Another fine day today, although a little windy.
More progress on the groundworks.... since lunchtime I have managed to lay most of the slabs which will define the retaining wall and location of the running line. This might seem the wrong way round of building a garden railway but I want to be able to get at the track from a good working height. It seems better to me to have good access to the storage and operating areas first, and the track fitted in where it is most accessible.


Whatever happens, I'm enjoying the experience! However, due to the nature of the construction, it will have to be right first time because there will be no chance to alter the build once the track plan is established. This is where I fall down because of my limited experience with other garden railways. Also, my complete lack of knowledge of how real railways work..... I'm sure to contravene all sorts of safety aspects in running a line, but, who's looking?
Posted: Tue Apr 09, 2013 8:23 am
by hussra
Hooray, track outdoors! Looks like a really good height, and nicely dry underfoot too. Keep posting and you may inspire me to press on with this year's portion of our line.
Posted: Tue Apr 30, 2013 9:16 pm
by Peter Butler
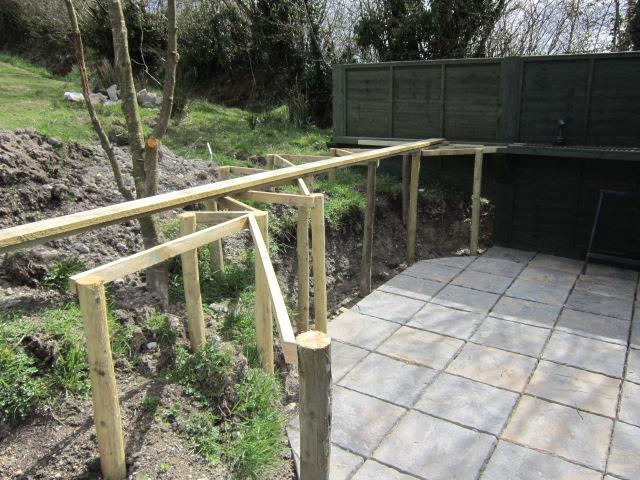
More progress to report.... I am building a waist height preparation area and station outside the shed with easy access to make up trains and hold others in sidings. This is about 4 feet wide and about 18 feet long when complete. I keep changing my mind about the track plan and the way the support structure will be when finished. However, I know what I am trying to achieve and will get there eventually.
The first picture shows the method of construction:
Next is the decking to put the station area on:

Finally, the boards which will hold back the mountain of soil on my sloping ground. I will fill up to track level but can then make hills and valleys to add interest.
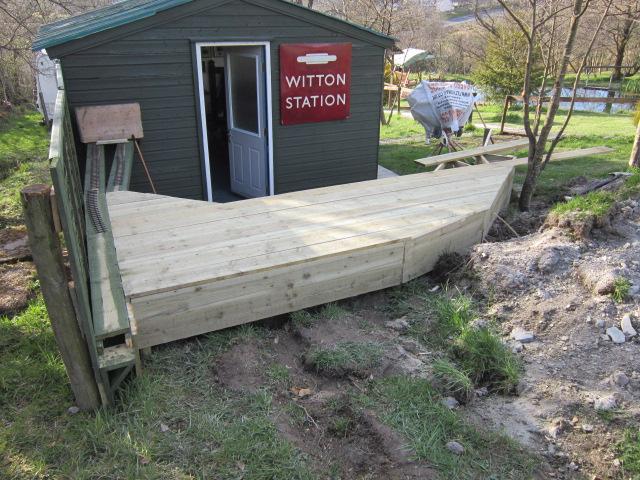
When I make something I make it to last... All timber is pressure treated and every piece is screwed (not nailed) for extra strength.
'Never knowingly under-engineered' is my motto.
Posted: Tue Apr 30, 2013 9:22 pm
by Dr. Bond of the DVLR
Looks smashing, very neat. How will the wood be preserved?
Posted: Tue Apr 30, 2013 9:27 pm
by Peter Butler
Timber which is pressure treated has a long lifespan in wet conditions. This particular timber is designed for use in gardens as edging for paths, bases underneath fence panels etc...
I have some already in my garden which has been there for nearly 10 years with no sign of detioration.
Additional protection can be brushed on, eg. fence paint, which also gives a coloured finish.
Posted: Tue Apr 30, 2013 9:40 pm
by Big Al
Looking good Peter, Can't wait to see how it turns out.
Posted: Tue Apr 30, 2013 10:02 pm
by Andrew
Big Al:82874 wrote:Looking good Peter, Can't wait to see how it turns out.
I agree! It's a very exciting project, thanks for the progress reports...
Andrew.
Posted: Wed May 01, 2013 7:08 am
by St.Michael
Just have to agree

It´s a beutiful project, I´m following and learning!!
What kind of "landscape materials" are you going to use on the board deck on the outside area?
Posted: Wed May 01, 2013 9:39 am
by Peter Butler
Hi Guys, many thanks for your interest and replies... As this is my first garden rail project I am also learning as I go. The firm base is essential as so many railways I have seen tend to move with changing ground conditions and have to be relaid.
The next major consideration I have learned from other Forum users is not to have tight curves, and as I have unlimited space I intend to make them as big as possible.
Now, the question of landscape materials.... This is very important to me, I want it to look as realistic as I can with the obvious constraints!
I want to put a station platform on the boards and would like to use 'real' slate or stone edging and possibly crushed stone surface. If anyone can offer advice on constructing this I would be delighted.
Question....... Should I put roofing felt on top of the boards and under the track first or would that make it more difficult to stick down the platform material?
Other scenic items will be natural stone/rock, tiny conifers and slate chippings for a quarry area.
Any other ideas greatly appreciated.
Posted: Sat May 11, 2013 9:24 pm
by Peter Butler
Slightly off the main subject, but connected to it..... I have had to make a move of my modelling table and all associated storage shelves etc. from the comfort of my kitchen/diner into the layout shed. This is not a problem as far as location goes as I can be next to the railway for tests and trials etc. However, I did have a nice set-up for all of my bits and pieces and needed to make a new storage unit to cater for them.
The answer came from an unusual source.....a redundant computer desk. This unit was missing its pull-out keyboard shelf but had all of its castors and was otherwise undamaged.
A few pieces of conti-board and several storage units later it now looks like this...
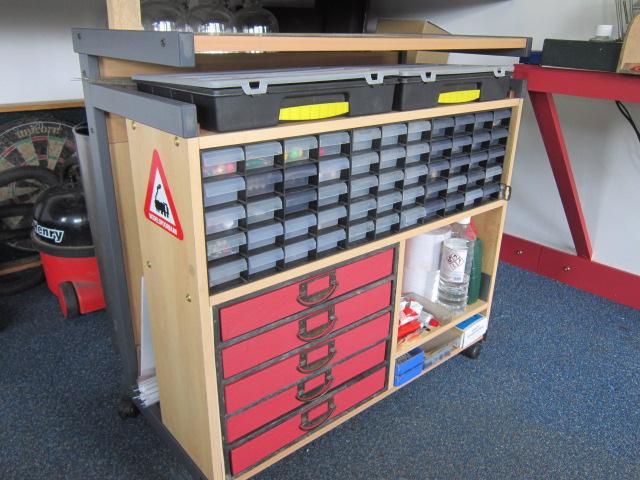

All of my spares and accessories are housed in this mobile unit. Plasticard sheet and metal rods etc are at the rear, paints and adhesives at the front. I have everything in reach without even leaving my chair.
Even room for a bottle of red on the top!
This is placed next to my modelling table, also a refugee from the kitchen...
[url=./myff/1558872/IMG_1048.JPG]

[/u
Now it's time to make something.....
Posted: Sat May 11, 2013 10:45 pm
by pauly
Snazzy!

Posted: Sun May 12, 2013 12:55 pm
by Big Al
That's looking good Peter, perhaps a small beer fridge under the work bench for visitors,

Posted: Sun May 12, 2013 1:03 pm
by Narrow Minded
(Looks at photo's on screen, then at desk........)

Posted: Sun May 12, 2013 2:08 pm
by Peter Butler
Allen, I like the idea of a beer fridge!
My caravan is parked very close by and, if needed, plenty of beer can be prepared for visitors.
I'm a red wine man myself and that doesn't neede a fridge.
Posted: Tue May 14, 2013 5:37 pm
by Peter Butler
Little progress on the railway in this weather!
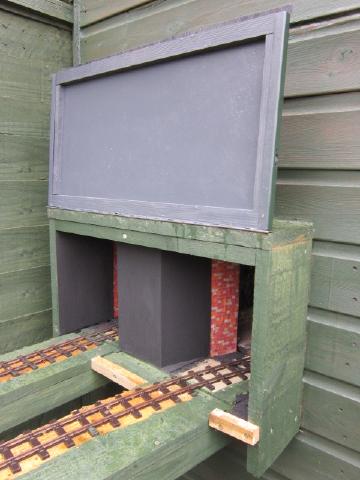
I don't mind working in the rain but the clay here is so slipperry it could be dangerous, so, I have turned my attention to the exit points where the tracks leave the shed. In previous photographs you can see a temporary board covering the openings. This was just to keep the rain out until I devised a permanent idea.
In the first picture below, the main structure has already been put in place. This is a 6inch frame pushing the opening away from the wall of the shed and keeping the scenery dry inside. Any damp would certainly destroy the plaster and other materials.

The groove, cut with my router, is to prevent any water from passing further than this point.

The new, permanent door, is made from a piece of sheet steel which I found in the 'useful one day' section of our storage shed.
It is hinged at the top with a piano hinge and brass screws. At the bottom is a strip of draught excluder which follows the contour of the track.
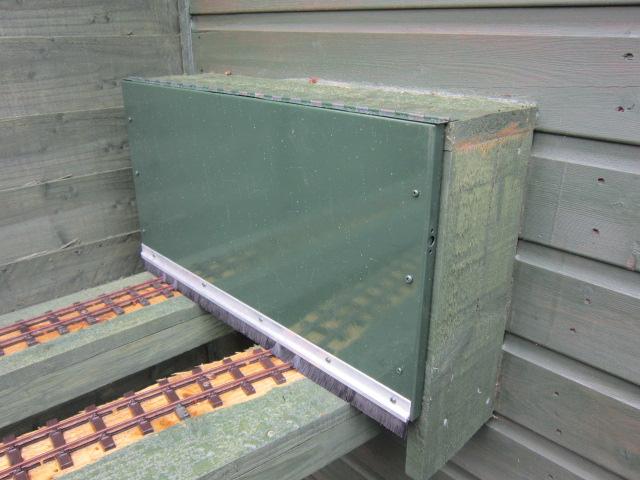
Door open..... Just have to make a clip to keep it from falling down on any stock passing below.
Posted: Tue May 14, 2013 5:40 pm
by Narrow Minded
Very well thought through and executed piece of civil engineering there!
Posted: Tue May 14, 2013 9:51 pm
by Big Al
Excellent work their Peter clever bit of recycling.
Posted: Sun May 19, 2013 11:25 pm
by Peter Butler
Since the last picture of the decking there has been more construction work and the whole area covered with under-slate roof felt. I have done this because the timber used, although weather resistant, is likely to expand and contract in the changing conditions. Gaps would certainly appear between the boards and the ground cover material, whatever I eventually use, would separate in straight lines.
The photograph shows the track fixed in place so far. This represents the outside station area, Brockhampton, of the Brockhampton and Umbridge Railway Preservation Society, (BURPS).
The far left line is the continuous loop with two points taking track away from the return to Umbridge (inside), one giving a reversing triangle for locos running round trains at Umbridge Station.
The tracks on the right are 'steam-up' lines for visiting locos (as I don't have one, yet!). In the meantime they are sidings for stock waiting its turn.
It's difficult to imagine, that in this photograph, three boxes of Peco track have been used. I never realised how much thought went into designing a useable track plan. Even now there must be people out there who are thinking...' I wouldn't have done that'... but I have tried to think of all operational alternatives to make use of the space.
Be gentle with me, I have never built a garden railway before!

Posted: Sun May 19, 2013 11:39 pm
by Stewart Gethin
I think it looks cracking, you haven't tried to cram a lot of track into the space available. And you've got the nice flowing curves as well.
Keep it up,
Stew