Page 3 of 9
Re: Nonaim Tramway - a 7/8ths layout
Posted: Wed May 17, 2017 7:36 pm
by jim@NAL
more pictures please all looking fantastic
Re: Nonaim Tramway
Posted: Wed May 17, 2017 7:49 pm
by Dwayne
jim@NAL wrote: Wed May 17, 2017 7:36 pm
more pictures please all looking fantastic
Would like to share more photos but things are moving along at a snails pace lately because of non-hobby projects.
I'm contemplating switching from 1:13.7 (2 footer) scale down to 1:20.3 (3 footer) scale...
Re: Nonaim Tramway - a 7/8ths layout
Posted: Thu May 18, 2017 9:55 pm
by Soar Valley Light
Hi Dwayne,
I know that feeling all too well!
The change in scale could be interesting, I get where you are coming from. Keep us updated as and when you get chance.
Andrew
Re: Nonaim Tramway
Posted: Thu May 18, 2017 11:35 pm
by Dwayne
Soar Valley Light wrote: Thu May 18, 2017 9:55 pm
Hi Dwayne,
I know that feeling all too well!
The change in scale could be interesting, I get where you are coming from. Keep us updated as and when you get chance.
Andrew
Will keep updates coming as the happen.
I definitely have decided to change scales after mulling it over for the past couple of days.
Re: Nonaim Tramway
Posted: Fri May 19, 2017 3:42 am
by Dwayne
With the decision to change scales I'm faced with my primary little engine being to large. I've had a fancy for a small box cab critter so after looking around on the net I found this little On30 engine that appealed to me.
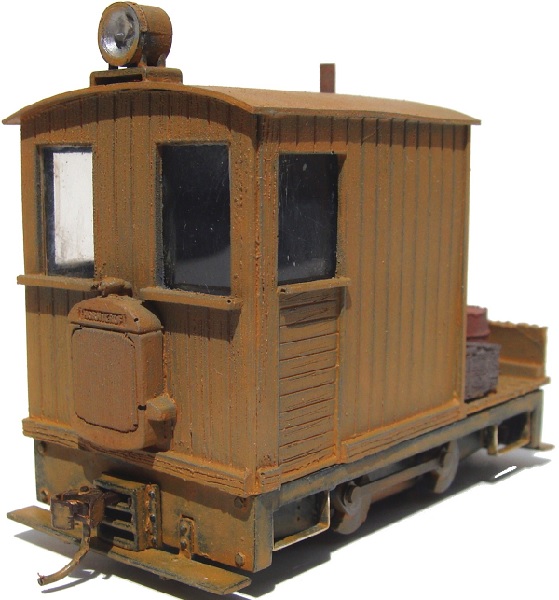
- b5be43c7534f344b952b6d197ea107cfsmall.jpg (92.97 KiB) Viewed 6659 times
With severe thunderstorms and tornados ripping around my area this evening putting my outdoor non-hobby projects on hold I decided to get a start on the conversion this evening. First thing to do with my existing critter was remove all the radio control components...

- IMGP0541a.jpg (97.82 KiB) Viewed 6659 times
I then removed the existing cab and engine cowl to get down to the frame. Using some styrene sheet I cut a piece that matches the dimensions of the frame and marked out the location of the electric motor which I will remove to allow this base to nestle down flat atop the frame.

- IMGP0542a.jpg (67.64 KiB) Viewed 6659 times
The cab will be about 4 inches front to back and 3-3/4 inches wide to match the existing frame. I haven't settled on an exact height but am considering something between 3 inches and 3-1/2 inches (a scale 5 feet - 6 feet). The bed portion behind the cab will be 2-3/4 inches long.
It's not much but it's a start.

Re: Nonaim Tramway - a 7/8ths layout
Posted: Fri May 19, 2017 5:08 am
by LNR
New loco choice looks nice.
Grant.
Re: Nonaim Tramway
Posted: Fri May 19, 2017 2:03 pm
by Dwayne
LNR wrote: Fri May 19, 2017 5:08 am
New loco choice looks nice.
Grant.
Thanks. I hope to get a decent amount done on it over the weekend.
Re: Nonaim Tramway
Posted: Sat May 20, 2017 2:41 am
by Dwayne
Continued work this evening on the new lokie by fitting the base plate over the chassis...

- IMGP0552a.jpg (33.33 KiB) Viewed 7299 times
Re: Nonaim Tramway
Posted: Sun Jun 04, 2017 1:02 am
by Dwayne
It's been a few weeks since the last update. On the home front the wife unit and I have reconciled and she has moved back in with me. After getting all her belongings resituated in the house I was able to turn my attention back to the tramway. The groundcovers (Creeping Charlie and Periwinkle) are finally taking hold and spreading out. We've had a dry spring so I'm having to water every couple of days to keep things alive.

- IMGP0597a.jpg (134.06 KiB) Viewed 7246 times
I'm continuing work on my cab forward box cab loco. I used some 1/16" thick acrylic for the cab walls. Cheap and easy to obtain at my local big box hardware store down the road from my place. Also conserves my styrene supply.
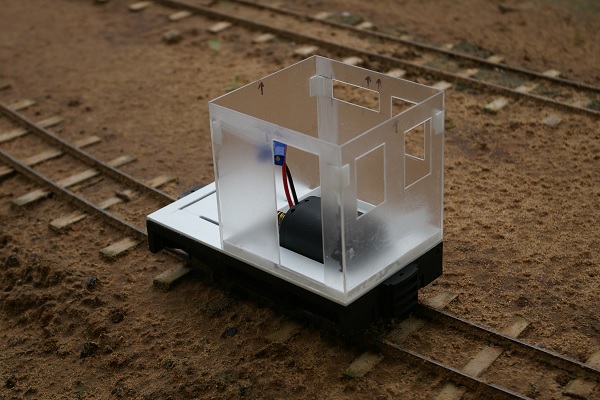
- IMGP0608a.jpg (91.86 KiB) Viewed 7246 times
Re: Nonaim Tramway
Posted: Sun Jun 04, 2017 5:45 pm
by philipy
Railway is coming on well, Dwayne. Glad to hear your good news on the domestic front.
What do you use to glue the acrylic?
Re: Nonaim Tramway
Posted: Sun Jun 04, 2017 8:39 pm
by Dwayne
philipy wrote: Sun Jun 04, 2017 5:45 pm
Railway is coming on well, Dwayne. Glad to hear your good news on the domestic front.
What do you use to glue the acrylic?
Thanks. The glue I use is CA.
Re: Nonaim Tramway
Posted: Sun Jun 04, 2017 9:50 pm
by Soar Valley Light
Hi Dwayne,
It's all happening for you just now! You have my best wishes on the domestic front.
The railway is looking really good. Your planting is taking hold nicely (and spreading quickly!), the watering is clearly worthwhile. I'm faced with much the same task, even in damp old England (which ain't been so damp of late!). The landscape is beginning to embrace your railway.

Andrew
Re: Nonaim Tramway
Posted: Sun Jun 04, 2017 11:28 pm
by Dwayne
Thanks Andrew. Rain moved into the area this morning so I continued working on the lokie.

- IMGP0618a.jpg (106.71 KiB) Viewed 7108 times
Re: Nonaim Tramway
Posted: Sat Jun 10, 2017 6:05 pm
by Dwayne
Although I still need to fabricate a roof for my cab forward critter, I decided to go ahead and splatter some paint on the body...
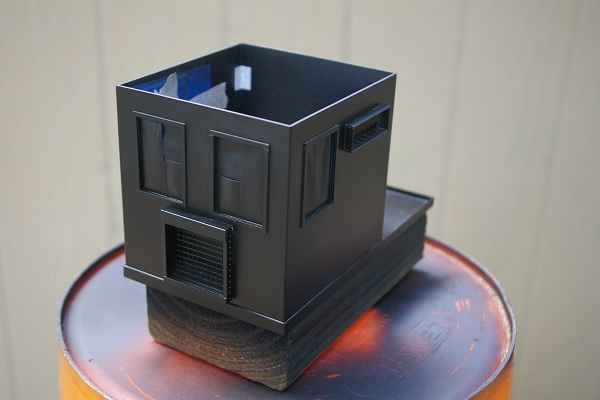
- IMGP0637a.jpg (46.57 KiB) Viewed 7045 times
Re: Nonaim Tramway
Posted: Sat Jun 10, 2017 9:16 pm
by Dwayne
Body of the forward cab critter on it's chassis...

- IMGP0641a.jpg (84.81 KiB) Viewed 7038 times
Re: Nonaim Tramway
Posted: Sun Jun 11, 2017 7:30 pm
by Soar Valley Light
That's coming along really well Dwayne, I love it. It looks great out on your line too. THe finished article is going to be worth waiting for.
Andrew
Re: Nonaim Tramway
Posted: Mon Jun 12, 2017 4:02 pm
by Dwayne
Thanks Andrew.
Re: Nonaim Tramway
Posted: Mon Jun 12, 2017 6:27 pm
by jim@NAL
looking good your track looks most impressive in the pictures
Re: Nonaim Tramway
Posted: Mon Jun 12, 2017 9:21 pm
by Dwayne
jim@NAL wrote: Mon Jun 12, 2017 6:27 pm
looking good your track looks most impressive in the pictures
Thank you. If I lived somewhere where rain and snow/frost were a factor my track laying method would likely cause all sorts of grief.
Re: Nonaim Tramway
Posted: Sun Jun 18, 2017 8:57 pm
by Dwayne
Added a run around track at the town of Imagination this afternoon. Installed a wye-switch on the main and a left hand switch to the outer most storage track.

- IMGP0669a.jpg (140.87 KiB) Viewed 6911 times

- IMGP0670a.jpg (119.9 KiB) Viewed 6911 times