Yr Hen Felin & Yr Orsaf Newydd
-
FWLR
- Driver

- Posts: 4588
- Joined: Sat Aug 05, 2017 9:45 am
- Location: Preston, Lancashire, UK
Re: Yr Hen Felin & Yr Orsaf Newydd
Nice video that Phil.  Mollie doesn't seem that bothered though...
ROD
Life is so easy when I run my trains.


https://gardenrails.org/forum/viewtopic ... 41&t=11364
https://www.youtube.com/@fairywoodlightrailway
Life is so easy when I run my trains.


https://gardenrails.org/forum/viewtopic ... 41&t=11364
https://www.youtube.com/@fairywoodlightrailway
-
ge_rik
- Administrator

- Posts: 7768
- Joined: Sun Oct 25, 2009 10:20 pm
- Location: Cheshire
- Contact:
Re: Yr Hen Felin & Yr Orsaf Newydd
I'm a sucker for clickety clack. A very attractive looking and sounding train.
Rik
Rik
-
Trevor Thompson
- Driver
- Posts: 1157
- Joined: Fri Oct 05, 2018 6:30 pm
- Location: South West Wales
-
gilfachphil
- Fireman

- Posts: 429
- Joined: Sun Nov 24, 2019 11:00 am
- Location: West Wales
Re: Yr Hen Felin & Yr Orsaf Newydd
With grateful thanks to Trevor, ace 3D print maker, there are now running in boards for the new station. They are double sided, two prints for each glued back to back using two part epoxy with a 6" nail for the upright. They were then edge filled with Perfect Plastic Putty, sprayed white and the black infilled between the letters. The latter operation took several goes as if done for too long at a time the error rate became too high! I then went over the errors with white paint.
Phil
Phil
- IMG_4004.jpeg (4.59 MiB) Viewed 10388 times
-
philipy
- Moderator
- Posts: 5929
- Joined: Sun Jan 30, 2011 3:00 pm
- Location: South Northants
Re: Yr Hen Felin & Yr Orsaf Newydd
That all looks very good Phil. The straight lengths put my "not quite" straights to shame. 
Philip
-
Old Man Aaron

- Driver
- Posts: 1128
- Joined: Wed Oct 19, 2016 11:08 am
- Location: Sunshine Coast QLD, Australia
Re: Yr Hen Felin & Yr Orsaf Newydd
Nails would have to be one of the most versatile objects out there. 
Regards,
Aaron - Scum Class Works
Aaron - Scum Class Works
-
gilfachphil
- Fireman
- Posts: 429
- Joined: Sun Nov 24, 2019 11:00 am
- Location: West Wales
-
gilfachphil
- Fireman
- Posts: 429
- Joined: Sun Nov 24, 2019 11:00 am
- Location: West Wales
Re: Yr Hen Felin & Yr Orsaf Newydd
Being a sunny Sunday morning a couple of trains felt possible, first however it was necessary to correct some humps in the platform surface which arise when it gets warm.
Trefor did some circuits with the Plateway Models balcony coaches and milkvan. These are fresh humps!
Then Clara came out to play with the Ffestiniog wagons.
As can be seen in some of the videos the platform raised some more humps. Extra pins were added to flatten them out so the spacing interval is now about 50mm. Will have to see whether that works OK. The second Clara video is after the extra pins. The recycled plastic does seem to expand quite a lot.
Phil
-
Peter Butler

- Driver
- Posts: 5671
- Joined: Sun Sep 09, 2012 10:33 pm
- Location: West Wales
Re: Yr Hen Felin & Yr Orsaf Newydd
Such a shame Phil, the expansion is quite pronounced in just a few degrees of raised temperature. The summer heat is likely to create further damage.
The best things in life are free.... so why am I doing this?
-
philipy
- Moderator
- Posts: 5929
- Joined: Sun Jan 30, 2011 3:00 pm
- Location: South Northants
Re: Yr Hen Felin & Yr Orsaf Newydd
At a guess, the expansion problems are a variation on the problems that some Filcris users have reported. Most notably Andrew SVLR.
Philip
-
gilfachphil
- Fireman
- Posts: 429
- Joined: Sun Nov 24, 2019 11:00 am
- Location: West Wales
Re: Yr Hen Felin & Yr Orsaf Newydd
I am hoping that by reducing the space between fixings the humps will become more of a minor ripple! Time will tell.
Phil
Phil
-
Trevor Thompson
- Driver
- Posts: 1157
- Joined: Fri Oct 05, 2018 6:30 pm
- Location: South West Wales
Re: Yr Hen Felin & Yr Orsaf Newydd
Philgilfachphil wrote: ↑Mon Mar 11, 2024 9:47 am I am hoping that by reducing the space between fixings the humps will become more of a minor ripple! Time will tell.
Phil
I wonder if you are taking the right approach to the expansion. Could the problem have been made worse by the nails preventing the plastic from expanding? A clue might be to see if the nails lift out easily when it is rippled.
I think you might be better allowing it to expand. What about slots under the pins you use to hold it down so that it can expand under the pins. You might need washers of course.
Trevor
-
Phil.P
- Trainee Driver

- Posts: 716
- Joined: Thu Jan 31, 2019 3:28 pm
- Location: Staffs. UK
Re: Yr Hen Felin & Yr Orsaf Newydd
Nature, and physics, will always win..
I think you should let the platform have room to 'breath', as once we get some proper sun, I think it will damage itself?
Is there a thin surface, to the platform, or is it 'solid' plastics?
Phil.P
I think you should let the platform have room to 'breath', as once we get some proper sun, I think it will damage itself?
Is there a thin surface, to the platform, or is it 'solid' plastics?
Phil.P
-
Peter Butler
- Driver
- Posts: 5671
- Joined: Sun Sep 09, 2012 10:33 pm
- Location: West Wales
Re: Yr Hen Felin & Yr Orsaf Newydd
How about removing the nails and letting it expand to its max, then pinning it down again?
The best things in life are free.... so why am I doing this?
-
gilfachphil
- Fireman
- Posts: 429
- Joined: Sun Nov 24, 2019 11:00 am
- Location: West Wales
Re: Yr Hen Felin & Yr Orsaf Newydd
it's 3mm thick and on top of uPVC sheet offcuts.
I wonder if you are taking the right approach to the expansion. Could the problem have been made worse by the nails preventing the plastic from expanding? A clue might be to see if the nails lift out easily when it is rippled.
I think you might be better allowing it to expand. What about slots under the pins you use to hold it down so that it can expand under the pins. You might need washers of course.
The problem with allowing it to move is that there are fixed points within it. I guess I could cut expansion slots across the platform either side of the bits that need to stay fixed, but that might look unsightly.
I have more of the material so if this bit is ruined I can try another method with the remaining stuff.
Thanks for the suggestions,
Phil
-
gilfachphil
- Fireman
- Posts: 429
- Joined: Sun Nov 24, 2019 11:00 am
- Location: West Wales
Re: Yr Hen Felin & Yr Orsaf Newydd
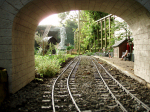
A few minutes with Henry hoover and very gentle use of a scraper lead to this:-
The edging which had taken so long to apply in the first place was mostly cracked and loose so had to come off.
Extra pins were applied in a number of places.
I'll now see what happens - it has two chances!
Phil
- IMG_4043.jpeg (4.79 MiB) Viewed 9661 times
Extra pins were applied in a number of places.
I'll now see what happens - it has two chances!
Phil
-
Old Man Aaron
- Driver
- Posts: 1128
- Joined: Wed Oct 19, 2016 11:08 am
- Location: Sunshine Coast QLD, Australia
Re: Yr Hen Felin & Yr Orsaf Newydd
Off-topic, but there's something very satisfying about how the track is laid out in that last photo. 
Regards,
Aaron - Scum Class Works
Aaron - Scum Class Works
-
gilfachphil
- Fireman
- Posts: 429
- Joined: Sun Nov 24, 2019 11:00 am
- Location: West Wales
Re: Yr Hen Felin & Yr Orsaf Newydd
Well thanks Aaron,Old Man Aaron wrote: ↑Wed Mar 13, 2024 4:49 am Off-topic, but there's something very satisfying about how the track is laid out in that last photo.
off topic compliments always appreciated
Phil
-
gilfachphil
- Fireman
- Posts: 429
- Joined: Sun Nov 24, 2019 11:00 am
- Location: West Wales
Re: Yr Hen Felin & Yr Orsaf Newydd
Back to the platform surface saga!
As the weather warms up (?) even though I had put lots more pins in to attempt to keep the plastic down the wrinkles in sunshine just became smaller but more of them.
As an experiment I got some black 5mm foamboard at The Works and have replaced the short end piece with some of that. I'm not very confident it will do as in sunshine the unconstrained board curls up as the top surface behaves differently to the cooler underneath one. It has been glued down with UHU and weighted with bricks to keep it flat whilst the glue dried.
I have removed all of the pins from the long section and reduced the continuous length to a series of short lengths (around 13" each mostly). These I have pinned at one end leaving the rest free to allow it to move. Under each joint there is a piece of black plasticard to hide the white uPVC base. The joints have been made with 2mm gaps. I'm hoping that with hot sun on the material it will relax and go flatter (fat chance I wonder?).
Phil
As the weather warms up (?) even though I had put lots more pins in to attempt to keep the plastic down the wrinkles in sunshine just became smaller but more of them.
As an experiment I got some black 5mm foamboard at The Works and have replaced the short end piece with some of that. I'm not very confident it will do as in sunshine the unconstrained board curls up as the top surface behaves differently to the cooler underneath one. It has been glued down with UHU and weighted with bricks to keep it flat whilst the glue dried.
I have removed all of the pins from the long section and reduced the continuous length to a series of short lengths (around 13" each mostly). These I have pinned at one end leaving the rest free to allow it to move. Under each joint there is a piece of black plasticard to hide the white uPVC base. The joints have been made with 2mm gaps. I'm hoping that with hot sun on the material it will relax and go flatter (fat chance I wonder?).
- IMG_0249.jpeg (3.52 MiB) Viewed 8915 times
-
philipy
- Moderator
- Posts: 5929
- Joined: Sun Jan 30, 2011 3:00 pm
- Location: South Northants
Re: Yr Hen Felin & Yr Orsaf Newydd
I admire your perseverance Phil, but I fear that any attempt to use any kind of plastic, especially black, will end up as a variation on a theme.
FWIW, I have used white foam board as a sub base then painted that with SBR and spread "Postcrete" on top. It weathers to a nice gravel appearance and has lasted about 7 or 8 years outside so far. The weather got into it this past wet winter but some diluted SBR dribbled on to the cracks seems to have sealed it OK.
FWIW, I have used white foam board as a sub base then painted that with SBR and spread "Postcrete" on top. It weathers to a nice gravel appearance and has lasted about 7 or 8 years outside so far. The weather got into it this past wet winter but some diluted SBR dribbled on to the cracks seems to have sealed it OK.
Philip
Who is online
Users browsing this forum: No registered users and 30 guests