Page 7 of 47
Posted: Sun Nov 22, 2015 11:43 am
by JMORG
We need an update soon Andrew! Your work always motivates me to hurry and finish Moel Tryfan!

Posted: Sun Nov 22, 2015 4:37 pm
by Andrew
JMORG:114407 wrote:We need an update soon Andrew! Your work always motivates me to hurry and finish Moel Tryfan!
Thanks for the enthusiasm! Things have been a little slow of late, but I should be able to post an update on Thursday afternoon...
Cheers!
Andrew.
Posted: Thu Nov 26, 2015 6:08 pm
by Andrew
OK, as promised, here's a (WH)WHR rolling stock update...
10 o'clock this morning saw me here:
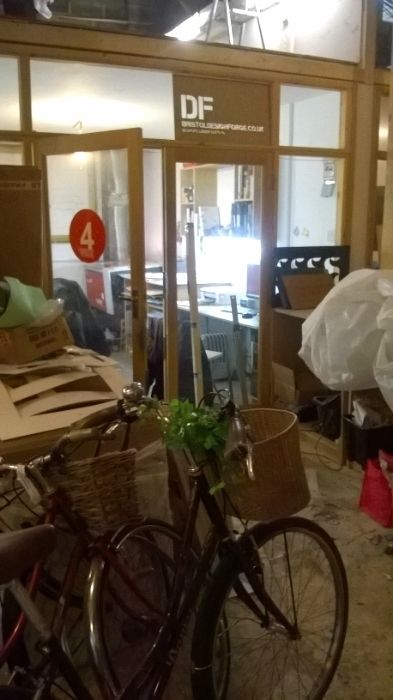
"Here" is Bristol Design Forge, where - after a half-hour induction - I was let loose on "Bertha", a big ol' laser cutter, to cut the CAD drawings for NWNGR four-wheelers that I seem to have been woring on forever.
Here's Bertha, on the left, and mission control, on the right:
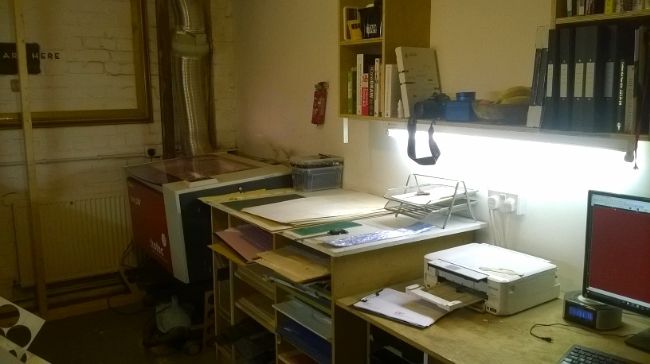
If I'm honest things didn't go entirely according to plan. The cutting was slower (and thus more expensive) than I'd thought it would be and, worse than that, the free CAD software I'd taught myself didn't seem to be entirely compatible with the set-up there. That resulted in the laser going over some parts three times, making things slower again and resulting in some parts being somewhat scorched...
Nonetheless, despite the set-backs, by the end of the session I had enough parts for a trial run of two carriages - here are some of them:
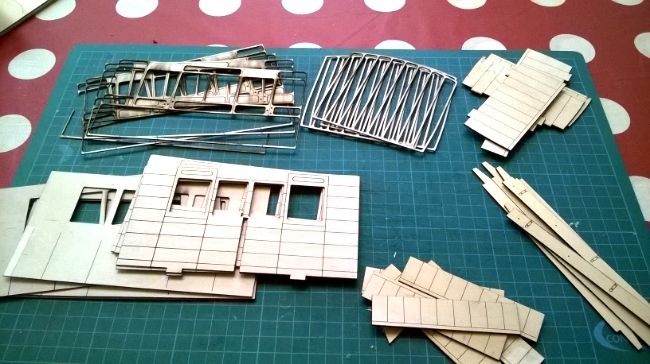
You can see the blackened bits in the top left of the picture - unfortunately they're also the most delicate parts... Initial explorations show that everything seems to fit where it should, so I'm looking forward to putting them together over the next few weeks. Once those are done I'll return to the cutter where the owner reckons he can help to iron out the current issues so I can get some more parts cut...
Cheers all,
Andrew.
Posted: Thu Nov 26, 2015 10:11 pm
by River Lin
Hi Andrew.
Really looking forward to seeing these made up Andrew.
Posted: Sat Nov 28, 2015 9:30 am
by JMORG
They look excellent! where did you get the details from for the 4 wheelers?
Also, any idea on what model cutter you used?
Posted: Sat Nov 28, 2015 6:21 pm
by Andrew
Hello!
Glad you like 'em...
They're made from my own drawings, based on the one surviving photo of the originals plus the few dimensions in Boyd's book. In the photo the carriages are coupled to one of the NWNGR single Fairlies, so I estimated the rest of dimensions from a drawing of those, plus some details on the ends pinched from the Bluebell's Ashbury "Mets"...
Sorry, not sure what make the cutter is, but it's Austrian (I think he said?!), with a bed size of 730x430mm, if that helps!
The parts are going together well (photos later maybe...) and, thanks to a member of this list (cheers Mike!), I think I've got some of the technical problems identified. I'll re-draw the parts in question and return to the cutter in the New Year to complete the rake...
Cheers,
Andrew.
Posted: Sun Nov 29, 2015 8:50 am
by GTB
Andrew:114520 wrote:
Sorry, not sure what make the cutter is, but it's Austrian (I think he said?!), with a bed size of 730x430mm, if that helps!
The one in the photo looks like a Trotec laser, made in Austria by Trodat, the rubber stamp mob.
A friend has one sitting unused under a bench in his garage, but I've never been able to pry it loose from him...........
Regards,
Graeme
Posted: Sun Nov 29, 2015 9:21 am
by WVLR
Andrew:114520 wrote: thanks to a member of this list (cheers Mike!)
Thanks Andrew and don't forget I provide a Laser Cutting and CAD
clean up service using a professional CAD program and a
600mm x 900mm 80 Watt laser cutter
Posted: Tue Dec 01, 2015 8:07 pm
by TTHLRMatt
Andrew, I can highly recommend Mike for cleaning up drawings and cutting!
Posted: Tue Dec 01, 2015 8:14 pm
by Andrew
GTB:114526 wrote:Andrew:114520 wrote:
Sorry, not sure what make the cutter is, but it's Austrian (I think he said?!), with a bed size of 730x430mm, if that helps!
The one in the photo looks like a Trotec laser, made in Austria by Trodat, the rubber stamp mob.
A friend has one sitting unused under a bench in his garage, but I've never been able to pry it loose from him...........
Regards,
Graeme
Ah yes, that sounds like what he said!
I think you need to try bribing your friend - so much potential! I've started putting my carriages together and it's lovely - the speed and convenience of putting together a kit, but one you've designed to your own specification, fantastic! I've no intention of dropping "traditional" skills, but it's fun learning some new ones...
Cheers,
Andrew.
Posted: Tue Dec 01, 2015 8:18 pm
by Andrew
TTHLRMatt:114567 wrote:Andrew, I can highly recommend Mike for cleaning up drawings and cutting! :D
Mike designed and cut the seats for my Gladstone Car (further up the thread somewhere...) and did a lovely job...
I've still got an awful lot to learn about CAD, and still have unused credit with my Bristol-based cutter (cheap rates if you do it yourself, after an initial induction), but I'll be in touch with Mike again when my next project reaches the final stages...
Cheers,
Andrew
Posted: Thu Dec 03, 2015 6:35 pm
by Andrew
Hello again,
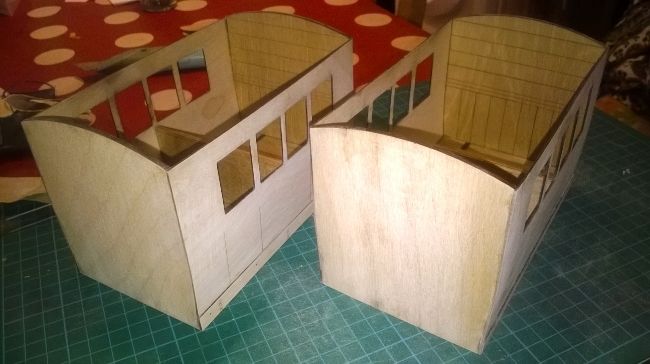
The carriages are starting to come together into pleasingly chunky little vehicles, a little larger than Ffestiniog bug boxes.
Not much detail on there yet, that'll come with the overlays once they're painted, but here's where I'm at so far - the basic bodies sealed and sanded for painting, plus the beginnings of the interior detail:
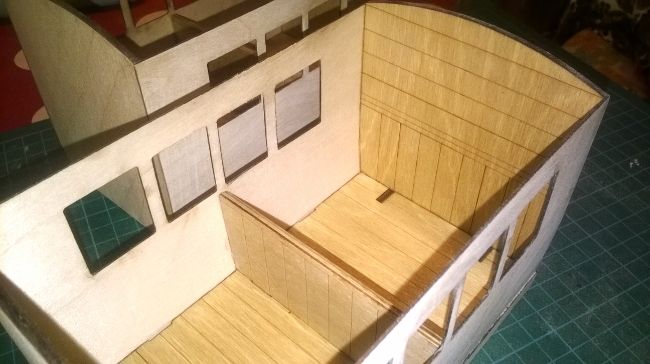
More soon - global environmental apocalypse aside, I'm hoping the unseasonably mild weather continues to the weekend so I can do some spray painting...
Cheers,
Andrew.
Posted: Thu Dec 03, 2015 8:16 pm
by Joe
very nice once again Andrew

Posted: Fri Dec 04, 2015 6:30 am
by philipy
Andrew:114570 wrote:
and still have unused credit with my Bristol-based cutter (cheap rates if you do it yourself, after an initial induction),
How much do you reckon these coaches will have cost to laser cut - not including your time and bought-in items like wheels, etc?
Posted: Fri Dec 04, 2015 9:34 am
by Andrew
philipy:114629 wrote:Andrew:114570 wrote:
and still have unused credit with my Bristol-based cutter (cheap rates if you do it yourself, after an initial induction),
How much do you reckon these coaches will have cost to laser cut - not including your time and bought-in items like wheels, etc?
Hello!
It's a little difficult to say as yet...
So far I've paid £150, for 6 hours of cutting time (at £22/hr), of which I've used 2.5, plus the sheet wood used to date, which I think is supplied with little or no mark-up.
I want a rake of 5 carriages for myself, and I shouldn't have any problem cutting 3 more in the time left, so that would work out at a little over £30 per carriage by the time I've purchased more wood.
If I can modify the drawings to reduce cutting time I'm hoping I can also cut parts for an additional 3 vehicles, making 8 in total at just over £20 each. If I manage that I'll try to sell the extra 3 to recoup some of the overall project costs - but they'd need to go for at Accucraft RTR carriage prices to achieve that, and I don't know how likely that is.
£20/£30 seems pretty reasonable, given that the finished "kit" is more like a Brandbright one than an IP one - multiple layers (including individual droplights and interior detail) of .8mm ply as opposed to a simpler design in chunkier and cheaper 1.5 and 3mm ply. It's as well I'm not including my time however, because I've used up loads of that!
More updates over the weekend...
Andrew.
Posted: Thu Dec 10, 2015 10:26 am
by Andrew
Here's the latest on my NWNGR 4 wheelers...
I've started painting, and the first one is now up on its wheels, the first time I've used IP running gear and couplings, so I wanted to make sure they worked well before buying any more. The lower part of the line was cleared of fallen leaves and other debris and trundled a quick test train up and down - all seems well, so I'll be placing an order for the rest of the rake...
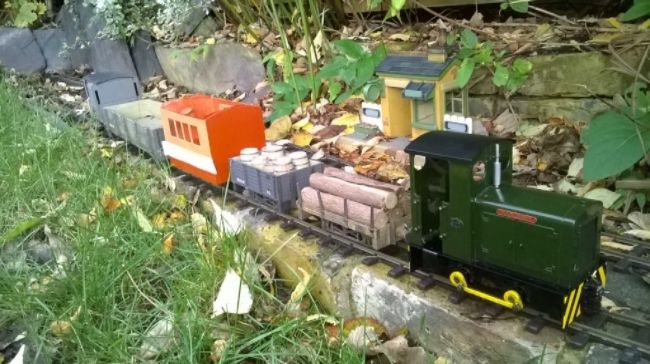
Painting has now progressed a little further, with both carriages now demonstrating why the "red oxide and custard" colour scheme is not considered a classic in British railway history...
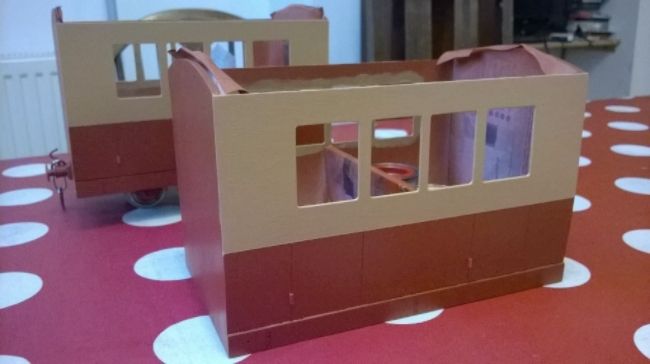
The cream colour looks darker in a better light, approximating the "tan" of Lancashire and Yorkshire livery, to which one version of NWNGR livery was supposedly similar. I could've gone for the other option of all over maroon, probably more likely for such lowly stock, but couldn't resist a two-tone colour scheme, particularly when most of my carriages are in plain green. I might paint some in maroon when I build more, but if I do it will be fully lined, Midland style...
Cheers,
Andrew.
Posted: Mon Dec 14, 2015 2:04 pm
by Andrew
A little more progress...
Both carriages have now received a coat of a deep browny-red - it should probably be a deep reddy-brown instead (!!!) but it looks nice. It's astonishing how both colours change according to the light - in this picture the livery looks almost like BR Carmine and Cream:
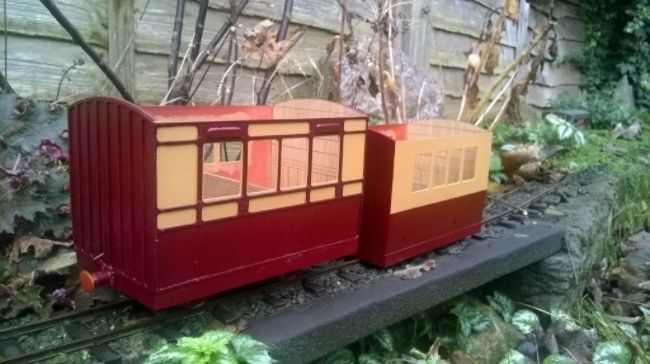
Still lots to do, and there probably won't be much more progress this side of Christmas, but I'm getting there...
Andrew
Posted: Mon Dec 14, 2015 5:54 pm
by Peter Butler
They look nicely detailed and well assembled. A good looking train will emerge from your workbench and will be worth the wait.
Posted: Mon Dec 14, 2015 8:48 pm
by Soar Valley Light
Hi Andrew,
They look superb. I can see the makings of a really quality and characterful train there. I love the livery, it looks like what the Midland Railway used to call Venetian Red. The shade of cream you've used compliments it extremely well.
Keep us posted!
Andrew
Posted: Tue Dec 15, 2015 5:35 am
by Annie
They are going to be a lovely pair of coaches Andrew