I am building my own body on Accucraft Ragleth engine unit, the end product will look a bit like an Edrig and I hope it looks as impressive as Brian's L&B Ragleth build. But I want rivet detail, I could go the press the rivet way but I'll have to make/purchase a rivet punch, probably the former as the later will be too expensive here in Australia, has anybody had any luck or success with any stick/decal rivet heads in 16mm scale?
And does anybody know of a operating water hatch that I can purchase to put on a side tank to cover the gas filler valve? I believe someone (Sweet Sixteen?) makes a casting but I don't know if it actually opens.
Wayne
Rivet detail
-
Snailrail

- Trainee Fireman

- Posts: 156
- Joined: Thu Dec 05, 2013 5:49 pm
- Location: Essex
Wayne,
I can't help you with the rivet detail. I would have liked some on my L & B Ragleth but wasn't sure how to go about it and as it was my first attempt at scratch building I didn't bother in the end.
I don't know of any opening water fillers. If you look at the pictures of mine, the fillers are the ones from Swiftsixteen. They are solid brass castings and don't open. Incidentally the gas valve on mine is under the left hand coal bunker. The coal is stuck on a plywood base and the large lump in the middle acts as a handle to lift it out to access the gas filler.
Brian
-
Whosk
Brian,
It will be a while before I build my body so I have time to research the rivet and filler detail, I may not bother with rivets in the end as well. I was thinking about the SS filler and just have it lift in and out, my side tanks are short like Edrigs and the filler will be up towards the front so a bit hard to hide with a coal basket. I might have a go at making one yet, I have some nice small brass hinges I could use.
My test/trial body is made out of thin aluminium sheet, it has had a few mods so I am glad I went that way to settle on a design, I must research how to post photos.
Another question though - what have you used for handrail knobs?
Wayne
-
Snailrail
- Trainee Fireman
- Posts: 156
- Joined: Thu Dec 05, 2013 5:49 pm
- Location: Essex
I picked the handrail knobs up at the Peterborough show from one of the regular suppliers. Can't remember for sure but think it was probably http://www.chuffed2bits.com/
Are you familiar with the 16mm Association website http://www.16mm.org.uk/newsite/default.html ? There are links on there to all the well known suppliers in the UK
Brian
Are you familiar with the 16mm Association website http://www.16mm.org.uk/newsite/default.html ? There are links on there to all the well known suppliers in the UK
Brian
-
GTB
- Driver

- Posts: 1721
- Joined: Sat Mar 05, 2011 2:46 pm
- Location: Australia
Re: Rivet detail
Decals look OK in HO, but I've not seen any that are made for SM32/45. Sticking on individual rivets is a sure fire ticket to a stay in the rubber room...... Rivet presses are dead boring to use as well, but are quicker.Whosk:96593 wrote:I could go the press the rivet way but I'll have to make/purchase a rivet punch, probably the former as the later will be too expensive here in Australia
I've had a NWSL Rivetter+ for many years. Lloyd's used to stock them here in Oz and I bought mine from him at an AMRA exhibition. I think NWSL no longer produce them and the MicroMark copy is also no longer listed.
I found it was a bit small for some Fn3 scale model parts when I changed scale, so I recently made a larger version that works the same way, but fits in my mill/drill.
This pic. is the rear panel of a tender I made recently with the new riveter table. The rivets are 0.7mm dia. at 1.5mm pitch around the edge and the same size at 5mm pitch on the staggered rows in the centre of the plate. This piece is made from 0.5mm brass plate, which I find is thick enough in this scale.

This is the riveter table set up in the mill.

For a cheaper alternative to a commercial press, the sketch below shows a DIY type of rivet press designed to be used with a bench drill,which is based on one used by a friend of mine. Drawn in Back of the Envelope CAD, so you are on your own with my handwriting. No dimensions, as they depend on your bench drill. Cost would be a function of what sort of scrap bin you keep in the shed.....
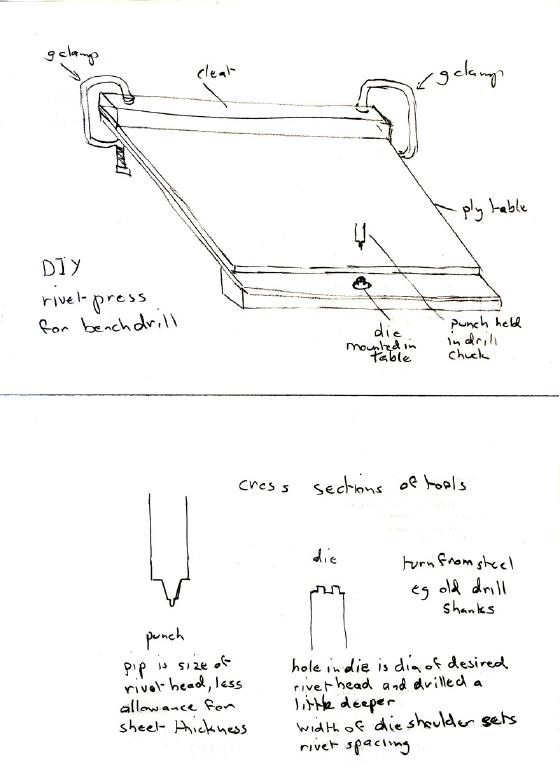
If you don't have facilities to make the punch and die, you can still buy the NWSL ones from the US. They are cheap enough at US$20 a pair and they come in a range of rivet sizes. If you make your own, it is the punch that sets the shape of the rivet head, the hole in the die just needs to be deep enough, it doesn't need a round bottom to the hole.
To use it, the fence is clamped in place and the part is slid along it to make the row of rivets. Rivet spacing is set by the die and all you do is punch one rivet, slide the part along, push the last rivet against the die and punch the next one. There is a step along the front of the table to clear the rivets once punched and the top of the die should be flush with the table surface. The die needs to be firmly fixed in place so it can't wobble around. Don't press too hard, or the punch will thin the metal out around the rivet impression and distort the edge of the part.
There are people that will say you can use an automatic centre punch to make rivets, but those inventions of the devil make lousy looking rivets.........
Argyle Loco in Melbourne usually has a stock of Roundhouse handrail knobs, along with other bits and pieces from Roundhouse and Accucraft.
Regards,
Graeme
-
Whosk
Very nice rivets and very inspirational words/pictures there Graeme, I am still a bit undecided about rivets, I would like to go that extra inch (rivet?), I have done a bit of googling tonight and found there is a high number of welded tanks out there, they can look good but rivets are just a nice feature. Thanks for the pic's though, I have a nother modeller in Victoria to get in touch with who has made his own rivet press as well.
Wayne
Wayne
-
GTB
- Driver
- Posts: 1721
- Joined: Sat Mar 05, 2011 2:46 pm
- Location: Australia
Depends on when the loco was built and where it was built.Whosk:96647 wrote:I have done a bit of googling tonight and found there is a high number of welded tanks out there
Arc welding didn't come into common use until after WW1, but British loco builders often used flush rivets for aesthetic reasons, long before electric welding was introduced.
Graeme
Who is online
Users browsing this forum: No registered users and 28 guests