Discussion of Live Steam locomotives should be located here
-
artfull dodger
- Trainee Driver

- Posts: 551
- Joined: Thu Apr 12, 2012 2:23 pm
- Location: Kokomo, Indiana, USA
Post
by artfull dodger » Fri Apr 12, 2013 6:32 pm
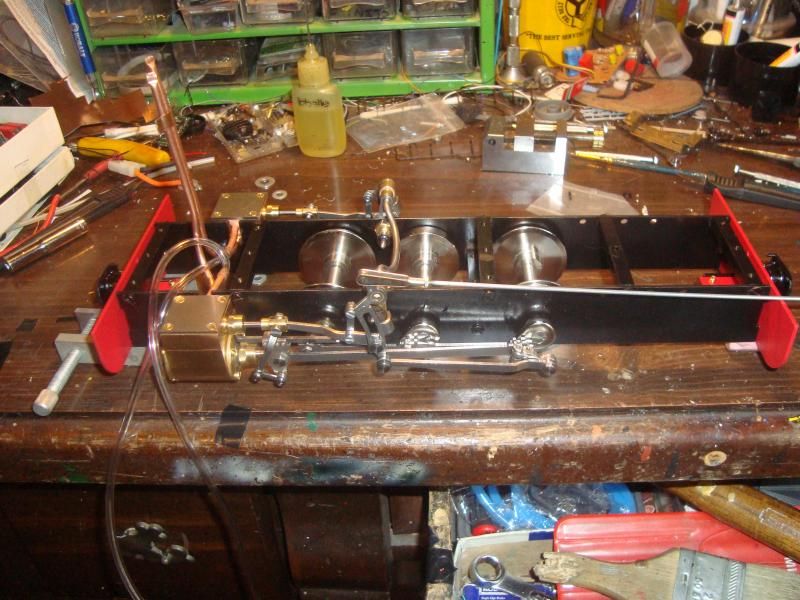
Here is a nice air test, about 10psi in forward and 18ish needed in reverse direction. Forward is a bit smoother on air. Everything was wel lubricated for the test. Valve duration is equil on both cylinders for both ports. Not my first trip around the block setting up valve timing. Cant wait to test on steam! First pic is a video, click on the pic to play the video. Second pic is just a pic. Forgive my messy deck, I do repair work for 2 hobby shops and I have been quite busy lately and havent had time to clean up the shop. Cheers Mike

-
Colinjamesporter
Post
by Colinjamesporter » Fri Apr 12, 2013 6:37 pm
Very interesting. Im thinking of getting their fowler kit. Is it easy to do the valve setting?
Best wishes
Colin
-
artfull dodger
- Trainee Driver
- Posts: 551
- Joined: Thu Apr 12, 2012 2:23 pm
- Location: Kokomo, Indiana, USA
Post
by artfull dodger » Fri Apr 12, 2013 6:56 pm
It was easy for me, but I had a working knowledge of how steam works. The instructions from Roundhouse are quite good for the newbie to live steam that might not understand how valve gear works. Only thing that threw me off is the return cranks lean toward the rear in "rods down" position, where as most USA engines lean forward in that direction. So I had to redrill and repin the cranks when I realized that the direction it was running was reversed. The valve rod should be in the bottom of the expansion link in forward gear. I have seen models done in reverse of this, Accucrafts Countess is like this I believe. Its corrected now and runs nice in my opinion. I highly recommend you give the Fowler kit a go! Mike
-
Colinjamesporter
Post
by Colinjamesporter » Fri Apr 12, 2013 7:27 pm
Thanks for the advice Mike. I will give it a go.
Best wishes
Colin
-
Sylvian Tennant
- Fireman

- Posts: 327
- Joined: Wed Aug 10, 2011 4:48 pm
- Location: Teesside
Post
by Sylvian Tennant » Sat Apr 13, 2013 12:40 am
Nice work there, shall be looking forward to seeing more of this little project in due time

-
artfull dodger
- Trainee Driver
- Posts: 551
- Joined: Thu Apr 12, 2012 2:23 pm
- Location: Kokomo, Indiana, USA
Post
by artfull dodger » Sat Apr 13, 2013 1:01 am
Excellent Colin, let us know when you get started on it. I will post up more once the other kits arrive. They both should be on the next order from RH to my dealer here in states. Was told about a month to month an a half. Thanks Mike
-
Colinjamesporter
Post
by Colinjamesporter » Mon Apr 15, 2013 1:39 pm
Hi Mike,
Just ordered my kit from Roundhouse. I am collecting it from the 16mm show. Will keep an eye on your topic to see how your Lady Ann build is progressing. Would it be possible to find out how you have set up your air supply to test it?
Best wishes
Colin
-
artfull dodger
- Trainee Driver
- Posts: 551
- Joined: Thu Apr 12, 2012 2:23 pm
- Location: Kokomo, Indiana, USA
Post
by artfull dodger » Mon Apr 15, 2013 2:17 pm
The air set up is a standard air compresser for use on an air brush, it has a variable regulator that I can adjust the air pressure from 0 up to about 30psi. For the air line, since I didnt have the boiler kit, it has the superheater tube with the "T" connection to the two seperate cylinder steam inlet pipes. So I used an air line that they put on your head to feed the oxygen to you in the hospital. I cut off of the part that goes up your nose, just leaving the 2 seperate air lines that combine to a common larger air line. If you get the boiler kit at the same time, you can just use a single piece of air line(model gas airplane/car fuel line works) to air test. I prelubricated everything real well. You dont want to put oil down the superheater tube if you test that way. Since I lacked that, I was feeding oil down the air tube into the cylinders. I got a message that my boiler kit and body kit have arrived at my dealer here in the states, so it wont be long till she starts looking like a steam locomotive. Mike
-
Colinjamesporter
Post
by Colinjamesporter » Mon Apr 15, 2013 2:22 pm
Hi Mike,
Thanks for the information. I will just have the chassis to start with so your advice is helpful. Will keep watching with interest.
Best wishes
Colin
-
Colinjamesporter
Post
by Colinjamesporter » Wed May 15, 2013 10:59 am
Hi Mike,
I have recently started building the fowler. How did uou bend the exhaust pipes from the cylinders? It doesnt make it clear in the roundhouse instructions.
Best wishes
Colin
-
artfull dodger
- Trainee Driver
- Posts: 551
- Joined: Thu Apr 12, 2012 2:23 pm
- Location: Kokomo, Indiana, USA
Post
by artfull dodger » Thu May 16, 2013 1:08 am
I just bent and shaped them with my fingers. I just put a simple 90" upwards bend to start cause I didnt have my boiler on hand to figure out the slightly foward bend to clean the superheater tube tie in on the steam input pipes. Do be carefull when you bend the exhaust pipes. Mine did end up a bit loose in the cylinders but once I put the Summerfields Chuffer on, it keeps them in perfect place as the chuffer is only about 1/4 inch from the top of my brass cap on the chimney. Mike
-
Colinjamesporter
Post
by Colinjamesporter » Thu May 16, 2013 2:16 pm
Thanks for the reply what sort of bend radiuses have you put in on the pipework?
Who is online
Users browsing this forum: No registered users and 44 guests


