My stock-building antics (was:access to laser cutter thread)

Discussion of Rolling Stock related topics should go here
big-ted
Trainee Fireman
Trainee Fireman
Posts: 239
Joined: Fri Nov 25, 2011 4:13 pm
Location: Vancouver, BC, Canada.

My stock-building antics (was:access to laser cutter thread)

Post by big-ted » Mon Feb 13, 2012 5:37 pm

It looks like I'm going to be the teaching assistant for a robotics course in the Summer, which means being trained on a laser cutter, 3D printer, water jet cutter etc etc. As far as the laser cutter and 3D printer are concerned, I'm told that personal projects are fair game, so long as I provide the materials. I figure it'd be rude NOT to have a go at something railway-related!

I've drawn up some CAD models for a 3 compartment carriage I plan on cutting out of ply, but bear in mind  my railway modelling experience is pretty limited. This will be a fun project that I can finish up and 'put to one side' ready for when I have a railway of my own! :)

Any advice and/or comments? I need to re-centre the window openings. I'm planning on making this a 4-wheeler, although the beauty of using Solidworks is that it would require only minimal effort to add on another compartment and turn it into a bogie coach. If this is successful, I'll draw up a brake compartment and start to build-up a rake for myself.

The plan is to have a reasonably thick (say, ~10mm) balsa-floor, onto which the body is mounted on top, and the frame is mounted below. The plan is to cut the body sheets from 1/16 thick ply, making the walls 1/8 thick when the two layers are glued together. The frame will likely be balsa wood. Axle boxes and wheels will be bought in. I plan on having a go at some of the detail parts on the 3D printer, but the resolution is only ~0.4mm, so that might limit me somewhat...

So, yes, advice needed! Any thoughts on the type of ply to use? I here people here talk of 'marine ply'. I'm in Canada, so I'm sure the nomenclature is different, but the guys at the timber store will no doubt be able to 'translate'!

Image
Last edited by big-ted on Mon Dec 17, 2012 11:11 pm, edited 1 time in total.

MDLR

Post by MDLR » Mon Feb 13, 2012 6:26 pm

You need to speak to Zach Bond - ZACH, ARE YOU LISTENING??

DLRdan

Post by DLRdan » Mon Feb 13, 2012 7:08 pm

I'll get him

ive painted all my locos blue with white rooves :D

User avatar
Dr. Bond of the DVLR
Retired Director
Retired Director
Posts: 4533
Joined: Tue Jun 09, 2009 9:43 pm
Location: Suffolk
Contact:

Post by Dr. Bond of the DVLR » Mon Feb 13, 2012 10:49 pm

blue locos? White rooves?? LASER cutters?!??!?!
Hello,
Sounds like you'll have fun. Advise:
Get the material before you start designing, its a right pain to have designed something for 3mm ply and what you get is 4mm ply...

LASER ply is the best stuff, available from MUTR, I get it here
http://www.mindsetsonline.co.uk/product ... ts_id=1249
It cuts really nicely without much burning of the edges.

You will need 2D designs for a LASER cutter and 3D designs for a 3D printer. When designing in 2D the real challenge is thinking what object you want in the end, pulling it apart mentally and drawing the parts for each layer. The exciting part is getting to repeat the process backwards in real life as you put together a kit.

I'd start with something simpler than a carriage. I started with a van. It looked like a lunch box gone wrong and I learnt alot from it! You can also practice with engraving and cutting more.

The best piece of advice I can give you is to cut things out of card first before out of wood. I make alot of silly little mistakes and alot of them can be spotted by making a card prototype first. That is the beauty of the LASER cutter, you can print exactly the same design out with different materials.

Most importantly have fun and be creative, think what you can't do with a knife and see if its possible with a LASER! If you have any particular questions or problems don't hesitate to ask!

Good Luck!
Image
The railway which people forgot
(to build)

User avatar
GTB
Driver
Driver
Posts: 1721
Joined: Sat Mar 05, 2011 2:46 pm
Location: Australia

Re: So, I'm being given access to a laser cutter...

Post by GTB » Tue Feb 14, 2012 12:17 pm

big-ted:66409 wrote: So, yes, advice needed! Any thoughts on the type of ply to use? I here people here talk of 'marine ply'. I'm in Canada, so I'm sure the nomenclature is different, but the guys at the timber store will no doubt be able to 'translate'!
What Zac said.... ;)

Don't use balsa wood. It's too soft and you don't need to save weight with railway rolling stock.

1/8" (3mm) ply will be adequate for the floor and underframe. If you cut them with the laser at the same time as the bodywork, the parts will also fit neatly without a lot of fiddling.

Marine ply is what you build boats with. The only real difference between it and exterior grade ply is that marine ply can't have any defects in the veneers and is consequently very expensive. Exterior grade ply uses the same waterproof glue, but costs a fraction of what marine ply does.

The laser ply mentioned by Zac can be found here in Aust. if you look hard enough, so I'd imagine you could find it where you are in Canada.

Laser cutters also do a good job of cutting polystyrene sheet, which is easier to assemble and doesn't require anything like the amount of work to get a smooth surface for painting.

I haven't used a laser cutter for 30 years, so can't give you any useful advice on using the things. The one I had was programmed with paper tape and an ASR33 teletype terminal...... :roll:

Regards,
Graeme

Busted Bricks

Post by Busted Bricks » Tue Feb 14, 2012 8:37 pm

MDF is great with lasers. Because it is very uniform it is easy to get the settings right. The density throughout a sheet of ply can vary a lot.

big-ted
Trainee Fireman
Trainee Fireman
Posts: 239
Joined: Fri Nov 25, 2011 4:13 pm
Location: Vancouver, BC, Canada.

Post by big-ted » Thu Feb 16, 2012 5:55 am

Wow. Some super useful info in here. Thanks all!

I'll look into 'Laser ply'. Not sure I want to use MDF as it seems I would lose some of the surface finish/texture that is the reason for going with ply in the first place, else I could go with plastic?

Zac, you mention using 3mm ply. If I am to use this for both layers, I end up with 6mm thick walls, which seems a bit excessive to me? I guess a bit of extra weight wouldn't hurt, but the detail is going to look too deep on the outer layer, no? How about 1.7mm for the outer layer, and 3mm for the inner layer?

User avatar
Dr. Bond of the DVLR
Retired Director
Retired Director
Posts: 4533
Joined: Tue Jun 09, 2009 9:43 pm
Location: Suffolk
Contact:

Post by Dr. Bond of the DVLR » Thu Feb 16, 2012 4:31 pm

Of course use any thickness you want. I use 4mm ply for the main bodys of things and for everything on a goods wagon which can be quite chunkey.
On the carriage I am making at the moment I am using 1.5mm ply with several layers to build up the detail. This is non LASER ply but cuts quite well.
You can cut pretty much any ply but always test to see how it behaves before you go a cut it for real.

Oh, and its Zach (sorry, pet hate...)
Image
The railway which people forgot
(to build)

big-ted
Trainee Fireman
Trainee Fireman
Posts: 239
Joined: Fri Nov 25, 2011 4:13 pm
Location: Vancouver, BC, Canada.

Post by big-ted » Sat Jul 21, 2012 8:30 pm

I cut some pieces today!

Image

I ended up using standard 1/8" ply, which I bought a 3'6" square piece for $5. I went a bit thin in some parts, but I guess that just provides an incentive to assemble it before they have a chance to break! Still need to decide how I'm constructing the base and roof. Not sure if Plasticard is available here in Canada. I'm sure I can find something similar...

Also, the astute among you will realise that, only after printing the side panels did I figure out the "engrave" function on our laser cutter. Needless to say, had I realised earlier, I would have added more detailing to the outsides! For now it did a great job adding panelling detail to the dividers though.

Also need to decide if I'm painting it. The finish from the laser cutter is kind of appealing. I'm tempted just to clear varnish it, but I suspect it might be harder to add convincing doors in that case. Maybe just scribing and going over it with a thin black marker will do the job...

Fun times!

User avatar
GTB
Driver
Driver
Posts: 1721
Joined: Sat Mar 05, 2011 2:46 pm
Location: Australia

Post by GTB » Sun Jul 22, 2012 2:49 pm

big-ted:73021 wrote:Not sure if Plasticard is available here in Canada. I'm sure I can find something similar...
Looking good......;)

Plasticard is a UK tradename. Look for high impact polystyrene (sometimes abbreviated to HIPS) sheet.

It's used for sign making and industrial plastics suppliers should carry it, although they may not be prepared to cut it. It comes in 4' x 2' sheets locally, but is a lot cheaper than plywood. I use 0.020", 0.040", 0.060" and 0.080" thicknesses in large scale. Glue it with a liquid cement, MEK (methyl ethyl ketone/2-butanone) if you can find it, but the plastic supplier may have something suitable. If all else fails try a hobby shop that sells plastic kits.

Graeme

User avatar
Keith S
Driver
Driver
Posts: 1668
Joined: Thu Feb 24, 2011 11:44 pm
Location: Canada

Post by Keith S » Sun Jul 22, 2012 4:50 pm

My Dad sometimes builds with polystyrene sheets, and he lives in Guelph.

I know at least one hobby store that sells polystyrene sheets but of course depending where you are in Canada this might not be of any help to you. Hobby stores are rapidly going extinct.

Ah, OK so I just ran into another of your posts in which you claim to be from Vancouver. I lived there for a while but the only hobby store I went to was in Victoria, and I can't remember the name of it. Sorry I couldn't be of more help.

big-ted
Trainee Fireman
Trainee Fireman
Posts: 239
Joined: Fri Nov 25, 2011 4:13 pm
Location: Vancouver, BC, Canada.

Post by big-ted » Mon Jul 23, 2012 8:28 pm

Cheers all. I'll keep an eye out for HIPS.

In the meantime, I'm eyeing up bogies so that I can figure out the floor thickness. I notice that all the usual suspects (Brandbright, Roundhouse, Swiftsixteen etc) require the user to fabricate a pivot mechanism. How do people normally go about doing this? Is it necessary to include some kind of brass bearing in there or do most just get by building up a stack of washers? It seems that it would be nice if the "bogie" was ready to bolt up to stock and came complete with pivot, but maybe that's just me...

User avatar
Dr. Bond of the DVLR
Retired Director
Retired Director
Posts: 4533
Joined: Tue Jun 09, 2009 9:43 pm
Location: Suffolk
Contact:

Post by Dr. Bond of the DVLR » Mon Jul 23, 2012 8:34 pm

Andel's ones come with a resin pivot. Great looking work there, very fine!
Image
The railway which people forgot
(to build)

User avatar
GTB
Driver
Driver
Posts: 1721
Joined: Sat Mar 05, 2011 2:46 pm
Location: Australia

Post by GTB » Tue Jul 24, 2012 3:22 pm

big-ted:73096 wrote: In the meantime, I'm eyeing up bogies so that I can figure out the floor thickness.
Some bogies come with mountings some don't. The bolster height varies brand to brand and even within a brand as well. It also depends on wheel size...

Probably best to decide on your bogies and wheels, get some, then make a mounting to suit. I use a block of wood shaped like a prototype bolster, but you can stack pieces of ply to form a suitable thickness block, or use ply as shims if the bogie supplier includes a mounting block.

You need to have a reasonable width bearing surface for one bogie (or small side support blocks) to keep it stable and have the other one a bit loose on a smaller block, so it can flop around. The carriage stays stable on the track that way, in much the same principle as a 3 leg stool.

Just a stack of washers on a bolt at each end would result in a carriage that shimmies down the track like an Egyptian belly dancer....

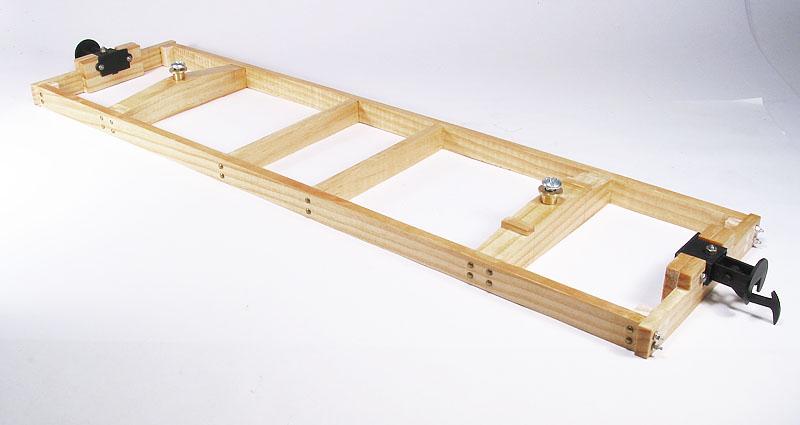
This photo of a work in progress shows how I mount bogies.

Image

The screws are just short wood screws, but the mounting holes in the bogies were much larger than any screws I had in stock, so the brass sleeves were made to take up the slack. They also stop the screw being tightened too much.

The bogies I use have a flat top to the stretcher, so the closest bolster has two blocks to provide side support. This bogie can rock longitudinally to some extent, but not laterally. The rear bolster has a small support area allowing the rear bogie to rock in any direction, which will keep all wheels on the rails even on fairly rough track.


Graeme

big-ted
Trainee Fireman
Trainee Fireman
Posts: 239
Joined: Fri Nov 25, 2011 4:13 pm
Location: Vancouver, BC, Canada.

Post by big-ted » Wed Jul 25, 2012 4:50 pm

Thanks GTB, that picture helps a lot. I'd planned on doing something like that (allowing one bogie to rock in two planes, whilst the other can only rock in one) after reading about the design of the Swiftsixteen bogies. Just to be clear though, in your picture, the bushing passes through a clearance hole in your chosen bogies, and is what is used to fix the bogie to your stock? This would require the screw head to be accessible from below with the bogie in place, correct?

I've managed to source a piece of 20mm thick pine that I've planed down to make a solid "floorpan". Should give it some weight! I'll have to make up some domed shims for the bogies though. Maybe those would make a fun 3D printer project... :)

User avatar
GTB
Driver
Driver
Posts: 1721
Joined: Sat Mar 05, 2011 2:46 pm
Location: Australia

Post by GTB » Thu Jul 26, 2012 2:29 pm

big-ted:73193 wrote: This would require the screw head to be accessible from below with the bogie in place, correct?
That's the usual arrangement. Just picture a bogie sandwiched between the screw and the bolster.............

Since I had to make the bushes anyway, they are cunningly made a little longer than the thickness of the bogie stretcher. That way the screw can be nipped up and the bogies will still be able to slop around.

Personally I'm in agreement with O'Toole** and always build models so I can later get them apart easily for maintenance. I'd never permanently fix a roof in place for instance, same with bogies.
big-ted:73193 wrote: I'll have to make up some domed shims for the bogies though. Maybe those would make a fun 3D printer project... :)
The loose bogie doesn't really need a domed seat I use a small flat area and leave slack in the mounting screw.

Regards,
Graeme

** O'Toole? He's the bloke that reckoned Murphy was an optimist........ ;)

big-ted
Trainee Fireman
Trainee Fireman
Posts: 239
Joined: Fri Nov 25, 2011 4:13 pm
Location: Vancouver, BC, Canada.

Post by big-ted » Sun Nov 18, 2012 1:18 am

An update!

I decided to cut out pieces to make an open wagon also. I've made up a removable roof for the carriage and begun to put together an interior. To be honest, there's a lot of things I would do differently next time, particularly regarding the roof. Still, I embarked on this project as a learning exercise. I've still not pulled the trigger on wheels, mainly because I've not been able to find any uk-style bogies and axle boxes here in Vancouver. I'll have to order some I guess...

Anyway, my dilemma now is how to make detail parts for the open wagon. Dummy hinges, corner pieces etc. I had a go at making some from recycled tin plate, but this proved difficult to paint due to the coating, & it was hard to cut crisp, even lines on such small pieces. Likewise my attempt cutting bits from sheet metal was pretty poor.

So, how do you guys go about making the little detail parts? I see some guys using plasticard and making dummy rivets. Any other tricks you care to share?
Image
Last edited by big-ted on Mon Nov 19, 2012 4:53 pm, edited 1 time in total.

IrishPeter

Post by IrishPeter » Mon Nov 19, 2012 4:09 pm

Bogies need to have one narrow transverse stretcher allowing that bogie to wiggle back and forth, but not side to side; the other needs to be able to wiggle both fore and aft and side to side. This eliminates body rock by giving a sort of three point suspension. This tip was passed along to me by one of the more learned among us.

I usually apply rivet detail to plasticard from behind with a centre punch. I usually do the job using a piece of scrap softwood as a base. A bradle is a bit too sharp and goes through most lighter weights of p-card. The results are variable depending on how much anagonism I expend on bring the hammer into contact with the punch; generally a light hand is better, if less satisfying!

Peter in AZ

big-ted
Trainee Fireman
Trainee Fireman
Posts: 239
Joined: Fri Nov 25, 2011 4:13 pm
Location: Vancouver, BC, Canada.

Post by big-ted » Sat Dec 01, 2012 1:16 am

I assembled another open wagon and started work on a covered wagon. I think is my best effort so far, so I feel happy in that I seem to be on an upwards learning curve! It has opening doors with handles made from broken bike spokes. (I break a lot of bike parts, so have a lot of these to hand).

Image

I really AM going to have to order some wheels and axle boxes soon, aren't I?![/img]

User avatar
dougrail
Driver
Driver
Posts: 1535
Joined: Mon Mar 14, 2011 5:11 pm
Location: Salopia; on the edge of Arcadia

Post by dougrail » Sat Dec 01, 2012 10:58 pm

Nicely done chap :)

Post Reply

Who is online

Users browsing this forum: No registered users and 28 guests