- IMG_20260627_084957.jpg (421.97 KiB) Viewed 177 times
Heat destruction
-
Allu
- Cleaner

- Posts: 64
- Joined: Wed Feb 25, 2026 2:53 pm
- Location: Finland
Heat destruction
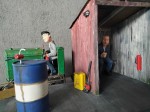
Just a word of warning, this is what happened after a few sunny and hot (well not so hot in Finland) days to my 3D printed oil drum. Bottom of the drum has bulged out and the top plate has deformed. I think it was printed with Standard Filament (temperature resistance up to 65°C).
Cheers,
Allu
Allu
-
drewzero1
- Administrator

- Posts: 851
- Joined: Fri Apr 21, 2023 4:35 pm
- Location: WI, US
- Contact:
Re: Heat destruction
Yikes, whatever's in that drum must need a hazmat label! 
I've had some things printed in PLA warp over time/heat/direct sun. PETG has given slightly better results, though it can warp for other reasons (humidity, I think). I've heard ABS is the best common FDM material for heat resistance, but I've yet to try it.
@GAP did some testing a couple of years ago for outdoor use: https://gardenrails.org/viewtopic.php?p=176253#p176253 I was surprised to hear that black PLA was slightly tougher than other colors of PLA but since then that has been my experience as well. I don't know if any FDM printed item will be able to handle direct sun in an enclosed porch/balcony though.
-
philipy
- Moderator
- Posts: 5979
- Joined: Sun Jan 30, 2011 3:00 pm
- Location: South Northants
Re: Heat destruction
My first questions are, is it hollow and sealed and how dense is the internal honeycombe? Because once the plastic softens the internal air will heat up more/faster and the increased pressure will do strange things to the soft plastic and that looks exactly like what has happened on the top - the pillow effect is the hot air pushing up between the honeycombe.
I've had PLA windows and doors outside 24/7/365 for a number of years with no significant damage apart from some roof ridge tile strips which have curled slightly.
I've had PLA windows and doors outside 24/7/365 for a number of years with no significant damage apart from some roof ridge tile strips which have curled slightly.
Philip
-
Allu
- Cleaner
- Posts: 64
- Joined: Wed Feb 25, 2026 2:53 pm
- Location: Finland
Re: Heat destruction
the drum is hollow and sealed. internals i do not know as it is a commercial product. yea the hot internal air expanding sounds logical
Cheers,
Allu
Allu
-
philipy
- Moderator
- Posts: 5979
- Joined: Sun Jan 30, 2011 3:00 pm
- Location: South Northants
Re: Heat destruction
I first came across that pillow effect soon after I started 3d printing. It showed itself on the tops of buffer beams that I was printing integral with the rest of the chassis. At the time I was using filament from a company that no longer exists but they had a really good customer service dept who told me exactly what the problem was. The answers are (a) print a thicker top ( more layers) and (b) make the internals denser (c) if the model/design allows it, leave breathing holes in the sides.
Not much you can do about a bought in item, but worth remembering for your own printing.
Not much you can do about a bought in item, but worth remembering for your own printing.
Philip
-
Peter Butler

- Driver

- Posts: 5693
- Joined: Sun Sep 09, 2012 10:33 pm
- Location: West Wales
Re: Heat destruction
About two years ago I reported on my purchase of the 16mm scale 3D printed L&B mobile crane, which is a superb model and I am delighted with it.
During its first outing to a garden railway open day on the Gower (Wales), and on a particularly warm day, it sat in its box waiting a running opportunity. The temperature rose and the jib distorted to such a degree it caused the crane to derail...
After contacting the manufacturers and describing the circumstances the jib and winding gear were immediately replaced without question, but I never did find out what material it was made from.
Certainly there is a risk involved wherever 3D printed items are exposed to high temperatures.
During its first outing to a garden railway open day on the Gower (Wales), and on a particularly warm day, it sat in its box waiting a running opportunity. The temperature rose and the jib distorted to such a degree it caused the crane to derail...
- 100_0232.JPG (259.43 KiB) Viewed 145 times
- 100_0233.JPG (201.77 KiB) Viewed 145 times
Certainly there is a risk involved wherever 3D printed items are exposed to high temperatures.
The best things in life are free.... so why am I doing this?
-
GAP

- Trainee Driver

- Posts: 875
- Joined: Sun Dec 23, 2012 10:34 pm
- Location: Bundaberg QLD Australia
- Contact:
Re: Heat destruction
I have 3D printed points using PETG that were exposed to the summer sun and the blades warped at the point end (thinnest print) my solution was to clamp them to the stock rail wit a paperclip when no trains were running and they went back into shape. When I asked AI for a reason and a possible solution.
This is the technical obtuse answer I got.
The glass transition temperature (\(T_{g}\)) is the point where a 3D-printed filament transitions from a hard, glassy state to a soft, rubbery one, signaling structural failure. It is not a melting point.
PLA: 55-65°C
PETG: 75-85°C
ABS / ASA: 100-105°C
Nylon (PA): 70-80°C (varies heavily by blend)
Polycarbonate (PC): 110-150°CExact \(T_{g}\) depends on the manufacturer's specific formula and additives.
To avoid warping or premature part failure, these \(T_{g}\) numbers should not be exceeded during use or storage.
The structural failure point where a 3D-printed model actually warps, bends, or collapses under its own weight is directly dictated by its Heat Deflection Temperature (HDT), not its melting point.
For 3D prints under standard mechanical stress (around 0.45 MPa), structural failure begins at the following temperatures:
PLA: 50–55°C (Will deform inside a hot car or under direct summer sunlight)
PETG: 68–72°C (Resists hot days, but sags under boiling water)
ABS / ASA: 90–95°C (Safe for functional outdoor and automotive engine bay brackets)
Nylon (PA): 60–90°C (Highly dependent on moisture absorption; dry nylon holds shape better)
Polycarbonate (PC): 120–140°C (Excellent for high-heat, high-stress engineering builds)
Crucial Variables/Mechanical Load:
Heavier loads cause parts to collapse at lower temperatures.
Infill Density: Sparse infill (e.g., 10%) collapses much faster than solid parts (100%).
Annealing: Baking PLA or PETG prints post-process can boost their failure point by 10–20°C.
To anneal a 3D-printed model, you must heat it in a controlled environment above its glass transition temperature (\(T_{g}\)) but below its melting point. This allows the polymer molecules to rearrange into a dense, semi-crystalline structure, drastically reducing internal stresses and boosting heat resistance.
The Standard Oven Method
You can use a kitchen electric oven, a laboratory incubator, or a food dehydrator. Do not use a microwave.
Preheat the heating chamber:
Bring the chamber to the target temperature for your specific material.
Use a standalone digital thermometer to verify accuracy, as built-in dials fluctuate wildly.
Bake the print: Place your part on a flat, non-stick baking sheet or foil.
PLA / HTPLA: Bake at 65–110°C for 30–60 minutes.
PETG: Bake at 95–110°C for 60 minutes.
Nylon: Bake at 110–130°C for 1 to 2 hours. (Note: ABS/ASA are not recommended for annealing as they warp destructively without specialized factory jigs).
Cool slowly: Turn off the heat completely. Do not open the door. Let the print cool naturally down to room temperature inside the oven over several hours. Sudden temperature drops cause cracks and severe structural warping.
The annealing process has me interested especially due to my location temperatures so I may sneak a print into SWMBO's domain and give it a go.
I have 3D printed points using PETG that were exposed to the summer sun and the blades warped at the point end (thinest print) my solutiom was to clamp them to the stock rail wit a paperclip when no trains were running and they went back into shape.
Annealing or using Polycarbonate infused PETG may be of use to me here, its worth more looking into.
All might be a bit much for a Sunday morning sorry.
Graeme
From the home of the Uppen Down Railway
https://ringbalin-light-railway.blogspo ... -page.html
From the home of the Uppen Down Railway
https://ringbalin-light-railway.blogspo ... -page.html
-
Petersfield

- Trainee Fireman

- Posts: 160
- Joined: Sun Nov 12, 2023 7:40 pm
Re: Heat destruction
Ouch! I feel for Allu and Peter, it's horrible to have that happen. I have my eye on several 3D printed items; I know there are some materials which are for indoor use only and some which are supposed to be OK for outside.
AI reminds me of Wikipedia's rep - it can be a useful starting point but check, check and check again before relying on it. But I too have heard of baking or annealing to 'toughen' 3D material. I'd be interested to hear how you get on. Fingers crossed!
GAP wrote: Sat Jun 27, 2026 10:24 pm I have 3D printed points using PETG that were exposed to the summer sun and the blades warped at the point end (thinnest print) my solution was to clamp them to the stock rail wit a paperclip when no trains were running and they went back into shape. When I asked AI for a reason and a possible solution.
This is the technical obtuse answer I got.
...
All might be a bit much for a Sunday morning sorry.
AI reminds me of Wikipedia's rep - it can be a useful starting point but check, check and check again before relying on it. But I too have heard of baking or annealing to 'toughen' 3D material. I'd be interested to hear how you get on. Fingers crossed!
Who is online
Users browsing this forum: No registered users and 25 guests