Almost any colour other than that ghastly blue!
PDF single Fairlie
-
philipy
- Moderator

- Posts: 5941
- Joined: Sun Jan 30, 2011 3:00 pm
- Location: South Northants
-
Garethep
- Cleaner

- Posts: 35
- Joined: Sun Sep 20, 2020 10:59 pm
Re: PDF single Fairlie
Blue is an option but definitely not "That" blue 
-
Old Man Aaron

- Driver

- Posts: 1134
- Joined: Wed Oct 19, 2016 11:08 am
- Location: Sunshine Coast QLD, Australia
-
Garethep
- Cleaner
- Posts: 35
- Joined: Sun Sep 20, 2020 10:59 pm
Re: PDF single Fairlie
I know AI gets a bad wrap (for good reason) amongst the modelling fraternity but I have found one good thing it can do is help visualise things like colour changes.......having put the suggestion of black into the "system" I think I'm tempted!

-
Old Man Aaron
- Driver
- Posts: 1134
- Joined: Wed Oct 19, 2016 11:08 am
- Location: Sunshine Coast QLD, Australia
Re: PDF single Fairlie
Without wishing to go down that rabbit hole, AI certainly does have it's uses. Beats laboriously photoshopping an image to test different liveries..
Choosing colour is never an easy task, but I certainly enjoy it..
Choosing colour is never an easy task, but I certainly enjoy it..
Regards,
Aaron - Scum Class Works
Aaron - Scum Class Works
-
Johnnie1000

- Cleaner
- Posts: 61
- Joined: Tue Oct 09, 2018 8:53 am
- Location: Staffordshire
Re: PDF single Fairlie
In my view it's not ghastly enough!

-
Garethep
- Cleaner
- Posts: 35
- Joined: Sun Sep 20, 2020 10:59 pm
Re: PDF single Fairlie
A bit more progress over the last few days....I had watched the YouTube video which is the closest thing to instructions that are available for this kit but realised that either the design of the bogies had been modified or the single fairlie bogie is different to the double Fairlie ones as some of the expected bits were missing.
It looks like this kit comes with top hat type bearings not the brass tubes described in the video but this appears straightforward enough. Assembling the bogies was a real mission as the screws to hold the cylinders to the frame are cap head.....the first one is easy enough to fit as the Allen key can pass through the holes for the opposite cylinder but the second is a real fiddle.....the video suggests cutting down an Allen key and I'd spent ages trying to find a way to avoid doing that then another ages cutting through a spare Allen key.....a very frustrating feature and either a smaller size screw or a hex head would have made things so much easier!


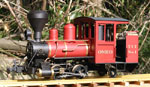
Today I took advantage of the good weather and put a few good thick layers of high build primer onto the whole model followed by a first coat of Matt black.....once dry I can rub this back and use it to identify the remaining imperfections....that said, it was an also an excuse to see what the loco looked like in black and I think I'm decided on that as my chosen livery..... hopefully the finished article will be a lot shinier and smoother but at least the nasty blue 'printed' look has gone!


It's been an eye-opening process getting my head around how this loco was designed and how it intended to be built.....it's definitely a different approach to how I would have gone about it but it certainly works.....I note that, although some pdf kits are now available again, this one isn't among them so a recommendation, or otherwise, doesn't hold much sway but I'd be reluctant to recommend a novice attempts this purely in view of the lack of instructions which really makes this into closer to a scratch aid than a kit.
Next steps will be to get the power bogie assembled and running then rub down the body ready for paint proper.
A job I'm not looking forward to is applying all the separate rivet heads....a friend who models in smaller scale has spoken highly of the 3d waterslide rivet transfers which are also available in a size suitable for 16mm......does anyone have any experience of using them? If so I welcome your views on whether they are a better option than individually sticking on a bazillion nail jewels
It looks like this kit comes with top hat type bearings not the brass tubes described in the video but this appears straightforward enough. Assembling the bogies was a real mission as the screws to hold the cylinders to the frame are cap head.....the first one is easy enough to fit as the Allen key can pass through the holes for the opposite cylinder but the second is a real fiddle.....the video suggests cutting down an Allen key and I'd spent ages trying to find a way to avoid doing that then another ages cutting through a spare Allen key.....a very frustrating feature and either a smaller size screw or a hex head would have made things so much easier!
Today I took advantage of the good weather and put a few good thick layers of high build primer onto the whole model followed by a first coat of Matt black.....once dry I can rub this back and use it to identify the remaining imperfections....that said, it was an also an excuse to see what the loco looked like in black and I think I'm decided on that as my chosen livery..... hopefully the finished article will be a lot shinier and smoother but at least the nasty blue 'printed' look has gone!
It's been an eye-opening process getting my head around how this loco was designed and how it intended to be built.....it's definitely a different approach to how I would have gone about it but it certainly works.....I note that, although some pdf kits are now available again, this one isn't among them so a recommendation, or otherwise, doesn't hold much sway but I'd be reluctant to recommend a novice attempts this purely in view of the lack of instructions which really makes this into closer to a scratch aid than a kit.
Next steps will be to get the power bogie assembled and running then rub down the body ready for paint proper.
A job I'm not looking forward to is applying all the separate rivet heads....a friend who models in smaller scale has spoken highly of the 3d waterslide rivet transfers which are also available in a size suitable for 16mm......does anyone have any experience of using them? If so I welcome your views on whether they are a better option than individually sticking on a bazillion nail jewels

-
GTB
- Driver
- Posts: 1692
- Joined: Sat Mar 05, 2011 2:46 pm
- Location: Australia
Re: PDF single Fairlie
I'd suggest investing in a suitable set of 'ball end hex keys' if you plan on making a habit of loco building. They are better at tightening socket head screws in awkward places, as they don't have to be in exact line with the socket to work. Shortening the hex key doesn't always do the job.
They look like the ones in this link. They also come in a version with a screwdriver type handle..........
https://www.bunnings.com.au/stanley-9-p ... 6_p0737140
If you think socket head screws are a pain, trying to do it with hex heads is even more difficult and slot, or philips head, screws would be impossible.
Graeme
ps. The Kiwis painted their Fairlies lined black early on, but the last survivors were probaby just plain black.
-
Garethep
- Cleaner
- Posts: 35
- Joined: Sun Sep 20, 2020 10:59 pm
Re: PDF single Fairlie
Thanks Graeme,
Yes a set of those would have been very handy! A set are now on their way which of course means I'll probably never need them again
Yes a set of those would have been very handy! A set are now on their way which of course means I'll probably never need them again
Who is online
Users browsing this forum: No registered users and 1 guest