Yr Hen Felin & Yr Orsaf Newydd
-
FWLR
- Driver

- Posts: 4588
- Joined: Sat Aug 05, 2017 9:45 am
- Location: Preston, Lancashire, UK
Re: Yr Hen Felin & Yr Orsaf Newydd
Really well done Chris. It certainly looks real enough. Brilliant job. 
ROD
Life is so easy when I run my trains.


https://gardenrails.org/forum/viewtopic ... 41&t=11364
https://www.youtube.com/@fairywoodlightrailway
Life is so easy when I run my trains.


https://gardenrails.org/forum/viewtopic ... 41&t=11364
https://www.youtube.com/@fairywoodlightrailway
-
gilfachphil
- Fireman

- Posts: 429
- Joined: Sun Nov 24, 2019 11:00 am
- Location: West Wales
Re: Yr Hen Felin & Yr Orsaf Newydd
Bakewell
The 3D jigsaw puzzle continues to make progress slowly. Several hours were spent yesterday fitting a bi-colour (red/white) LED into a lamp kindly printed and given to me by Trevor. Both the inside of the lamp and the LED had a couple of coats of black paint, I can scrape as much off the front face of the LED as necessary to let the light shine thro. There is a hole on the bottom of the lamp to take the wires out of, I filled the inside of the lamp around the LED with Blacktack and glued the back plate on after some fettling.
The lamp bracket was modified to fit over the top of the smoke box. The LED wires pass into a hole in the top of the smoke box, which I drilled through to that one passing horizontally through in the centre of the smoke box door position so that I could feed thin flex though to the inside of the tank. I worked small slots for the wires to locate under the chimney. Once all is sprayed black the wires will nearly disappear.
All this much more easily said than done!
A view of the loco so far from the rear.
It is very difficult to sand the cab side plates because of their shape. I have not bothered with the insides because I hope that once they are matt black the ridges will not be visible from normal viewing distances. Because of their shapes it would be very difficult to laminate them with thin plastikard.
The tank is coming on quite well, I think, it is due another sanding with fine abrasive to see how well the striations are filling with primer.
There is a quandary as to what to do about fitting a charging socket to the underneath
I cannot work out where it could go considering all the obstructions underneath and that I want to fit the battery pack centrally above the wheels.
Phil
The 3D jigsaw puzzle continues to make progress slowly. Several hours were spent yesterday fitting a bi-colour (red/white) LED into a lamp kindly printed and given to me by Trevor. Both the inside of the lamp and the LED had a couple of coats of black paint, I can scrape as much off the front face of the LED as necessary to let the light shine thro. There is a hole on the bottom of the lamp to take the wires out of, I filled the inside of the lamp around the LED with Blacktack and glued the back plate on after some fettling.
- IMG_4422.jpeg (1.22 MiB) Viewed 16020 times
All this much more easily said than done!
- IMG_4423.jpeg (1.43 MiB) Viewed 16020 times
It is very difficult to sand the cab side plates because of their shape. I have not bothered with the insides because I hope that once they are matt black the ridges will not be visible from normal viewing distances. Because of their shapes it would be very difficult to laminate them with thin plastikard.
The tank is coming on quite well, I think, it is due another sanding with fine abrasive to see how well the striations are filling with primer.
There is a quandary as to what to do about fitting a charging socket to the underneath
- IMG_4421.jpeg (1.57 MiB) Viewed 16020 times
Phil
-
philipy
- Moderator

- Posts: 5929
- Joined: Sun Jan 30, 2011 3:00 pm
- Location: South Northants
Re: Yr Hen Felin & Yr Orsaf Newydd
To some extent it depends on what type of batteries you are going to use, but if you are thinking of NiMh, then the simplest, easiest and least space consuming option, is simply to wire up two brass bolts, one +ve and one -ive, protruding from the underside at convenient points, and use crocodile clips on the charger. The spaces around the two fixing screws look suitable, or on the spacer in front of the gear wheel?gilfachphil wrote: ↑Tue Aug 27, 2024 2:09 pm
There is a quandary as to what to do about fitting a charging socket to the underneath
I cannot work out where it could go considering all the obstructions underneath and that I want to fit the battery pack centrally above the wheels.
You could use the same system for LiPo's and put the balance socket at some other location, but it is less simple.
However, either way two bolts take up a lot less space than a socket.
It's a solution suggested to me by Grant and it has worked well for me on several models.
Philip
-
ge_rik
- Administrator
- Posts: 7768
- Joined: Sun Oct 25, 2009 10:20 pm
- Location: Cheshire
- Contact:
Re: Yr Hen Felin & Yr Orsaf Newydd
That lamp is a thing of beauty.
I shroud LEDs in my lamps in black heatshrink tube, which is equally effective.
Rik
I shroud LEDs in my lamps in black heatshrink tube, which is equally effective.
Rik
-
gilfachphil
- Fireman
- Posts: 429
- Joined: Sun Nov 24, 2019 11:00 am
- Location: West Wales
Re: Yr Hen Felin & Yr Orsaf Newydd
Thanks Philip for your comments. I am using NiMH cells, a bank of 6AA. The charger I use has a 2.1mm DC plug outlet so I prefer to stick to the matching socket if possible. The solution which occurred to me earlier was to mount the socket on a small piece of aluminium araldited to the keeper plate! I can then feed two wires up thought the footplate through a small hole. Hope that works!
Rik, all credit for the lamp goes to Trevor of The 'Railway in the Valley of the MIll' fame and user of 3D printing for many purposes,
Phil
Rik, all credit for the lamp goes to Trevor of The 'Railway in the Valley of the MIll' fame and user of 3D printing for many purposes,
Phil
-
gilfachphil
- Fireman
- Posts: 429
- Joined: Sun Nov 24, 2019 11:00 am
- Location: West Wales
Re: Yr Hen Felin & Yr Orsaf Newydd
I think this will work:-
Phil
- IMG_4433.jpeg (3.11 MiB) Viewed 15973 times
Phil
-
FWLR
- Driver
- Posts: 4588
- Joined: Sat Aug 05, 2017 9:45 am
- Location: Preston, Lancashire, UK
Re: Yr Hen Felin & Yr Orsaf Newydd
Nice and neat Phil. Brilliantly done.
ROD
Life is so easy when I run my trains.
https://gardenrails.org/forum/viewtopic ... 41&t=11364
https://www.youtube.com/@fairywoodlightrailway
Life is so easy when I run my trains.
https://gardenrails.org/forum/viewtopic ... 41&t=11364
https://www.youtube.com/@fairywoodlightrailway
-
gilfachphil
- Fireman
- Posts: 429
- Joined: Sun Nov 24, 2019 11:00 am
- Location: West Wales
Re: Yr Hen Felin & Yr Orsaf Newydd
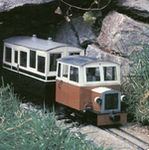
These coaches appeared for a short while in the For Sale section:-
Having commented how nice they are my phone went a few minutes later. It's good when the seller is a friend, thanks Chris.
I changed the wheelsets to 32mm, which is easy if you read the instructions and only remove the axle box assembly from one side.
I have changed the couplings to dummy buffers from Ebay since nearly all of my stock uses three link rather than the Accucraft chopper coupling.
Here they are with a Jerry Irwin victorian coach for comparison:-
Phil
Having commented how nice they are my phone went a few minutes later. It's good when the seller is a friend, thanks Chris.
I changed the wheelsets to 32mm, which is easy if you read the instructions and only remove the axle box assembly from one side.
I have changed the couplings to dummy buffers from Ebay since nearly all of my stock uses three link rather than the Accucraft chopper coupling.
Here they are with a Jerry Irwin victorian coach for comparison:-
- IMG_4496.jpeg (1.69 MiB) Viewed 15654 times
-
philipy
- Moderator
- Posts: 5929
- Joined: Sun Jan 30, 2011 3:00 pm
- Location: South Northants
Re: Yr Hen Felin & Yr Orsaf Newydd
They look good in motion and the JI coach goes OK with them as well.
Philip
-
Preseli Chris
- Trainee Fireman

- Posts: 246
- Joined: Fri May 24, 2024 4:25 pm
- Location: Land of the Draig
Re: Yr Hen Felin & Yr Orsaf Newydd
Hi Phil .
I found it helpful to use a length of 1mm brass rod to hold the floor spacers in place on my rake. Although they are 1.20 5 scale they don't look out of place
I found it helpful to use a length of 1mm brass rod to hold the floor spacers in place on my rake. Although they are 1.20 5 scale they don't look out of place
- 20240831_115442.jpg (2.6 MiB) Viewed 15634 times
Yr Tren Nesa Wedi Mynd
-
gilfachphil
- Fireman
- Posts: 429
- Joined: Sun Nov 24, 2019 11:00 am
- Location: West Wales
Re: Yr Hen Felin & Yr Orsaf Newydd
A few friends from the South West wales 16mm Group visited today. To finish our running session we had six trains in convoy round the layout. Here they are all parked up afterwards with a seventh which did not run in the convoy.
Thanks to all who came to play,
Phil
Thanks to all who came to play,
Phil
- IMG_4506.jpeg (2.85 MiB) Viewed 15532 times
-
Peter Butler

- Driver
- Posts: 5671
- Joined: Sun Sep 09, 2012 10:33 pm
- Location: West Wales
Re: Yr Hen Felin & Yr Orsaf Newydd
A wonderful, dry and warm day it turned out to be. Thank you Phil for the company and Angelo for the delicious cakes.
The best things in life are free.... so why am I doing this?
-
Andrew

- Moderator
- Posts: 3422
- Joined: Tue Jul 03, 2012 1:33 pm
- Location: Bristol, UK
- Contact:
Re: Yr Hen Felin & Yr Orsaf Newydd
It certainly looks a lot of fun.
When I read about what you lot over there get up to I wonder if I should move to West Wales!
When I read about what you lot over there get up to I wonder if I should move to West Wales!
-
gilfachphil
- Fireman
- Posts: 429
- Joined: Sun Nov 24, 2019 11:00 am
- Location: West Wales
Re: Yr Hen Felin & Yr Orsaf Newydd
Would you be allowed in? 
Phil
Phil
-
drewzero1
- Administrator
- Posts: 837
- Joined: Fri Apr 21, 2023 4:35 pm
- Location: WI, US
- Contact:
Re: Yr Hen Felin & Yr Orsaf Newydd
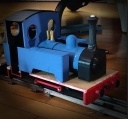
What's the little grey diesel on the right? I like the cab!
-
Peter Butler
- Driver
- Posts: 5671
- Joined: Sun Sep 09, 2012 10:33 pm
- Location: West Wales
Re: Yr Hen Felin & Yr Orsaf Newydd
I would personally see to it that you were made most welcome.
The best things in life are free.... so why am I doing this?
-
gilfachphil
- Fireman
- Posts: 429
- Joined: Sun Nov 24, 2019 11:00 am
- Location: West Wales
Re: Yr Hen Felin & Yr Orsaf Newydd
It’s an IP Glaslyn, actually dark blue. My very first 16mm loco build. It is often the shunting engine for the Inglenook puzzle as it has a low top speed and is thus ideal for members of the public to use. The driver has very thick lens glasses and I’m not sure he can see where he’s going!
Phil
-
gilfachphil
- Fireman
- Posts: 429
- Joined: Sun Nov 24, 2019 11:00 am
- Location: West Wales
Re: Yr Hen Felin & Yr Orsaf Newydd
Anna is Chuffed
This is a very simple upgrade in the case of a Silver Lady. The Summerlands Chuffer is a direct replacement for the factory fitted exhaust and screws in via the chimney. Time 5 minutes max!
Anna is Chuffed so am I
Phil.
This is a very simple upgrade in the case of a Silver Lady. The Summerlands Chuffer is a direct replacement for the factory fitted exhaust and screws in via the chimney. Time 5 minutes max!
- IMG_4515.jpeg (1.17 MiB) Viewed 15285 times
Phil.
-
gilfachphil
- Fireman
- Posts: 429
- Joined: Sun Nov 24, 2019 11:00 am
- Location: West Wales
Re: Yr Hen Felin & Yr Orsaf Newydd
Anna came with the transmitter shown:-
The left hand joystick is the regulator, the right hand one does both reverser and simulated cylinder drain cocks and being sprung needs holding constantly in one of the four corners. I looked into replacing the R/C set up with something like the Micron ones I use for my battery fleet and then found a very helpful YouTube video explaining how one could assign the switches at the top of the transmitter to copy the joysticks. It took me several views but eventually I got the hang of it and have managed to program the reverser to the switch C and the drain cocks to D. This works a treat allowing single handed control most of the time. It is possible to program the transmitter to control a number of models, I did look at adding Russell in as another named model but am not sure whether this transmitter will pair with the receiver in Russell, which is a Planet one, and I find him easy to control with the Planet T5 supplied where the joysticks are not sprung and only two functions are used.
Phil
- IMG_0264.jpeg (2.76 MiB) Viewed 15282 times
Phil
-
LNR

- Driver
- Posts: 1833
- Joined: Sat Feb 27, 2016 5:26 am
- Location: Melbourne, Australia
Re: Yr Hen Felin & Yr Orsaf Newydd
Interesting what you've done with that transmitter Phil. I use the same one for my RC boats, I know it can do many more things, just haven't got round to exploring it all yet.
Grant.
Grant.
Who is online
Users browsing this forum: No registered users and 31 guests