I don't understand. Shouldn't the axles on the ZeCar have been TOO long? Or did you somehow get one with shorter axles?
Your plan is exactly the same as mine. I wanted to get something on the rails for testing before I invested any time making a better-looking wagon.
It would be great to see a video of "steamy Clare" or "Smoky Sophie" in action once you have the wagon working!
Zach Bond "Momentum Van" project
Re: axles
]I'm confused (quite easy when it comes to anything apart from signalling) - when you say that you've moved the old axleboxes "in" - what "in" do you mean?
Do you a) mean away from the headstocks and "in" towards the centre line of the wagon or b) narrowed them in relative to the gauge?[/quote]
The axles are about 5mm shorter than the original Accucraft axle the the wheels came from so in order for the axles to actually sit in the axle boxes (which effectively fixes that end of the Zecar to the wagon) either the wagon frames or the axle boxes needed moving closer together. So that's why the coffee sirrers came into use. It seems some Zecars are different to others, and not just cosmetically! Hope this makes more sense.
-
Dr. Bond of the DVLR

- Retired Director

- Posts: 4485
- Joined: Tue Jun 09, 2009 9:43 pm
- Location: Suffolk
- Contact:
Its more likely that accucraft axleboxes and sole bars are particularly far out (relative to the gauge) than others - remembering that on mine I put the solebars on to suit the zecar and KeithSs one was built with the axle boxes to suit the zecar. It's unlikely that some products have shorter axles than others. Of course the simplest solution would be for 2 people to get a ruler and measure their zecars' axles

The railway which people forgot
(to build)
-
Tony Bird

- Trainee Driver

- Posts: 570
- Joined: Thu Jul 29, 2010 8:25 am
- Location: Cardiff, South Wales, UK.
Hi,
I have had a go at fitting the flywheel unit from the Postman Pat Greendale Rocket toy as shown earlier in this thread. The unit is a lot smaller than the Zecar one and has only one axle, its gear ratio is 1:46 and all the gear wheels are plastic/nylon running in plastic bearings the only metal bits other than the screws are the flywheel and its axle. The axle as fitted is long enough to take wheels for both G1 and 0 gauge. If outside bearings are needed as the axle is 3mm in diameter a longer one is easily fitted and Binnie wheels could be used. I decided to increase the axle size to 1/8" and use IPE 24mm wagon wheels. The plastic gear was pushed onto the slightly larger 1/8" axle without a problem and the bearingsfor the axle were made a little larger. The wagon chosen for the test was made from a Mamod log wagon chassis fitted with 24mm Binnie wheels and had an old pot boiler fitted to it to make it into a tanker wagon.
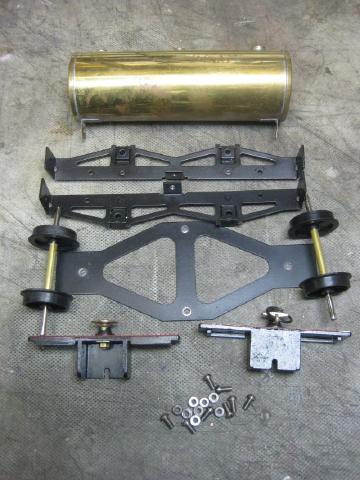

The flywheel gear box is 24 mm wide so will easily fit between 0 gauge wheels.

Any bits not needed were removed from the gear box frame which fitted well into the Mamod chassis.

Copying Alan Palmer the axles were connected by chain and the exposed gears covered.

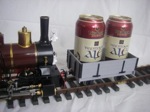
As the finished wagon looks.

The wagon when pulled by an electric model locomotive is heavy enough to start the flywheel revolving on a dry track. If found necessary the weight of the wagon can be increased by putting sand in the tank. I cannot easily test the wagon as my garden railway is flat and has no sharp curves and the garden railway at the Cardiff Model Engineering Society is very similar, so it will have to wait until it is run on a suitable hilly or tightly curved track to check it out. I cannot see that it wouldn't perform as well as other similar wagons.
Regards Tony.
I have had a go at fitting the flywheel unit from the Postman Pat Greendale Rocket toy as shown earlier in this thread. The unit is a lot smaller than the Zecar one and has only one axle, its gear ratio is 1:46 and all the gear wheels are plastic/nylon running in plastic bearings the only metal bits other than the screws are the flywheel and its axle. The axle as fitted is long enough to take wheels for both G1 and 0 gauge. If outside bearings are needed as the axle is 3mm in diameter a longer one is easily fitted and Binnie wheels could be used. I decided to increase the axle size to 1/8" and use IPE 24mm wagon wheels. The plastic gear was pushed onto the slightly larger 1/8" axle without a problem and the bearingsfor the axle were made a little larger. The wagon chosen for the test was made from a Mamod log wagon chassis fitted with 24mm Binnie wheels and had an old pot boiler fitted to it to make it into a tanker wagon.
The flywheel gear box is 24 mm wide so will easily fit between 0 gauge wheels.
Any bits not needed were removed from the gear box frame which fitted well into the Mamod chassis.
Copying Alan Palmer the axles were connected by chain and the exposed gears covered.
As the finished wagon looks.
The wagon when pulled by an electric model locomotive is heavy enough to start the flywheel revolving on a dry track. If found necessary the weight of the wagon can be increased by putting sand in the tank. I cannot easily test the wagon as my garden railway is flat and has no sharp curves and the garden railway at the Cardiff Model Engineering Society is very similar, so it will have to wait until it is run on a suitable hilly or tightly curved track to check it out. I cannot see that it wouldn't perform as well as other similar wagons.
Regards Tony.
-
tom_tom_go

- Driver

- Posts: 4824
- Joined: Wed Feb 23, 2011 3:08 am
- Location: Kent, UK
- Contact:
I cut the wheels off as I could not get the original wheels to slide off the axles.
I have measured the axles after cutting plus the pieces left in the metal wheels and they only measure around 50mm.
So if the axles had been longer I would not have had to try and replace them which has resulted in the crap plastic sprocket breaking while I tried to remove the axle
Any ideas of where I can find a brass replacement? I need it to fit a 1/8in axle and I reckon it needs to be either a 38 or 40 tooth sprocket.
Tony that's an interesting variation. I'm looking forward to hearing how it works. I think it still would be worth testing it even on your track, to see how your various engines cope with it and see the effect it has on slow running.
Lacking a proper track has prevented me from giving my wagon a decent test, other than on the workbench. I managed to get about a 18 foot run on the basement floor, with some curves at either end and a straight bit in the middle. I tried the wagon out with another weighted wagon behind it to simulate a train. It was promising: if you set the regulator just right it marches into the curves more purposefully and maintains a steady pace. On a long straight stretch, if it is given enough space, the locomotive is still able to build up to a fairly brisk pace, I think this will work best on a railway which doesn't have straight bits that are long enough to let the train build up a lot of speed. A curve here and there would control the average velocity pretty well, because it takes a long run to accelerate and if you could interrupt this with a curve, it would have to start building up speed all over again leaving the curve. Of course radio control would make that easier.
I think what I like most about the device is the long, steady acceleration it gives the train. If the locomotive does happen to stall on a curve, it doesn't build up steam and suddenly burst away again, it slowly and steadily chuffs away in a gratifying manner.
This has all got me curious about using the centrifugal brake from a rotary-dial phone, putting it on the other axle and then the wagon would not only provide momentum, but would limit top speed as well.
I'm really looking forward to seeing how others get on with this project; I am mildly frustrated now that I don't have a railway, I can't properly enjoy the benefits of this device or properly test it.

Guys. I've been following this thread with interest and i think that the Zecar must have had a few variations in it's build over the years.
The gears on mine are all metal.
The wheels were removed very easily by resting them on a small vice with the axle between the jaws and just gently tapping the end of the axle with a drift.
Unlike Keith's and Cheshire's excellent wagons mine doesn't have the support of axles boxes. The axles just run in the original Zecar chassis. It's had quite a bit of use since last September and seems to be holding up fine, saying that, my line has some tight curves but is generally flat.
Tony, having already seen pics of your Mamod Tanker Wagon, i really must make one of those, i will be very interested to see how it performs with it's latest mod.
After consultation with the esteemed Mr Bond during the construction of my MV the final weight of the completed wagon was 620g. This seems to be a good working weight.
-
tom_tom_go
- Driver
- Posts: 4824
- Joined: Wed Feb 23, 2011 3:08 am
- Location: Kent, UK
- Contact:
-
Peter Butler

- Driver
- Posts: 5245
- Joined: Sun Sep 09, 2012 10:33 pm
- Location: West Wales
Having followed this thread from the beginning I just couldn't resist the challenge! My Zecar arrived in the post this morning and I am very impressed with its construction, especially for the price.

Mine has extended axles which will protrude well past the wheel gauge and into axle boxes. I will only use the powered axle on the track with the other raised so that the wheelbase can be extended.
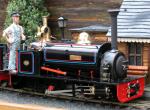
My idea is to scratchbuild a tender for my 'Billie' so it can be permanently attached for forward or reverse running.
Other projects must be finished first so there might be some slight delay in posting results.
Mine has extended axles which will protrude well past the wheel gauge and into axle boxes. I will only use the powered axle on the track with the other raised so that the wheelbase can be extended.
My idea is to scratchbuild a tender for my 'Billie' so it can be permanently attached for forward or reverse running.
Other projects must be finished first so there might be some slight delay in posting results.
The best things in life are free.... so why am I doing this?
-
tom_tom_go
- Driver
- Posts: 4824
- Joined: Wed Feb 23, 2011 3:08 am
- Location: Kent, UK
- Contact:
-
Peter Butler
- Driver
- Posts: 5245
- Joined: Sun Sep 09, 2012 10:33 pm
- Location: West Wales
-
tom_tom_go
- Driver
- Posts: 4824
- Joined: Wed Feb 23, 2011 3:08 am
- Location: Kent, UK
- Contact:

Have you tried this firm, http://www.rapidonline.com/electrical-p ... ars-521162 http://www.ebay.co.uk/bhp/meccano-gears http://hobby.uk.com/components/gears-pulleys.html
Allen Hopper - early retirement can't beat it !


-
robyholmes
- Cleaner

- Posts: 69
- Joined: Mon Mar 09, 2015 5:22 pm
- Contact:
I to ordered a Zecar thanks to the mention on here, from otherhand on Amazon and my axles are around 60mm.Peter Butler:110493 wrote:Having followed this thread ...
I to intend to build this in to a billy chassis for my up coming Riverdale coal fired billy. Looking at the roundhouse 4 wheel tender instructions I don't think its going to be possible to use the axles but thinking a chain drive, maybe from both axles of the tender to the zecar sat further up will do the job. Likely to pick up the tender kit at Elsecar Show in September.
Completed wagon
This is the completed wagon, when it's sunny I will attempt a video.


Who is online
Users browsing this forum: No registered users and 9 guests