Page 1 of 2
Speech House Road goods shed
Posted: Sun Dec 15, 2013 10:22 am
by bazzer42


I feel guilty about reading other people's construction threads, pinching their ideas and never posting anything in return. This model, when we get there is based on some of the Eassie designs for the Severn and Wye. The rear of the wild swan books have 4mm drawings so it was 10 minutes on the xerox and full size drawings appeared. I have just moved into live steam so it was a chance to construct new buildings with a common style.
After a bout of pneumonia in March I invested in some 5mm foam board to scribe brick buildings from but have only just got round to using it. It is nice to work with and has been scribed with screwdrivers and a 2.4mm pin punch for the ship lap.
The doors ran on metal wheels but I have a feeling some old airfix tankers will be without wheels by the end of the day. I also hope to cut some pvc angle corners to cover the joints - todays job. I am thinking of 1mm plasticard for tiles and barge boards from the 3mm foam board I have used for the doors.
Having no windows this was an easy model to start with but I have invested in some resin to try and cast some window frames that I can use on station buildings. It looks easy enough on other people's threads


Posted: Sun Dec 15, 2013 11:10 am
by Peter Butler
Very nice tidy work, looking forward to seeing further progress.
Posted: Sun Dec 15, 2013 4:46 pm
by Dannypenguin
Only just living down the road from Speech House, this'll be an interesting one to watch.

Posted: Sun Dec 15, 2013 5:18 pm
by bazzer42
If you open a window you might hear the swearing as I haven't left enough room for the guttering with the size of the doors.....

my mate Stanley knife will help.
Posted: Sun Dec 15, 2013 10:30 pm
by Big Jim
(Sticks head out of window)
Blimey, and I thought the wife could swear

Don't worry we have all done it one way or another.
Posted: Mon Dec 16, 2013 8:06 am
by bazzer42
You are right Jim but you would have thought that by now though I would have learnt not to just to dive straight in! I think I can make the doors work but not sure whether something like that is fine if it wasn't destined to live outside. Probably safer if they are permanently fixed.
Posted: Mon Dec 16, 2013 9:21 am
by Andrew
That's looking great...
Have you tried scribing the brickwork yet?
Looking forward to seeing the rest of it take shape,
Andrew.
Posted: Mon Dec 16, 2013 10:01 pm
by jim@NAL
looks good very very neat work there
Posted: Fri Dec 27, 2013 5:00 pm
by bazzer42
Taking advantage of the inclement weather I have scribed three sides of the brick base. I need to complete this so I can fit the doors.

Posted: Fri Dec 27, 2013 9:31 pm
by Peter Butler
The brickwork looks to be most impressive. Neat and evenly spaced. Time consuming I'll bet!
Keep up the posting and show us the finished item, please.
Posted: Sun Dec 29, 2013 1:17 pm
by bazzer42


A quick shake with a red oxide rattle can and my bottom is all red! After all this I've just noticed my deliberate mistake...tip, when measuring up to get full bricks at each end you will probably have an odd size left. I have tried to overcome this by measuring in from both ends making the central bricks smaller for 3 or four. I have obviously used the wrong marks on this end piece if you look at some of the central vertical scores. From 6 foot who cares?
Posted: Sun Dec 29, 2013 1:22 pm
by bazzer42


A quick coat of masonary grey and a wipe with a damp rag and instant mortar. I have added a slice of artificial slate to the bas for ballast and will use it as a base for the roof to give weight to the shed itself.
The scribing is tedious Peter but you learn an awful lot about screwdrivers, that is a boring subject (apologies to any screwdriver collectors).
Stick the doors on this afternoon or gas up Lady Anne??
Posted: Sun Dec 29, 2013 3:34 pm
by bazzer42
Decision made, and Everton won.....
Posted: Sun Dec 29, 2013 4:32 pm
by Peter Butler
Tedious or not, it is well worth the effort. The base with mortar lines is most convincing and the corners work well with bricks interlocking. I'm tempted to try this method myself to make use of my extensive screwdriver collection!
The thought of reaching a point where I can show show my red bottom to my wife and friends is also an interesting prospect!
Posted: Sun Dec 29, 2013 4:59 pm
by bazzer42
I'm working to 12mm bricks and 5mm spacing, this assumes the scribed line eats 1mm to give 3" bricks.
I'd like to try some other types of courses in other buildings, one day I plan to build a single road engine shed with integral water tank so that could be a chance to experiment.
The sheet is 5mm foambord sourced from ebay.
Posted: Sun Dec 29, 2013 6:30 pm
by Dannypenguin
Like!

Posted: Sun Dec 29, 2013 9:33 pm
by bazzer42

The last post for the day. Poor Mrs B has a migraine so I have had to fill the day somehow. Walls glued together waiting for their corner strips.
Posted: Mon Dec 30, 2013 10:51 am
by Andrew
This is great, inspirational stuff!
I'm thinking that maybe I could use this to recreate the brick bits on a NWNGR building I need to make - the stone parts will be real slate I think, wonder how the two techniques would marry up?
Hope Mrs B's feeling better...
Posted: Mon Dec 30, 2013 3:41 pm
by bazzer42
Andrew, I had wondered how I could have done a real stone base. I have seen an article on GR Club website but impatience got the better of me. The board is quite forgiving and I have managed to get some barge boards done with a groove in them, as per the plan although I believe plain were used. I also believe the original didn't use Airfix tanker wheels
The gutters will be a bodge......
Mrs B up and about and curtailing modelling time

Posted: Mon Dec 30, 2013 5:26 pm
by Andrew
Thanks, useful info...
I plan to use some slate kitchen tiles for my stone buildings, obtained very cheaply (broken tiles in Wickes) or free (out of someone's recycling bin - the Council don't do mineral recycling!). I'll stick them to a wooden frame and "mortar" with exterior Pollyfilla.
Fortunately I don't need to worry about making convincing stone corners because NWNGR buildings used yellow brick for that.
Unfortunately that means I need to do the brick bits well!
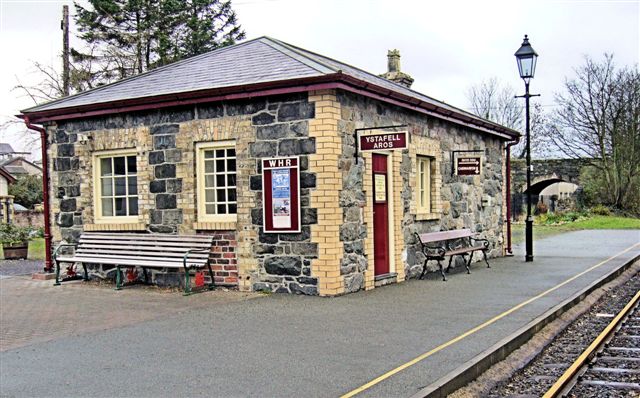
Your postings have inspired me to wonder whether foam board could be a good way of doing that, especially if I can split the slate to the same thickness.
Ian Stock used plasticard for slate roofs - lightly sanding black stuff looks surprisingly convincing, although his later buildings do use real slate. I'll give the latter a try, but as you said, I fear patience may be an issue...
All the best,
Andrew.