Busted bricks based steam loco

A place for discussing battery-electric locomotives, whether they're diesel, steam or even electric outline
Post Reply
Si
Trainee Fireman
Trainee Fireman
Posts: 116
Joined: Mon Sep 03, 2012 10:26 am

Busted bricks based steam loco

Post by Si » Tue Nov 05, 2013 1:47 pm

Based on the Busted Bricks budget 2wd chassis... the chassis was built and then chopped in half, one end was turned around and a fillet put in the middle to lengthen it (this was going to be for rail car but that never really got going properly).
So I decided to build a skirted steam engine as I have no steam on my railway. Obviously skirted because the Busted Bricks chassis is a model of a diesel and so doesn't have a motion.

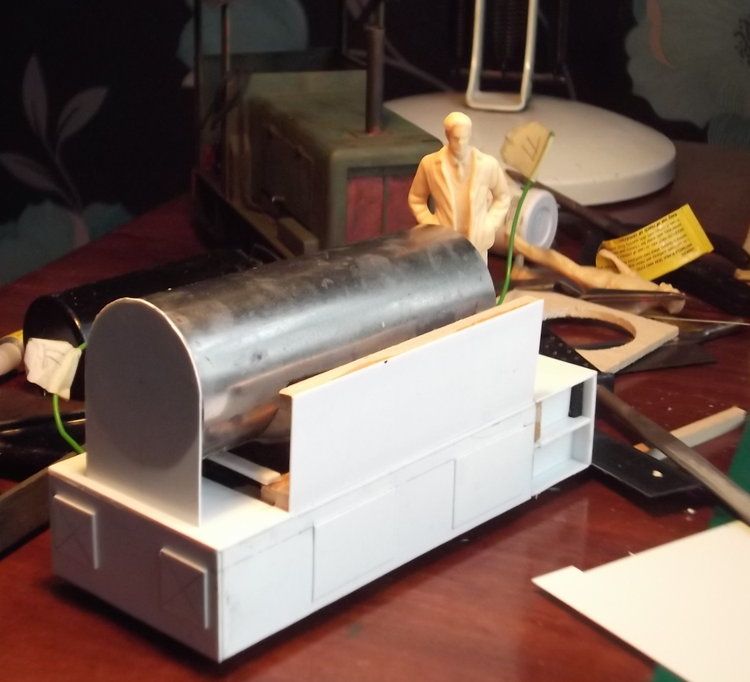
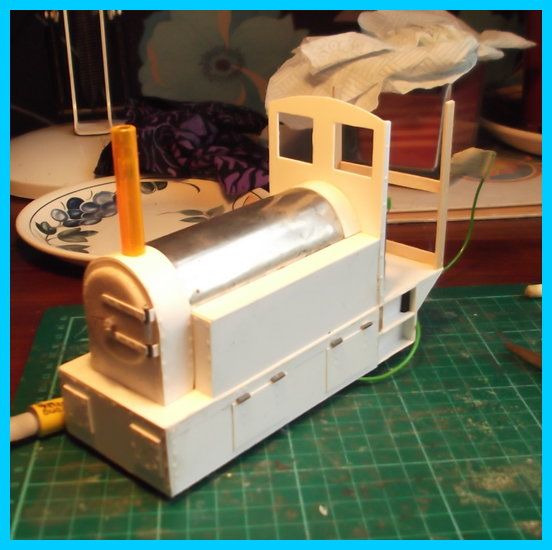
So here we have it with the skits applied to the chassis and a boiler made out of a sweetie tin (with hole cut for the motor).
Image

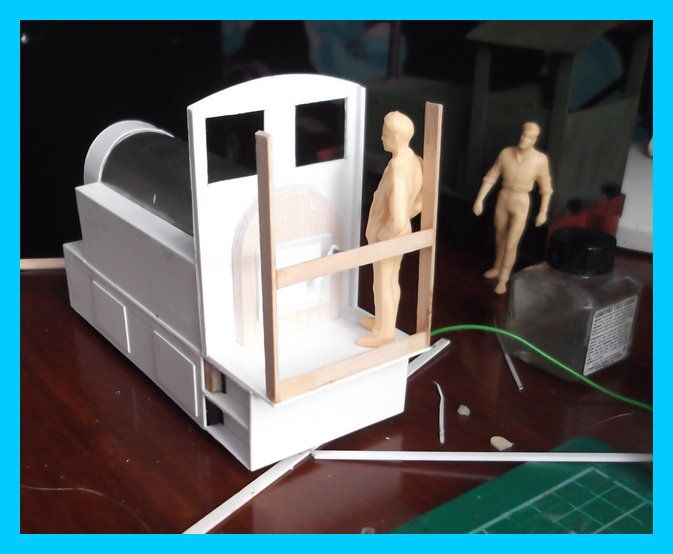
The side tank outers put on
Image

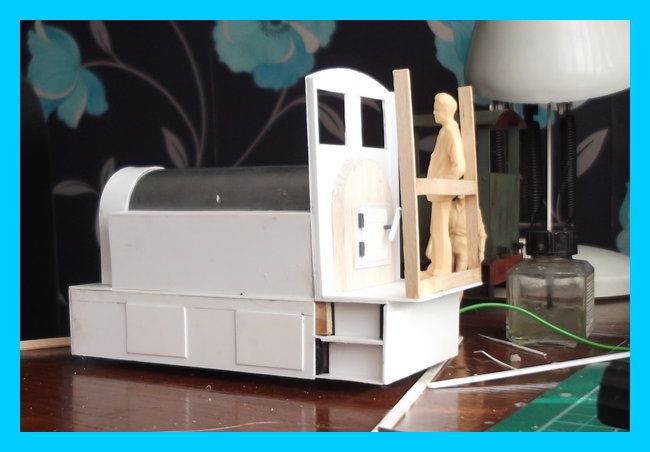
and the cab started with the fire box door added and the side tanks. The side tanks have an interference fit with the boiler (nice springy tin) and so no other fastening is needed to keep it in place.

Image

Image

QUESTIONS.......
..you will notice that the cab windows are square...this is due to my total inability to cut circular windows...how would you do it? Also, do you think that the cab is too short?

User avatar
sstjc
Fireman
Fireman
Posts: 442
Joined: Mon Dec 22, 2008 10:47 am
Location: Faversham Kent
Contact:

Post by sstjc » Tue Nov 05, 2013 2:28 pm

I love it Si... and no the cab is not too short for my taste. What sort of sweet tin was that?

Well done !
Regards
Barry

www.5inchrail.com

User avatar
dougrail
Driver
Driver
Posts: 1532
Joined: Mon Mar 14, 2011 5:11 pm
Location: Salopia; on the edge of Arcadia

Post by dougrail » Tue Nov 05, 2013 2:28 pm

Looks about the same length as a standard Mamod cab :)

Nice work there too - with the square windows and skirts, I'm seeing a GVT loco?

Si
Trainee Fireman
Trainee Fireman
Posts: 116
Joined: Mon Sep 03, 2012 10:26 am

Post by Si » Tue Nov 05, 2013 3:24 pm

Thanks for the comments. The tin is a Cadbury's Roses tin...will probably use it for the cab roof too as I find it much easier to form curves in tin than plastic card. Luckily my wife is a teacher and there are always lots of tins of chocs at the end of term!

Now I think about it it does look a tad GVT! However, this one is to have a tender (because the electrics are going to be a bit larger than usual due to having an auto reverse switch on them.)

Si
Trainee Fireman
Trainee Fireman
Posts: 116
Joined: Mon Sep 03, 2012 10:26 am

Post by Si » Fri Nov 22, 2013 3:14 pm

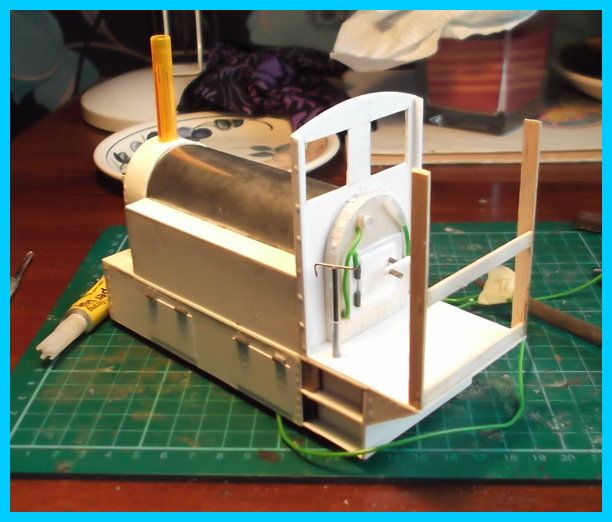
Bit more progress:

Image

Image

...alas the rivets are all wonky as I spilt the glue and had to apply them fast before it dried so did them all by Mk 1 eyeball rather than measuring and marking first.

Big Jim
Moderator
Moderator
Posts: 2694
Joined: Sat Jul 06, 2013 5:28 pm
Location: Near Llanelli

Post by Big Jim » Fri Nov 22, 2013 3:41 pm

You have made a nice job of that, don't forget to post some pics when it is all painted.

User avatar
Arcandier
Cleaner
Cleaner
Posts: 20
Joined: Fri Nov 22, 2013 7:27 am
Location: France

Post by Arcandier » Sat Nov 23, 2013 10:07 am

Well done. I really like it. Can't wait for the next step!

User avatar
GTB
Driver
Driver
Posts: 1559
Joined: Sat Mar 05, 2011 2:46 pm
Location: Australia

Re: Busted bricks based steam loco

Post by GTB » Sat Nov 23, 2013 11:21 am

Si:91373 wrote: QUESTIONS.......
..you will notice that the cab windows are square...this is due to my total inability to cut circular windows...how would you do it?  Also, do you think that the cab is too short?
It's coming along nicely.

Just noticed the questions.....

Round windows aren't a lot harder in polystyrene sheet than square ones and the process is much the same.

I use a pair of compasses to mark out the circle, then cut around roughly just inside the pencil line. The compasses that come in a school geometry set work fine for setting out the circle.

Then finish to the marked size using the curved side of a half round needle file, or an oval one. Don't try to do it with a round needle file, as the radius is too small and the edge of the opening will end up wavy.

Olfa sell circle cutters, which are basically compasses with a knife blade instead of a pencil. I've seen them in art shops, but never used one and I'm fairly sure they wouldn't be able to cut anything much thicker than 10 thou polystyrene sheet.

I prefer to open up the hole with a piercing saw, but a knife works just as well, just needs a bit more effort in thicker sheet.

If you want a raised rim on the window, glue a disc on the spectacle plate first and then open up the circular hole inside that disc, which makes it easier to keep the rim a constant width.

You'll get the hang of it with a bit of practice. ;)

Some steam locos. have square windows instead of round ones in any case....

The cab looks OK for a small diesel, but possibly a little short for a steamer, as the fireman usually needs space to swing a shovel. That said, some industrial steamers had very small cabs and the one man crew had to use a special short handled shovel.

Graeme
User avatar
MDLR
Driver
Driver
Posts: 4027
Joined: Thu Jan 15, 2009 10:38 pm
Location: Near Ripley, Derbyshire, UK
Contact:

Re: Busted bricks based steam loco

Post by MDLR » Sat Nov 23, 2013 1:57 pm

GTB:92150 wrote: I use a pair of compasses to mark out the circle, then cut around roughly just inside the pencil line. The compasses that come in a school geometry set work fine for setting out the circle.
If you were to use dividers, instead of a compass, you'd get a scribed circle which would make life much easier - start from the centre and take the hole out in cheese-shaped segments - the scribed lne acts as a "stop"............
Brian L Dominic
Managing Director
Flagg Fluorspar Co
www.mdlr.co.uk/ff.html

Si
Trainee Fireman
Trainee Fireman
Posts: 116
Joined: Mon Sep 03, 2012 10:26 am

Re: Busted bricks based steam loco

Post by Si » Mon Nov 25, 2013 7:47 pm

MDLR:92156 wrote:
GTB:92150 wrote: I use a pair of compasses to mark out the circle, then cut around roughly just inside the pencil line. The compasses that come in a school geometry set work fine for setting out the circle.
If you were to use dividers, instead of a compass, you'd get a scribed circle which would make life much easier - start from the centre and take the hole out in cheese-shaped segments - the scribed lne acts as a "stop"............
Now that sounds like a good idea..will try it that way next time, thanks.

User avatar
GTB
Driver
Driver
Posts: 1559
Joined: Sat Mar 05, 2011 2:46 pm
Location: Australia

Re: Busted bricks based steam loco

Post by GTB » Tue Nov 26, 2013 12:32 pm

Si:92281 wrote: Now that sounds like a good idea..will try it that way next time, thanks.
Let us know how you go.

I gave up using dividers years ago, as I prefer to mark out with pencil and I use a 0.3mm Pentel draughting pencil.

As I remember from when I used dividers, the scribing point can tend to dig into the plastic and walk the pivot point out of the centre pop. This can be minimised by using small dividers for things like portholes and drilling a smale hole for the pivot. I dug out the spring dividers I used to use and they were 2" size ones from a drawing instrument set.

I also largely gave up on scribe and snap years ago, as the break rarely follows a curved score line any accuracy. If you don't leave a cleanup allowance, the hole will end up bigger than the original scribe line by the time you have cleaned it up.

I still use scribe and snap to cut large sheets down to manageable size, as I buy polystyrene in 1500 x 750mm sheets. That is simple straight lines though and even those need a rub with a sanding block to square up the edge.

Have fun....
Graeme

BEYNAK.
Cleaner
Cleaner
Posts: 7
Joined: Thu Dec 12, 2013 1:46 pm

Post by BEYNAK. » Thu Dec 12, 2013 2:04 pm

Great job ! What's up ?

jim@NAL
Driver
Driver
Posts: 1115
Joined: Sun Sep 23, 2012 11:01 am
Location: haverhill suffok

Post by jim@NAL » Mon Dec 16, 2013 10:11 pm

looking good lots of detail in there

Si
Trainee Fireman
Trainee Fireman
Posts: 116
Joined: Mon Sep 03, 2012 10:26 am

Post by Si » Tue Dec 17, 2013 2:58 pm

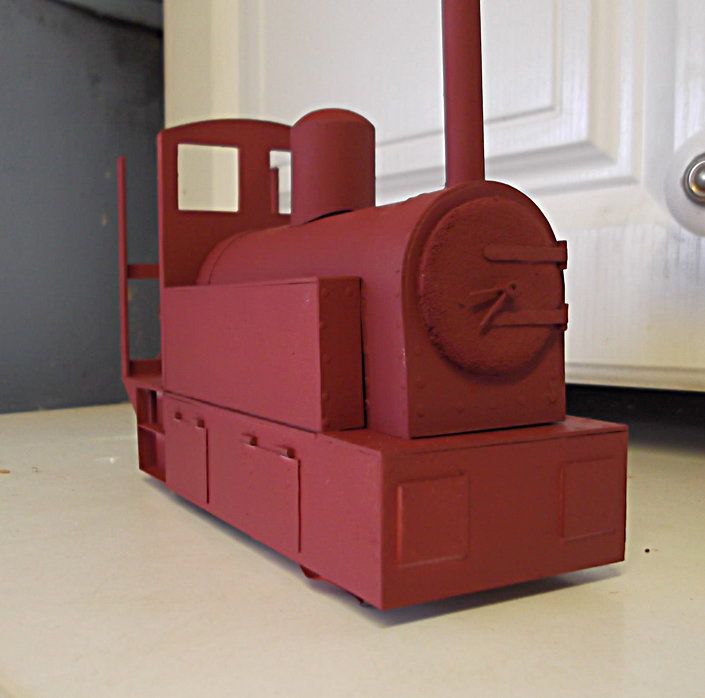
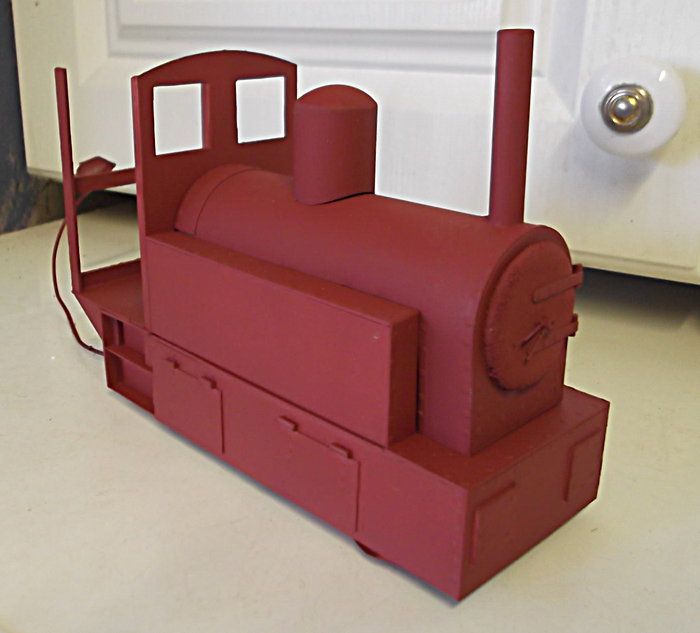
Latest progress - first spray to find all the imperfections and gaps:

Image

Image

..and boy are there a lot of imperfections and gaps!

User avatar
BIGNY
Cleaner
Cleaner
Posts: 18
Joined: Mon Mar 24, 2014 8:30 am
Location: France

Post by BIGNY » Sun Mar 30, 2014 1:52 pm

Great work. Can't wait for the next step !

Si
Trainee Fireman
Trainee Fireman
Posts: 116
Joined: Mon Sep 03, 2012 10:26 am

Post by Si » Thu Aug 14, 2014 4:45 pm

It's been a long time since I did any work on this loco, apart from paint it. As the saying goes..."other scales get in the way".


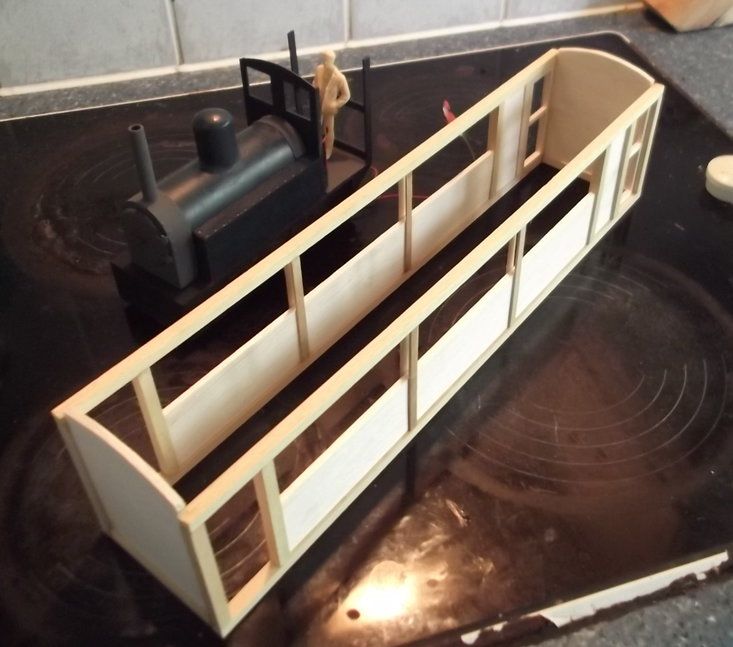
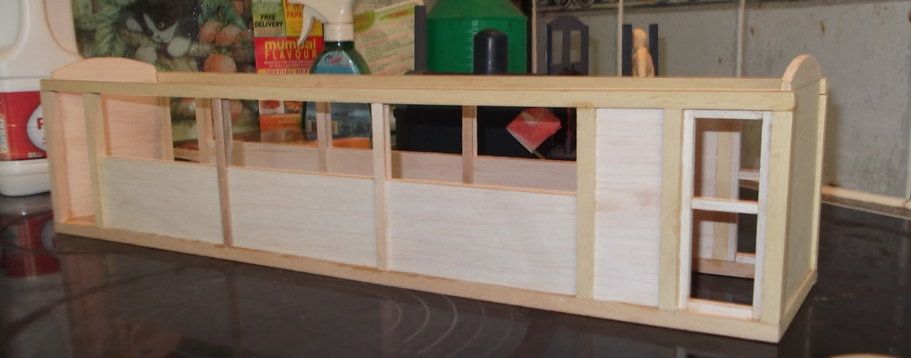
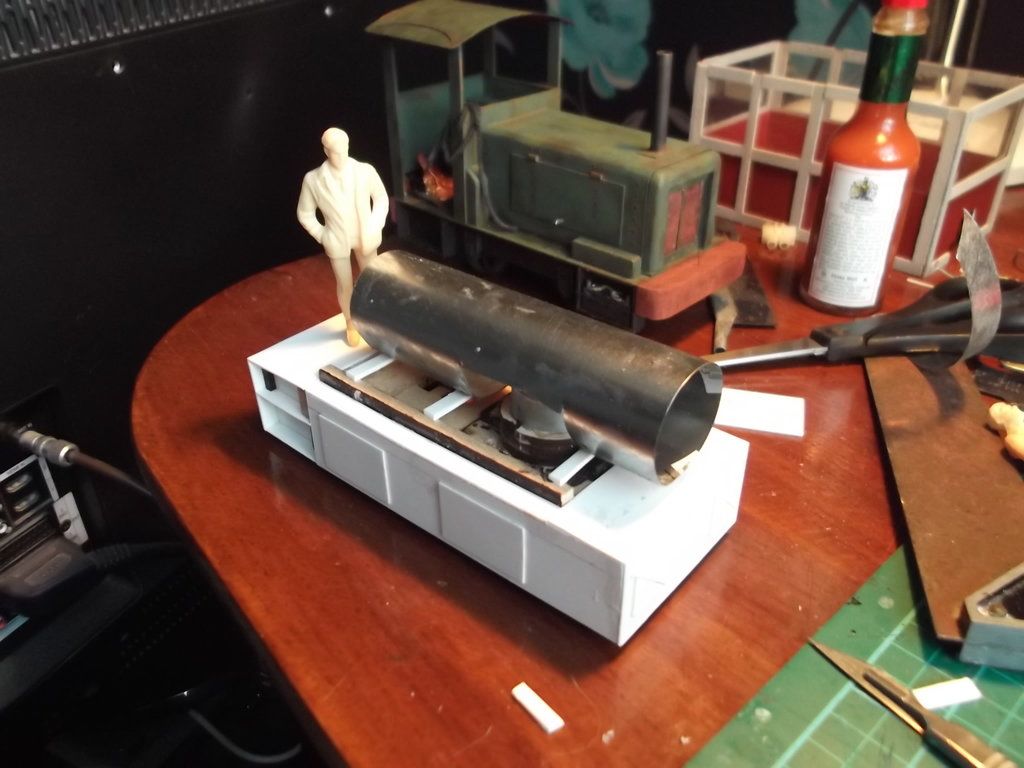
I've decided to turn it into a motor rail auto coach type thingy, with a single bogied coach permanently coupled. Two reasons for this: it uses fewer wheel sets, and having a coach permanently coupled to it gives me more room for battery storage. So, I've started bodging a coach together, and, blimey, ain't coaches big in this scale!!!!! I've just measured one of my 7mm coaches and doubled the dimensions...yes, yes, I know the old adage that states that you should make models of prototypes not other models...but my railway, my rules..


In the photos below you can see the engine and the start of the coach. You will notice that the engine is now a horrible shade of grey/blue....no, I didn't like it either so have just bought some nice bright red so that it'll stand out in the garden better. Why is it sat on the top of the cooker you ask - the ceramic hob gives a nice flat, level surface for sticking the various body panels together. It's made from balsa, coffee stirrers and some other kind of wood, and stuck together with pound-shop super glue. Not decided yet if it will be glazed or semi-open...probably semi-open due to my idleness.

Image

Image

Si
Trainee Fireman
Trainee Fireman
Posts: 116
Joined: Mon Sep 03, 2012 10:26 am

Post by Si » Thu Aug 28, 2014 5:37 pm

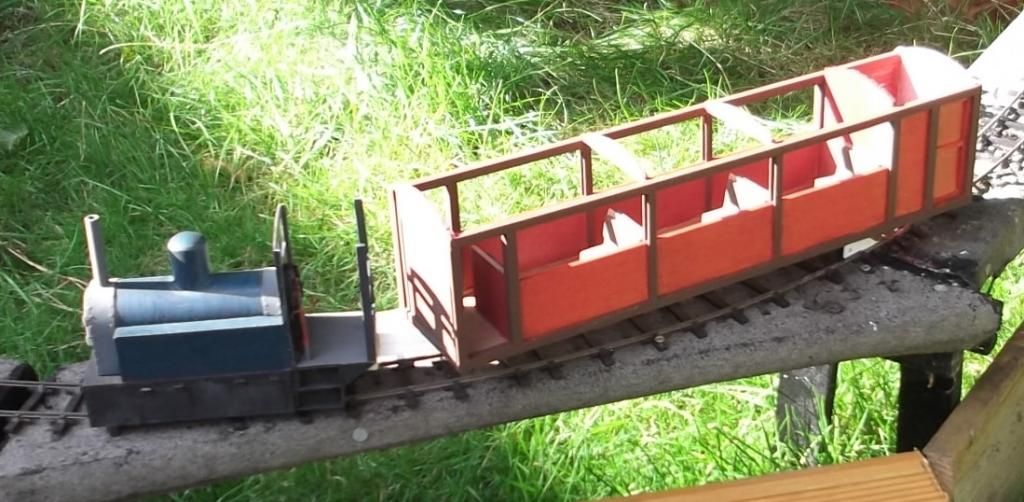
Have built a bogie (possibly with slightly under sized wheels?), connected up the lectric, put the coupling on, added some seats, and splashed a bit of paint around.

AND had it running! The skirt on the dalek does seem a bit low - catches on one track screw and the various debris on the line, but apart from that seems to run OK. The link between the dalek andthe coach was left deliberately sloppy, thus compensating for the small flanges on the coach wheels...no derailments yet. I think it might benefit from a bit more weight over the drive wheels as it's 2wd and I had a brain fade and set it up so the drive wheels were the front pair, thus the weight of the coach reduces grip <rolls eyes>

Image

Image

Si
Trainee Fireman
Trainee Fireman
Posts: 116
Joined: Mon Sep 03, 2012 10:26 am

Post by Si » Mon May 25, 2015 2:21 pm

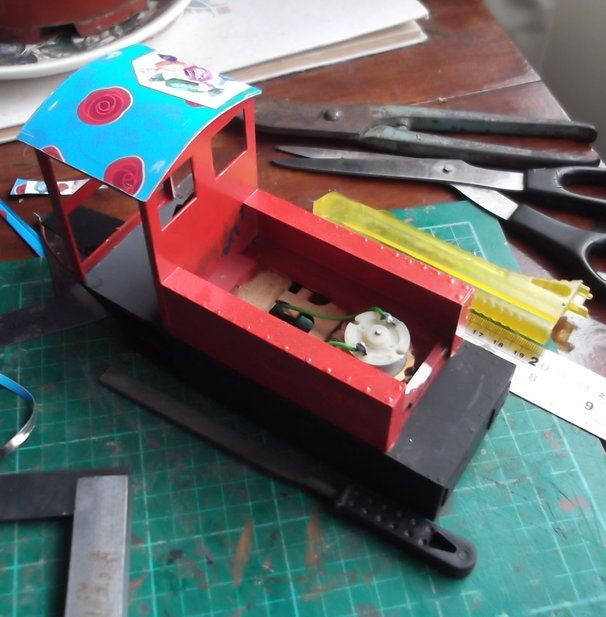
A year and a half since I started and finally got the engine roof on! Decided that I didn't like the paint job so have started to repaint. And she now has a name: "Rosie", can you guess why?

Image

User avatar
ge_rik
Administrator
Administrator
Posts: 6593
Joined: Sun Oct 25, 2009 10:20 pm
Location: Cheshire
Contact:

Post by ge_rik » Mon May 25, 2015 6:20 pm

Coming along nicely. The beauty of freelance narrow gauge stock is that it always ends up looking right. And this looks just right!

Rik
------------------------
Peckforton Light Railway - Blog Facebook Youtube

Post Reply

Who is online

Users browsing this forum: No registered users and 2 guests