

Rik
Yr Hen Felin & Yr Orsaf Newydd
Re: Yr Hen Felin & Yr Orsaf Newydd
Wow, Phil. You're a lot more meticulous than me. I'd have just done it by eye...... 
Rik
Rik
-
gilfachphil
- Trainee Fireman

- Posts: 176
- Joined: Sun Nov 24, 2019 11:00 am
- Location: West Wales
Re: Yr Hen Felin & Yr Orsaf Newydd
I find it easier to do it this way, everything lines up the same every time. This block of wood was used for the seats in the previous coach and the other end of it to do the luggage racks.
Phil
Phil
Re: Yr Hen Felin & Yr Orsaf Newydd
Thanks Phil, I will get around to giving them a call.
That chair jig is brilliant by the way, got to keep them correct hey...
That chair jig is brilliant by the way, got to keep them correct hey...
ROD
Life is so easy when I run my trains.


https://gardenrails.org/forum/viewtopic ... 41&t=11364
https://www.youtube.com/@fairywoodlightrailway
Life is so easy when I run my trains.


https://gardenrails.org/forum/viewtopic ... 41&t=11364
https://www.youtube.com/@fairywoodlightrailway
-
gilfachphil
- Trainee Fireman
- Posts: 176
- Joined: Sun Nov 24, 2019 11:00 am
- Location: West Wales
Re: Yr Hen Felin & Yr Orsaf Newydd
Platform experients.
The recycled plastic sheet I am using for the platform surface is textured, a bit of a regular geometric pattern but fine from a normal viewing distance. The material does not accept glues, the surface is a bit 'oily'. I wanted to get an edging so have been playing with various ways of doing it. in all cases I masked off an area of a spae piece of the board
This shows the result of several coats of exterior wall paint straight onto the board. It is difficult to fill in the pattern and the paint creeps under the edge of the masking tape into the diamonds!
In Peter Butler's thread there has been discussion of filler putties, I have Perfect Plastic Putty and car body filler putty. This photo shows the result of two coats of PPP followed by two of the paint, much better filling of the pattern and a much better edge, BUT the PPP is not water proof.
In both of the above cases I scribed across the finish to mark individual paving stones quite successfully.
Two layers of Holts Cataloy scraped on, allowed to dry fully then sanded lightly before two coats of paint. The masking tape mostly pulled off leaving a good edge, scribing across the white band caused lumps to chip out of the Cataloy, a knife drawn across did not give a good line, simplest to use an HB pencil. I quite like this version, only 18' of platform edge to do.
Lastly a view showing the platform face but not the detail of the white surface.
Phil
The recycled plastic sheet I am using for the platform surface is textured, a bit of a regular geometric pattern but fine from a normal viewing distance. The material does not accept glues, the surface is a bit 'oily'. I wanted to get an edging so have been playing with various ways of doing it. in all cases I masked off an area of a spae piece of the board
- IMG_3658.jpeg (3.49 MiB) Viewed 4779 times
- IMG_3657.jpeg (3.16 MiB) Viewed 4779 times
In both of the above cases I scribed across the finish to mark individual paving stones quite successfully.
- IMG_3656.jpeg (3.14 MiB) Viewed 4779 times
Two layers of Holts Cataloy scraped on, allowed to dry fully then sanded lightly before two coats of paint. The masking tape mostly pulled off leaving a good edge, scribing across the white band caused lumps to chip out of the Cataloy, a knife drawn across did not give a good line, simplest to use an HB pencil. I quite like this version, only 18' of platform edge to do.
- IMG_3659.jpeg (3.32 MiB) Viewed 4779 times
Lastly a view showing the platform face but not the detail of the white surface.
Phil
-
Peter Butler

- Driver

- Posts: 5266
- Joined: Sun Sep 09, 2012 10:33 pm
- Location: West Wales
Re: Yr Hen Felin & Yr Orsaf Newydd
Just out of curiosity I searched Google to find more information about the use of white lines on platform edges. I already knew they were introduced during WW2 for safety reasons on commuter lines etc. However, there were instances where they were not required and I doubt very much that narrow gauge lines would have needed them at all? Many NG lines had little in the way of identifiable platform at the time, let alone edging!
The best things in life are free.... so why am I doing this?
-
gilfachphil
- Trainee Fireman
- Posts: 176
- Joined: Sun Nov 24, 2019 11:00 am
- Location: West Wales
Re: Yr Hen Felin & Yr Orsaf Newydd
Thanks Peter,
I think it will probably look better with some sort of edging rather than just the black plastic. Maybe some grey paint would be better than the white, I'll have to look out for some match pots to play with. Having said that, the Cataloy paste is grey!
Phil
I think it will probably look better with some sort of edging rather than just the black plastic. Maybe some grey paint would be better than the white, I'll have to look out for some match pots to play with. Having said that, the Cataloy paste is grey!
Phil
-
gilfachphil
- Trainee Fireman
- Posts: 176
- Joined: Sun Nov 24, 2019 11:00 am
- Location: West Wales
Re: Yr Hen Felin & Yr Orsaf Newydd
Making the curved roofs.
The kit contains a pair of jigs to hold the roof spars in position whilst gluing together. I found this difficult to clamp up and so mounted the ply jig pieces either side of an appropriate width piece of timber which is more solid and easier to clamp to:-
This shows my 'deluxe' jig for the two compartment coach with the roof spars inserted. I sanded the slots in the jigs slightly to allow the spars to fit a little looser since it would be difficult to remove the roof from the jig doing it this way. I have only put glue on one of the two central spars in case the middle partition wall is not exactly in the right place, the roof should then fit one way round at least!
Here is the assembly clamped together.
I did the one for the guard's van yesterday afternoon using a smaller jig, there are three spars for that. The clamps held the roof tightly at the edges but there was a little play in the centre so I clamped the assembly to the bench with a piece of timber along the centre of the roof. All seemed well when I left it to dry but this morning I found:-
The pressure obviously got too much over the extended period. I'm hoping Michael carries some spare parts!
Phil
The kit contains a pair of jigs to hold the roof spars in position whilst gluing together. I found this difficult to clamp up and so mounted the ply jig pieces either side of an appropriate width piece of timber which is more solid and easier to clamp to:-
- IMG_3675.jpeg (2.12 MiB) Viewed 4724 times
This shows my 'deluxe' jig for the two compartment coach with the roof spars inserted. I sanded the slots in the jigs slightly to allow the spars to fit a little looser since it would be difficult to remove the roof from the jig doing it this way. I have only put glue on one of the two central spars in case the middle partition wall is not exactly in the right place, the roof should then fit one way round at least!
- IMG_3676.jpeg (2.1 MiB) Viewed 4724 times
Here is the assembly clamped together.
I did the one for the guard's van yesterday afternoon using a smaller jig, there are three spars for that. The clamps held the roof tightly at the edges but there was a little play in the centre so I clamped the assembly to the bench with a piece of timber along the centre of the roof. All seemed well when I left it to dry but this morning I found:-
- IMG_3662.jpeg (2.21 MiB) Viewed 4724 times
The pressure obviously got too much over the extended period. I'm hoping Michael carries some spare parts!
Phil
-
Peter Butler
- Driver
- Posts: 5266
- Joined: Sun Sep 09, 2012 10:33 pm
- Location: West Wales
Re: Yr Hen Felin & Yr Orsaf Newydd
That's bad luck Phil, possibly deeper score lines in the roof panel might help next time?
Here's another jig for your growing collection.....
Many roof panels are a similar radius so this can be adapted to fit by adding spacers as appropriate. I use a hardwood batten along the centre line with clamps at either end, this allows full view of the correct positioning of each spar.
Hope that helps.
Here's another jig for your growing collection.....
- IMG_5909.JPG (84.39 KiB) Viewed 4718 times
- IMG_5910.JPG (78.47 KiB) Viewed 4718 times
Hope that helps.
The best things in life are free.... so why am I doing this?
Re: Yr Hen Felin & Yr Orsaf Newydd
Oops!
Hopefully you will get replacement parts, but if not it shouldn't be too difficult to make your own. Fingers crossed
Hopefully you will get replacement parts, but if not it shouldn't be too difficult to make your own. Fingers crossed

Phil
Sporadic Garden Railer who's inconsistencies know no bounds
My Line - https://gardenrails.org/forum/viewtopic ... 41&t=11077
Sporadic Garden Railer who's inconsistencies know no bounds
My Line - https://gardenrails.org/forum/viewtopic ... 41&t=11077

Re: Yr Hen Felin & Yr Orsaf Newydd
I'd have thought that a small dab of white glue in each of those breaks and then careful manipulation should enable it all to go back togther. A length of wood/styrene or whatever of the correct distance from apex to eaves under the centre line then clamp/weight down it to a flat board should see it all back as it should be?
Philip
-
gilfachphil
- Trainee Fireman
- Posts: 176
- Joined: Sun Nov 24, 2019 11:00 am
- Location: West Wales
Re: Yr Hen Felin & Yr Orsaf Newydd
I wondered about that but the breaks are very splintery so getting them back together would be quite tricky. The spars are also detached from the roof now too!philipy wrote: ↑Sun Sep 17, 2023 1:50 pm I'd have thought that a small dab of white glue in each of those breaks and then careful manipulation should enable it all to go back togther. A length of wood/styrene or whatever of the correct distance from apex to eaves under the centre line then clamp/weight down it to a flat board should see it all back as it should be?
Phil
PS further to the above I had another look at them and found they would re-align quite well so I have injected Veritas Chair Doctor glue from my useful things shelf to see what happens.
Re: Yr Hen Felin & Yr Orsaf Newydd
If that doesn't work Phil, I use 0.8mm plywood and soak it in warm water for half a minute and it will go in to any shape you want it to, so long as you cut the piece length ways with the grain. It will glue in place easily with no problem. I use Everbuild super glue put on with a straightened paperclip. It soaks in brilliantly, but do both sides like Jerry Irwin tells us in his videos and you'll have no problem.
Look on eBay or Amazon, you will find loads of suppliers. Or anyone on the internet...
Look on eBay or Amazon, you will find loads of suppliers. Or anyone on the internet...
ROD
Life is so easy when I run my trains.
https://gardenrails.org/forum/viewtopic ... 41&t=11364
https://www.youtube.com/@fairywoodlightrailway
Life is so easy when I run my trains.
https://gardenrails.org/forum/viewtopic ... 41&t=11364
https://www.youtube.com/@fairywoodlightrailway
-
gilfachphil
- Trainee Fireman
- Posts: 176
- Joined: Sun Nov 24, 2019 11:00 am
- Location: West Wales
Re: Yr Hen Felin & Yr Orsaf Newydd
Getting there!
I glued a narrow spar, which I have spares of, to each of the three repaired ones. Once set (nearly anyway!) I fixed the three repaired spars in the jig with some blu-tack to keep them aligned:-
Then I spread glue along them and inverted the jig onto the roof and clamped it. The extra narrow spars at the ends are loose but help keep the curvature:-
Turning the whole lot up the other way it quickly became clear that the spars were deforming again so I removed the middle clamps which are much stronger and wedged with two screwdrivers to keep the spars in shape, crossed fingers and left overnight:-
Phil
I glued a narrow spar, which I have spares of, to each of the three repaired ones. Once set (nearly anyway!) I fixed the three repaired spars in the jig with some blu-tack to keep them aligned:-
- IMG_3679.jpeg (2.6 MiB) Viewed 4549 times
Then I spread glue along them and inverted the jig onto the roof and clamped it. The extra narrow spars at the ends are loose but help keep the curvature:-
- IMG_3680.jpeg (2.26 MiB) Viewed 4549 times
Turning the whole lot up the other way it quickly became clear that the spars were deforming again so I removed the middle clamps which are much stronger and wedged with two screwdrivers to keep the spars in shape, crossed fingers and left overnight:-
- IMG_3681.jpeg (2.34 MiB) Viewed 4549 times
Phil
-
gilfachphil
- Trainee Fireman
- Posts: 176
- Joined: Sun Nov 24, 2019 11:00 am
- Location: West Wales
Re: Yr Hen Felin & Yr Orsaf Newydd
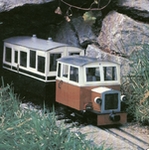
Whilst the glue was drying, thoroughly this time, I worked on handles and wheels.
This morning:-
Phil
This morning:-
- IMG_0187.jpeg (1.76 MiB) Viewed 4547 times
Phil
Re: Yr Hen Felin & Yr Orsaf Newydd
They are looking great Phil. Do you intend to varnish or paint them..
ROD
Life is so easy when I run my trains.
https://gardenrails.org/forum/viewtopic ... 41&t=11364
https://www.youtube.com/@fairywoodlightrailway
Life is so easy when I run my trains.
https://gardenrails.org/forum/viewtopic ... 41&t=11364
https://www.youtube.com/@fairywoodlightrailway
-
gilfachphil
- Trainee Fireman
- Posts: 176
- Joined: Sun Nov 24, 2019 11:00 am
- Location: West Wales
Re: Yr Hen Felin & Yr Orsaf Newydd
Rod,
the one on the right is the finished one. The finish is being applied to the parts before assembly, wood stains and varnish. The roofs of the two new ones will be painted.
Phil
the one on the right is the finished one. The finish is being applied to the parts before assembly, wood stains and varnish. The roofs of the two new ones will be painted.
Phil
Re: Yr Hen Felin & Yr Orsaf Newydd
Nice Phil.
ROD
Life is so easy when I run my trains.
https://gardenrails.org/forum/viewtopic ... 41&t=11364
https://www.youtube.com/@fairywoodlightrailway
Life is so easy when I run my trains.
https://gardenrails.org/forum/viewtopic ... 41&t=11364
https://www.youtube.com/@fairywoodlightrailway
-
gilfachphil
- Trainee Fireman
- Posts: 176
- Joined: Sun Nov 24, 2019 11:00 am
- Location: West Wales
Re: Yr Hen Felin & Yr Orsaf Newydd
The roof structures complete and ready for a couple of coats of varnish underneath.
Phil
- IMG_0188.jpeg (2.27 MiB) Viewed 4435 times
Phil
Re: Yr Hen Felin & Yr Orsaf Newydd
Lovely looking coaches. Good work.
Phil
Sporadic Garden Railer who's inconsistencies know no bounds
My Line - https://gardenrails.org/forum/viewtopic ... 41&t=11077
Sporadic Garden Railer who's inconsistencies know no bounds
My Line - https://gardenrails.org/forum/viewtopic ... 41&t=11077
Who is online
Users browsing this forum: No registered users and 1 guest