Page 1 of 1
Scratchbuilding a 'Rye & Camber' style coach
Posted: Tue Nov 24, 2020 10:53 am
by Tom85
Hi everyone,
I'm planning my next scratchbuilding project - a 'Rye & Camber' style coach, to go with my Bagnall 2-4-0. It will ride on tried-and-tested IP engineering small bogies, and the rest will be contructed from good old plasticard sheets.
The Rye and Camber only ever had two proper coaches, which were altered several times over their lives. Mine will have balcony ends, which at least one of the prototypes had at some point in its life, just because I like the look.
I've got a few questions for the more experienced scratchbuilders on here, if anyone can help?
Painting plasticard - this still seems to be hit and miss for me. Is there a 'right' way to do it? Does it need priming first? And do you spray or brush paint your models?
For the interior, I'm hoping for a varnished wood look, is there a way to acheive this with plasticard?
Finally, the outside of the prototype was vertical wood panelling (as usual, no idea what the correct term would be). I was thinking of modelling this by first building the bodysides in, say, 1.5mm plasticard, then adding individual strips of thinner plasticard next to each other as an overlay. How does this sound - is there a better way of doing it?
As with my other projects I'll share my updates.
Cheers everyone,
Tom
Re: Scratchbuilding a 'Rye & Camber' style coach
Posted: Tue Nov 24, 2020 11:54 am
by philipy
A couple of answers for you.
Painting styrene is simple, personaly I use Halfords grey rattle can primer. They do a plastic primer in spray can as well, although I've never noticed any real difference myself.
For your external vertical palnking, again personaly I wouldn't do it as you suggest. It's difficult to keep the edges crisp because the solvent will tend to soften them, plus with all the solvent you need to do that there will probably be a long term slow warping as the solvent dries out. a much better technique (IMO of course!) is to scribe the planking on to the surface of a thickish piece of plastic, the only thing to be careful of is that it will tend to try to curl so you'll need stiffening at the back.
Re: Scratchbuilding a 'Rye & Camber' style coach
Posted: Tue Nov 24, 2020 4:49 pm
by Peter Butler
Totally agree with Philip, rattle can grey primer is a good basecoat which will not hide detail and give a matt surface to take either spray or brush paint finish. For brush painting I use 'Citadel' acrylics which are excellent and dry without leaving brush strokes.
For panelling effect, as Philip suggests, scribe planking on flat sheet before assembly. Mark out the lines and use a Stanley type knife blade against a steel rule. Keep the bade at 90 degrees to the edge to make a 'V' groove, finish by light sanding any raised edges.
If you want to give timber grain effect use a razor saw blade drawn along sideways with the grain to make fine random lines, again, a light sanding will help.....

- IMG_2991.JPG (126.92 KiB) Viewed 5560 times

- IMG_2987.JPG (90.31 KiB) Viewed 5560 times
Re: Scratchbuilding a 'Rye & Camber' style coach
Posted: Wed Nov 25, 2020 8:10 am
by GTB
The only thing I'd add to what Peter and Philip have said, is that I use a specific tool for scribing boards, door frames etc. onto polystyrene sheet....
I do all my scribing with an Olfa P-cutter that I bought 40+ yrs ago. It is still using the original blade as I keep it just for scribing plastic. These days the tool is called an Olfa PC-S and the handle shape has changed, but it does the same job......
https://www.olfa.co.jp/products/product ... ail/32/270
Tamiya also sell a badge engineered version under their own label as a 'Plastic Scriber II'.
In use the hook shaped blade of a p-cutter removes a long spiral piece of swarf leaving a clean v-groove in the surface of the plastic.
Graeme
Re: Scratchbuilding a 'Rye & Camber' style coach
Posted: Wed Nov 25, 2020 11:03 am
by -steves-
Hi Tom
Do you have any drawings for this coach as it's something I am particularly interested in?
Cheers
Steve
Re: Scratchbuilding a 'Rye & Camber' style coach
Posted: Wed Nov 25, 2020 1:39 pm
by Andrew
Good idea!
Re the interior, I've been looking on some smaller scale forums to see how they deal with reproducing LNER teak carriages etc. They seem to take a variety of approaches, but most seem to be variations on (prime, then) add a basecoat, then washes of high and low-lights - guess that'd work better if you'd scribed some detail for the washes to settle in.
Another option (which I go for) would be to make an inner wall in either manila card or thin wood and then varnish it...
Looking forward to seeing how you get on...
Andrew.
Re: Scratchbuilding a 'Rye & Camber' style coach
Posted: Thu Nov 26, 2020 1:58 pm
by GTB
When I built the Irish passenger carriages out of white polystyrene I wanted a stained wood effect for the interior so I painted the interior a buff colour and then gave it a wash of brown paint using a stiff bristle brush to give a faux woodgrain finish.
I also made up wooden seats and stained them. Once the windows and roof were fitted it was difficult to see anything inside.......

When I built the American style passenger cars, I still fitted the seats, but decided to just paint the interior buff. It's close to impossible to see any difference between the different interior treatments. I wouldn't leave interiors white though.
There's an interior photo of one of my US type cars in the build article here. The way I make seats is also shown.
https://gardenrails.org/viewtopic.php?f=39&t=10173
From memory the walls were painted a desert sand camoflage colour, the floor was painted dark brown and the ceiling is the same very light grey used to simulate the opal glass in the clerestory windows. There's also a photo there of both types of finished carriages, but outside in the sun there's not much of the interior visible.
I'd agree with Andrew, if fully detailing the inside of a passenger carriage is something that appeals, the best way of getting a stained wood effect would probably be to use the real thing. ie. Panel out the interior using pieces of a suitable wood veneer and stain it to get the desired colour. I've seen photos of one of the Bachmann cars detailed this way and it looked very good, with the roof removed.
I built a guards van a while ago for the timber tram and built the model out of wood and ply. The prototype was fairly rudimentary and didn't have glass windows, so the interior is easily visible and is finished with wood stain. I'm happy with how that turned out and I doubt I could match the effect with just paint and polystyrene sheet.
Regards,
Graeme
Re: Scratchbuilding a 'Rye & Camber' style coach
Posted: Mon Nov 30, 2020 8:30 pm
by Tom85
Hi everyone, sorry for the late reply but thank you all very much for the very useful feedback. I'll let you know how I get on with the project.
Re: Scratchbuilding a 'Rye & Camber' style coach
Posted: Wed Dec 02, 2020 10:46 am
by FWLR
Hi Tom,
This is how most of us do the scribing on Plasticard mate.
1. Mark 10mm lines spaced equally apart. Don't worry too much if the last one is smaller in width. Just place the smaller width at the bottom of your build all around.
Also there is no need to buy expensive tools to mark the grain. Just use an wide toothed modelling saw or like I and others do, a hacksaw blade with a short tooth by inch blade, eg: 14 (tpi) 18 (tpi) etc. Even the junior blades are ok, but I find them hard to hold. The more pressure you put on the blade will dictate how deep the grain is. I start with a deep grain, then less pressure for lighter grains. You can also use the back of safety blades, but I prefer small flat screwdrivers heads. I also actually use the bigger hacksaw blade to mark the 10mm lines first, then use the same blade for the grain. And yes you can smooth the rough bits that will appear in the scribing and marking out the board lines especially for the edges, sometimes I will leave them to get a more "rough wood" look.

- 2673B774-359A-4273-9E68-4D2A63D049D0_1_105_c.jpeg (169.85 KiB) Viewed 5297 times
2. Depending on how much you want to "stain" the piece depends on how much base coat you put on.
Light Base Coat ...

- F84F96A1-9663-4484-BE22-7F4FC3DCE68E_1_105_c.jpeg (124.74 KiB) Viewed 5297 times
= Light Stain
Also wipe your brush first before applying the paint. Too much and you won't get the effect you want. I also use an old sponge to wipe the excess off if I have put too much on.
- 6C4D6011-4E49-4D89-9B8E-56D275019D25_1_105_c.jpeg (136.58 KiB) Viewed 5297 times
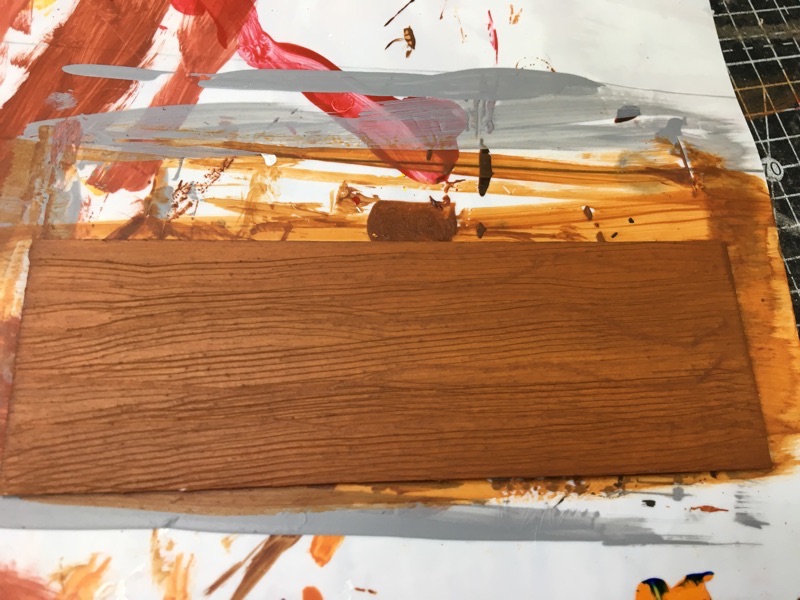
3. Medium Base Coat...

- 4D129712-4475-4B5F-A05E-A6684DC734D4_1_105_c.jpeg (126.72 KiB) Viewed 5297 times
= Medium Stain

- DF11AD41-9508-4270-A437-C7D6C4B1851D_1_105_c.jpeg (133.88 KiB) Viewed 5297 times
4. Dark Base Coat...

- 4A1EA401-08C2-49EE-AA7D-C7C0168DCD4B_1_105_c.jpeg (84.56 KiB) Viewed 5297 times
= Dark Stain

- D6969A91-09A6-4787-BD67-CA1A1165DD92_1_105_c.jpeg (134.69 KiB) Viewed 5297 times
I tend to go for light to medium stain, it's the same for whichever colour you use. But remember the lighter or darker the finished effect. the lighter or darker the finish is.
It's all about practice until you get what you what to achieve. Good luck and hopefully you will end up with some very impressive model builds.
Re: Scratchbuilding a 'Rye & Camber' style coach
Posted: Thu Dec 03, 2020 2:47 pm
by Tom85
Oh looks great, cheers! I will definitely give that a go!
Re: Scratchbuilding a 'Rye & Camber' style coach
Posted: Thu Dec 03, 2020 3:09 pm
by Jimmyb
Rod the planking wood grain effect is really great looking, a couple of questions, the base I assume is your favourite acrylic or enamel paint, however for the stain, this actual wood stain or a further coat of "brown" paint.
Re: Scratchbuilding a 'Rye & Camber' style coach
Posted: Fri Dec 04, 2020 9:34 am
by FWLR
Hi Tom,
The base coat can be any colour you like. I do like to use grey, but I also use white which is good for the brighter colours. It can be "stain" or again whatever colour you what to use. If it is grey of course for the top coat, then just use that.
If I want a grey top coat, I use a thin black and wipe it off before it dries for in-between the planks scribing, it gives and makes them standout more.
Stain can be a wash or proper stain, but I really only use stain's for bare wood. It's all practise and fun really to see what works for you. I generally use off cuts and bits of what ever material I am using to see what effect I can achieve. Sometimes I do get it wrong.....
Try things out and have fun Tom. Thats what our hobby is about isn't it, having fun and enjoying what we do hey.

Re: Scratchbuilding a 'Rye & Camber' style coach
Posted: Fri Dec 04, 2020 11:23 am
by philipy
Tom,
This is a slight deviation from the topic but I was browsing through a book of plans by the 7mm Association this morning and I noticed that they have a drawings of the R & C Golf Links station building. You might already know of it, but if it's of interest, let me know.
Re: Scratchbuilding a 'Rye & Camber' style coach
Posted: Fri Dec 04, 2020 11:36 am
by Andrew
philipy wrote: ↑Fri Dec 04, 2020 11:23 am
Tom,
This is a slight deviation from the topic but I was browsing through a book of plans by the 7mm Association this morning and I noticed that they have a drawings of the R & C Golf Links station building. You might already know of it, but if it's of interest, let me know.
Is that the one with the lovely wavy bargeboards?
Re: Scratchbuilding a 'Rye & Camber' style coach
Posted: Fri Dec 04, 2020 7:28 pm
by philipy
Andrew wrote: ↑Fri Dec 04, 2020 11:36 am
philipy wrote: ↑Fri Dec 04, 2020 11:23 am
Tom,
This is a slight deviation from the topic but I was browsing through a book of plans by the 7mm Association this morning and I noticed that they have a drawings of the R & C Golf Links station building. You might already know of it, but if it's of interest, let me know.
Is that the one with the lovely wavy bargeboards?
The gable ends have wavy bargeboards on a corrugated iron roof.
Re: Scratchbuilding a 'Rye & Camber' style coach
Posted: Sat Dec 05, 2020 7:52 am
by ge_rik
Hi Tom
I concur with everything that has been said so far - ie scribing and Halfords rattle cans.
I'd also suggest investing in a tube of Squadron White Putty (I get mine from Eileen's Emporium). No matter how carefully you cut and join your plasticard parts, there are bound to be some gaps that need filling. I usually fill and sand down before applying a couple of coats of grey primer. The primer then shows up any gaps and dints which I missed, so I apply more filler. The primer will need a light sanding anyway, so sanding the filler at this stage fits in quite neatly.
Another coat of primer and then the top coat can go on . I use Halfords car paint aerosols for the top coat on coaches (Vauxhall Burgundy Red) and rub down lightly before a couple of light coats of Halfords clear lacquer.
The secret is to apply a few light coats of spray, turning the model round and over between coats, rather than trying to do it all in one go. They recommend 15 minutes drying between coats so it doesn't take too long. But I know Peter and others get really great results with careful brush painting. It just depends on what you feel most comfortable with.
Rik
Re: Scratchbuilding a 'Rye & Camber' style coach
Posted: Sat Dec 05, 2020 8:50 am
by philipy
ge_rik wrote: ↑Sat Dec 05, 2020 7:52 am
I'd also suggest investing in a tube of Squadron White Putty (I get mine from Eileen's Emporium).
Yes, magic stuff!
Re: Scratchbuilding a 'Rye & Camber' style coach
Posted: Sat Dec 05, 2020 11:51 am
by Peter Butler
ge_rik wrote: ↑Sat Dec 05, 2020 7:52 am
I use Halfords car paint aerosols for the top coat on coaches (Vauxhall Burgundy Red) and rub down lightly before a couple of light coats of Halfords clear lacquer.
The secret is to apply a few light coats of spray, turning the model round and over between coats, rather than trying to do it all in one go. They recommend 15 minutes drying between coats so it doesn't take too long. But I know Peter and others get really great results with careful brush painting. It just depends on what you feel most comfortable with.
Rik
Halford's acrylic aerosols are good and have a wide colour selection, 'Burgundy Red' (paint and wine) is also a personal choice! Light coats are preferable for an even coating, as with the clear lacquer. For a less shiny surface I add a spray of Satin Lacquer on top.
Brush painting, using Citadel Acrylics, is next to impossible to mess-up as they dry perfectly smooth. Naturally it is sometimes simpler to brush areas with less masking required than with spray paints.
For goods vehicles a matt finish is preferable and a grey primer spray gives a good covering to begin any weathering finish. Otherwise, brush painting with acrylics (following the primer coat) and a clear matt spray top coat to seal the paint will do the trick.
I can't comment on the putty as I have never used one.
Re: Scratchbuilding a 'Rye & Camber' style coach
Posted: Sun Dec 06, 2020 10:03 am
by FWLR
Peter Butler wrote: ↑Sat Dec 05, 2020 11:51 am
For goods vehicles a matt finish is preferable and a grey primer spray gives a good covering to begin any weathering finish. Otherwise, brush painting with acrylics (following the primer coat) and a clear matt spray top coat to seal the paint will do the trick.
I can't comment on the putty as I have never used one.
That's probably because you are that good at building models with Plasticard Peter.