Please let it be the neighbour sunbathing topless!ge_rik wrote: ↑Sat Jul 04, 2020 8:11 amWe all do something similar at some point .... Well I did. Except in my case I stepped down off the railway on to a garden chair after cutting the hedge - the chair collapsed....... One neighbour dashed through the house to my rescue. My wife was quite oblivious until the neighbour rushed through the house.
Rik
FINAL NEW FWLR LINE
-
Peter Butler

- Driver

- Posts: 5266
- Joined: Sun Sep 09, 2012 10:33 pm
- Location: West Wales
Re: NEW FWLR LINE
The best things in life are free.... so why am I doing this?


Re: NEW FWLR LINE
No, not on this occasion. He kept his shirt on ......
Rik
Re: NEW FWLR LINE
That's one of the things I love about this forum, funny banter... 
ROD
Life is so easy when I run my trains.


https://gardenrails.org/forum/viewtopic ... 41&t=11364
https://www.youtube.com/@fairywoodlightrailway
Life is so easy when I run my trains.


https://gardenrails.org/forum/viewtopic ... 41&t=11364
https://www.youtube.com/@fairywoodlightrailway
Re: NEW FWLR LINE
Been busy since I last posted with needing to redo the tunnel (Sigh) it collapsed completely after the next door neighbours cat episode  Still it was a blessing in that I am glad it happened before anything was able to run in it...
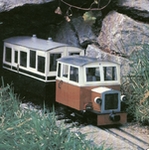
I have, well we have now almost completed the track on the raised bed, just a couple of lengths to put on. I am was shattered after eight hours with an half hour dinner and a 10 minute break in the afternoon, felt like I was back at work.... I am aching today though, but hopefully it will all be worth it.
Couple of photos showing our progress.
The middle photo is where I need to finish putting the last couple of track lengths.
The last photo is where Anne has suggested I put an engine shed, more work..It's the middle bit of line that is floating about..
Anne has put the houses on and put where she wants the plants. I leave all that up to her. I have still got to finish the track at the back of the house, I am contemplating having a turntable there has at the moment it will only be used has an end to end. The last photo of the track shows were I need to put a left hand point, but budget restrictions ie: not much left in the monthly state pension.. mains I will need to save up for one. Have you seen the prices for them now and secondhand are almost impossible to find.
There is still a lot to do yet. I have started to make the tunnel portals and I still have a building to finish, plus...you get the picture. Lines are never completely finished are they.
I have, well we have now almost completed the track on the raised bed, just a couple of lengths to put on. I am was shattered after eight hours with an half hour dinner and a 10 minute break in the afternoon, felt like I was back at work....
Couple of photos showing our progress.
- 33FF4501-2C5E-4B5C-94CC-2324F111DC39.jpeg (239.62 KiB) Viewed 9412 times
The middle photo is where I need to finish putting the last couple of track lengths.
- D8778029-A9E9-4A2B-B34D-33B5B062C01C.jpeg (226.73 KiB) Viewed 9412 times
The last photo is where Anne has suggested I put an engine shed, more work..It's the middle bit of line that is floating about..
- 04217868-E9F3-437F-9132-542AA7AC7A2D.jpeg (232.91 KiB) Viewed 9412 times
Anne has put the houses on and put where she wants the plants. I leave all that up to her. I have still got to finish the track at the back of the house, I am contemplating having a turntable there has at the moment it will only be used has an end to end. The last photo of the track shows were I need to put a left hand point, but budget restrictions ie: not much left in the monthly state pension..
There is still a lot to do yet. I have started to make the tunnel portals and I still have a building to finish, plus...you get the picture. Lines are never completely finished are they.
ROD
Life is so easy when I run my trains.
https://gardenrails.org/forum/viewtopic ... 41&t=11364
https://www.youtube.com/@fairywoodlightrailway
Life is so easy when I run my trains.
https://gardenrails.org/forum/viewtopic ... 41&t=11364
https://www.youtube.com/@fairywoodlightrailway
Re: NEW FWLR LINE
On the question of points. Would a normal left hand medium point, I am using medium points already, or a Y medium be better, as I will be at some point ( No pun ) be taking the line around the bush at the back of the house.
ROD
Life is so easy when I run my trains.
https://gardenrails.org/forum/viewtopic ... 41&t=11364
https://www.youtube.com/@fairywoodlightrailway
Life is so easy when I run my trains.
https://gardenrails.org/forum/viewtopic ... 41&t=11364
https://www.youtube.com/@fairywoodlightrailway
Re: NEW FWLR LINE
Looks like it's coming along nicely, Rod. Will be good when it's fully up and running.
Rik
Rik
Re: NEW FWLR LINE
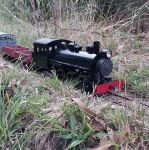
Finally got around to fixing the name plates for my Roundhouse "Billy". It's only been just under 3 years since I bought them from Narrow Planet and that is after I lost/misplaced the first ones they did for me
Her she is with her new name plates.
I am rather proud of her, as she is dedicated to my partner Anne. Who has and is a tower for me. She has been there all through my health problems and even helped in the construction of our new line and done so much for me.
Sorry for the last sentences, I do get carried away sometimes....
Her she is with her new name plates.
- A4C99C47-F90A-40D2-8B25-7BA6021A3838.jpeg (218.14 KiB) Viewed 9075 times
- A91F0BF6-397D-4250-B831-4A6020CED9FC.jpeg (200.45 KiB) Viewed 9075 times
I am rather proud of her, as she is dedicated to my partner Anne. Who has and is a tower for me. She has been there all through my health problems and even helped in the construction of our new line and done so much for me.
Sorry for the last sentences, I do get carried away sometimes....
ROD
Life is so easy when I run my trains.
https://gardenrails.org/forum/viewtopic ... 41&t=11364
https://www.youtube.com/@fairywoodlightrailway
Life is so easy when I run my trains.
https://gardenrails.org/forum/viewtopic ... 41&t=11364
https://www.youtube.com/@fairywoodlightrailway
-
gregh
- Trainee Driver

- Posts: 572
- Joined: Sun Apr 01, 2018 5:44 am
- Location: Sydney, Australia
- Contact:
Re: NEW FWLR LINE
Don't apologise to us - Tell HER.FWLR wrote: ↑Fri Aug 07, 2020 9:02 am I am rather proud of her, as she is dedicated to my partner Anne. Who has and is a tower for me. She has been there all through my health problems and even helped in the construction of our new line and done so much for me.
Sorry for the last sentences, I do get carried away sometimes....
Great loco too.
Greg from downunder.
The Sandstone & Termite's website: https://members.optusnet.com.au/satr/satr.htm
The Sandstone & Termite's website: https://members.optusnet.com.au/satr/satr.htm
-
Peter Butler
- Driver
- Posts: 5266
- Joined: Sun Sep 09, 2012 10:33 pm
- Location: West Wales
Re: NEW FWLR LINE
Looks good Rod, nice compliment to her.
The best things in life are free.... so why am I doing this?


Re: NEW FWLR LINE
Does 45mm Billy have wheels on outside of the chassis
-
Peter Butler
- Driver
- Posts: 5266
- Joined: Sun Sep 09, 2012 10:33 pm
- Location: West Wales
Re: NEW FWLR LINE
No, not on this model. Gauge is adjustable within the frames simply by sliding the wheels on the axle and locking with a grub-screw.
The best things in life are free.... so why am I doing this?
Re: NEW FWLR LINE
Hi Rod
HAving been absent on here for some time I find you have made some great progress but also sadly had a nasty fall. Do be carefull. I had one last year I was on the top of a twelve tread step ladder which topled over fortunately it tipped away but I fell about straight down onto my back.
I like the look of the new line and it looks like you are enjoying it.
Don
Re: NEW FWLR LINE
I have Greg, that's why I named my Billy after her....gregh wrote: ↑Fri Aug 07, 2020 9:36 amDon't apologise to us - Tell HER.FWLR wrote: ↑Fri Aug 07, 2020 9:02 am I am rather proud of her, as she is dedicated to my partner Anne. Who has and is a tower for me. She has been there all through my health problems and even helped in the construction of our new line and done so much for me.
Sorry for the last sentences, I do get carried away sometimes....
Great loco too.
ROD
Life is so easy when I run my trains.
https://gardenrails.org/forum/viewtopic ... 41&t=11364
https://www.youtube.com/@fairywoodlightrailway
Life is so easy when I run my trains.
https://gardenrails.org/forum/viewtopic ... 41&t=11364
https://www.youtube.com/@fairywoodlightrailway
-
Tropic Blunder
- Trainee Fireman

- Posts: 189
- Joined: Sun Dec 06, 2015 4:02 am
- Location: Australia
- Contact:
Re: NEW FWLR LINE
Nice billy Rod it does look rather fetching in that red! Glad to hear you have such a supportive partner in your hobby and in life. its always a bit easier when we have someone who cares about us watching our back
Jake

Re: NEW FWLR LINE
Anne went and bought something for the line........
And this one too....It was looking into the new tunnel.
After sometime in building the portals, I am not the fastest builder. They are now in place on the line.
First was to cut some board to put what I was intending to use for the portals. Then I used DAS air modelling clay for the stone work. I used a sculpting tool to make the stonework.
This is the smaller portal for the tunnel near the property.
And this larger one is for the other end....
I have put a name plaque on both of them. Anne likes them....
And they are finally fitted to the tunnel.
The smaller one has a little bit more smoke weathering because it is the start of the end to end line, so I felt it needed to have more of it....
- 28DB3276-B4F0-4D71-93D9-57FADF1D00ED.jpeg (240.56 KiB) Viewed 8897 times
- 4F87A850-6B68-4439-9116-828237EDDFFF.jpeg (201.14 KiB) Viewed 8897 times
And this one too....It was looking into the new tunnel.
- 24B198C6-2AEE-40AE-B9CE-2E194345474B.jpeg (134.22 KiB) Viewed 8897 times
- 9A065D29-8CB2-4AF8-B982-CD771661F838.jpeg (102.36 KiB) Viewed 8897 times
After sometime in building the portals, I am not the fastest builder. They are now in place on the line.
First was to cut some board to put what I was intending to use for the portals. Then I used DAS air modelling clay for the stone work. I used a sculpting tool to make the stonework.
- 761F4255-C929-4518-98A6-88FA868C1037.jpeg (121.98 KiB) Viewed 8897 times
- A4B8D99F-2BBF-4A55-8986-E92E97211A70.jpeg (146.32 KiB) Viewed 8897 times
This is the smaller portal for the tunnel near the property.
- 389FB808-A056-44A0-934A-A04BDA0303DD.jpeg (122.61 KiB) Viewed 8897 times
And this larger one is for the other end....
- 129360D5-EF15-4D56-B56D-3C7AB523C460.jpeg (130.7 KiB) Viewed 8897 times
I have put a name plaque on both of them. Anne likes them....
And they are finally fitted to the tunnel.
- C9DCE275-6CB3-4C03-917A-295AF9D56813.jpeg (208.42 KiB) Viewed 8897 times
- 359851F2-8CEB-46E7-91C8-C102BEBA3540.jpeg (185.68 KiB) Viewed 8897 times
- 25133D9F-1D99-405F-AB81-F98B4590FFFD.jpeg (208.41 KiB) Viewed 8897 times
The smaller one has a little bit more smoke weathering because it is the start of the end to end line, so I felt it needed to have more of it....
ROD
Life is so easy when I run my trains.
https://gardenrails.org/forum/viewtopic ... 41&t=11364
https://www.youtube.com/@fairywoodlightrailway
Life is so easy when I run my trains.
https://gardenrails.org/forum/viewtopic ... 41&t=11364
https://www.youtube.com/@fairywoodlightrailway
-
Sylvian Tennant

- Fireman

- Posts: 327
- Joined: Wed Aug 10, 2011 4:48 pm
- Location: Teesside
Re: NEW FWLR LINE
I wouldn't complain if I found those fairies in my garden. Cracking job so far mate.
Last edited by Sylvian Tennant on Sat Aug 15, 2020 8:47 pm, edited 1 time in total.
Facebook - https://www.facebook.com/Area51Models/
Instagram - https://www.instagram.com/area51greumach/
Instagram - https://www.instagram.com/area51greumach/
-
Peter Butler
- Driver
- Posts: 5266
- Joined: Sun Sep 09, 2012 10:33 pm
- Location: West Wales
Re: NEW FWLR LINE
Well done Rod, just remember to take your tunnel portals inside if it looks like rain, DAS is not waterproof and will soon soften if it gets wet.
The best things in life are free.... so why am I doing this?

Re: NEW FWLR LINE
Great work Rod - both loco and tunnel mouths looking excellent!
Re: NEW FWLR LINE
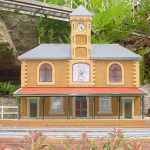
Now it's been sometime since I have posted on my own thread...It's mainly due to my health situation. I get tied very quickly and that has meant it takes some time doing any builds, but I have now finished two builds, so I will post the first one now, it will have of the build and unfortunately I didn't take any photos when I started it. But it's not hard to work out what I started with hopefully. It's just a sort of square box.....
After we (Anne) and I finished laying the track on the raised bed, the line that came out of the bush by the back of the house was left short so we could have a turntable. In time we are going to put an extension from the out of the tunnel around the bush and there will also be a short length of line for a steam up/start of the line. So here is some photos of the build, sorry it may be a lot of photos...The other build has even more.......
The turntable ( t-t ) by the time I had built the lampposts and the office was about 2 and half months old I made the lampposts from 6mm copper pipe and the shades are my trusted toothpaste tops and the office is just Plasticard that hides the wiring for the lampposts, the switch is hidden in the log store. It is a bit under scale for 32mm, it's more like O gauge, well I think it's O, it maybe smaller, anyway it looks the part I think...I did the corrugated roof from metallic sheet that was crimped with one of those crimpers you can buy. It' not perfect because it all depends on how much pressure you put on the rollers, take it from me it's not easy to do...I made two walls out of 4mm cardboard that I saved from a bit of flat packed furniture that was around the inside of the packaging. It was fairly easy to bend and secure with small pieces of wood laid down on the inside and outside of two lengths of it. Then I filled it with some small cork pieces bought from a Model Farm site that use it for ballast for the laying of roads....Don't ask... Painted it green, it looks ok I think.Then I have some of that stuff the smaller gauge guys use for their layouts has bushes and stuff. It did what I wanted it for, to hide the outside of the wall.
The t-t was put on a lazy-susan, the actual t-t is on a small top from a bedside table, it looks ok I think...
Next was to build a platform of some description for the turning of the t-t. So after looking for some ideas online I came up with my own take on one. It is just a basic box build and lengths cut up to make the posts and rails. The roof is more corrugated sheet, but this time it's some I had left from my garage build. The cost of that stuff has gone up too much for me to spend on now, that's why I used that metallic sheet for the office.
Anne downloaded some pictures of steam gauges and made the gauges and the levers while I was laid up for a few days.
I think she did an excellent job for a first timer who has no experience at all at modelling.....
For some reason my photos aren't loading properly, so I will need to put another post up quickly has I am getting tired now.....
After we (Anne) and I finished laying the track on the raised bed, the line that came out of the bush by the back of the house was left short so we could have a turntable. In time we are going to put an extension from the out of the tunnel around the bush and there will also be a short length of line for a steam up/start of the line. So here is some photos of the build, sorry it may be a lot of photos...The other build has even more.......
The turntable ( t-t ) by the time I had built the lampposts and the office was about 2 and half months old
- 83154A5D-CF05-4EB7-AF6B-7F9FD401779F.jpeg (492.18 KiB) Viewed 7999 times
- 2B75294A-3136-4A6D-BCB5-CADFCCD05283.jpeg (496.6 KiB) Viewed 7999 times
- 7390B761-2AEA-4895-87A5-0D8ADEB0CEAD.jpeg (485.23 KiB) Viewed 7999 times
The t-t was put on a lazy-susan, the actual t-t is on a small top from a bedside table, it looks ok I think...
Next was to build a platform of some description for the turning of the t-t. So after looking for some ideas online I came up with my own take on one. It is just a basic box build and lengths cut up to make the posts and rails. The roof is more corrugated sheet, but this time it's some I had left from my garage build. The cost of that stuff has gone up too much for me to spend on now, that's why I used that metallic sheet for the office.
Anne downloaded some pictures of steam gauges and made the gauges and the levers while I was laid up for a few days.
- 0919D42B-DB32-4327-B103-568557B58B79.jpeg (30.3 KiB) Viewed 7999 times
- 0154742E-8434-4906-95A9-8F4D94AA3C39_4_5005_c.jpeg (23.48 KiB) Viewed 7999 times
- 09C21A6C-9A92-4BF8-8C65-4B424CC90079.jpeg (123.44 KiB) Viewed 7999 times
- 2DDBDB27-0CC1-4A6A-B2C7-2C72DB9D3D05.jpeg (129.75 KiB) Viewed 7999 times
- D5C87D6E-8E3D-476F-8171-8FA098000027.jpeg (139.22 KiB) Viewed 7999 times
- 3B241ACB-A428-47EA-BB44-2956BB2EF526.jpeg (161.97 KiB) Viewed 7999 times
- Attachments
-
- F1DB5DDE-62F9-401F-8664-961E11426C8E.jpeg (273.13 KiB) Viewed 7999 times
ROD
Life is so easy when I run my trains.
https://gardenrails.org/forum/viewtopic ... 41&t=11364
https://www.youtube.com/@fairywoodlightrailway
Life is so easy when I run my trains.
https://gardenrails.org/forum/viewtopic ... 41&t=11364
https://www.youtube.com/@fairywoodlightrailway
Re: NEW FWLR LINE
Some more photos of the Turntable.
The little bridge was again made from off cuts of Plasticard.
The vacuum pipes are made from electric wire wound around some insulating sleeves and some offset plastic tubes for the connectors. I have forgotten to put some security chain on them.
These are taken outside on the line.
I need to come up with something to keep the Turntable in place for the locos to get onto the it.....
Hope it's ok for you guys. Know there are been a discussion on the forum about the use of turntables on narrow gauge lines, but I have seen them myself, so I thought it would be ok to put one on ours....
- 8893AB10-BA8D-4873-80B3-C3F9540F6BF8.jpeg (477.88 KiB) Viewed 7999 times
- 1BDE849A-BBBF-4080-ABD2-689339B3914E.jpeg (484.04 KiB) Viewed 7999 times
- 01B7D206-56F5-416F-B0D6-5EB76BA5E448.jpeg (471.74 KiB) Viewed 7999 times
- F112C181-28F8-450C-B505-B2290D89EA77.jpeg (483.04 KiB) Viewed 7999 times
- 17841059-27B6-46D7-918A-DD90599E7403.jpeg (461.01 KiB) Viewed 7999 times
- 58525FA4-65AE-4ABC-959E-3D5C2D6E1F41.jpeg (465.64 KiB) Viewed 7999 times
- 7DA07E11-EF03-4E0D-9F6B-BFEF67BBB07B.jpeg (471.85 KiB) Viewed 7999 times
These are taken outside on the line.
- C659E22E-1F36-4D8E-BD16-7FED61A99156.jpeg (485.9 KiB) Viewed 7999 times
- 7A0F3D0A-4BBB-49F5-B38D-2A85B344D6B4.jpeg (476.24 KiB) Viewed 7999 times
- D936C483-B418-4501-AC56-573396B5B7F4.jpeg (484.92 KiB) Viewed 7999 times
- 6787B6B5-FD6D-475F-B92E-0629C0720A4B.jpeg (474.29 KiB) Viewed 7999 times
I need to come up with something to keep the Turntable in place for the locos to get onto the it.....
Hope it's ok for you guys. Know there are been a discussion on the forum about the use of turntables on narrow gauge lines, but I have seen them myself, so I thought it would be ok to put one on ours....
- Attachments
-
- E1734419-B5A5-4EC3-A3DA-E0F88ADD8C4D.jpeg (478.7 KiB) Viewed 7999 times
ROD
Life is so easy when I run my trains.
https://gardenrails.org/forum/viewtopic ... 41&t=11364
https://www.youtube.com/@fairywoodlightrailway
Life is so easy when I run my trains.
https://gardenrails.org/forum/viewtopic ... 41&t=11364
https://www.youtube.com/@fairywoodlightrailway
Who is online
Users browsing this forum: No registered users and 1 guest