Thanks Al, I had thought about scratch building but there are so many other things to do! Besides, Cain lives only a few miles from me and I have been to his workshop where he has his buildings on display on his own railway. I was so impressed I couldn't resist buying this one and will certainly go back for more.
Apart from this introduction to his structures I have no business connection with Cain.
Time to build a railway...but where?
-
Peter Butler

- Driver

- Posts: 5707
- Joined: Sun Sep 09, 2012 10:33 pm
- Location: West Wales
-
Peter Butler
- Driver
- Posts: 5707
- Joined: Sun Sep 09, 2012 10:33 pm
- Location: West Wales
Several projects in the pipeline at the moment.... my engine shed has had a primer paint coat to show mortar lines when I pick out the individual stonework. The roof has been sheeted with a 1mm Plasticard layer stuck onto the plywood, which in turn has been treated with a generous coat of SBR to give extra protection against the wet. I am currently waiting for a delivery of black Plasticard sheet to cut slates which I will bond to the roof in strips. I thought that would be simpler than trying to stick individual strips direct to plywood.
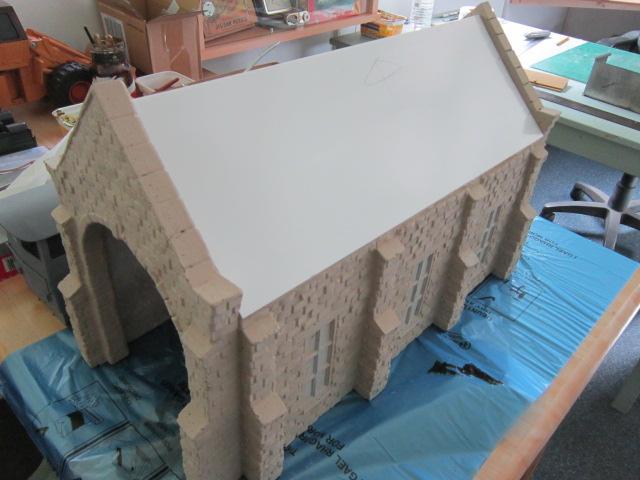
The doors have been made for the shed and fitted with a working hasp and staple from 'Model Earth'. Also expected in the post are working strap hinges from doll's house suppliers.


Another ongoing project has been the coal storage which will be in the coal yard. I have now got to the stage where a polystyrene base has been added to form the piles of coal. As before, these have been painted black and are now ready to be covered with real coal.
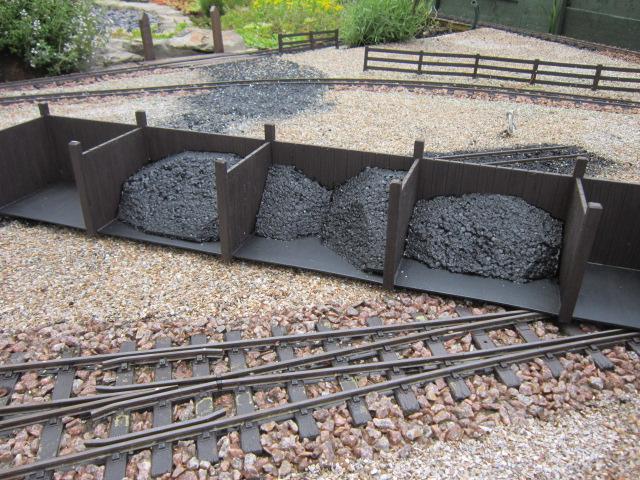
And there's more..........
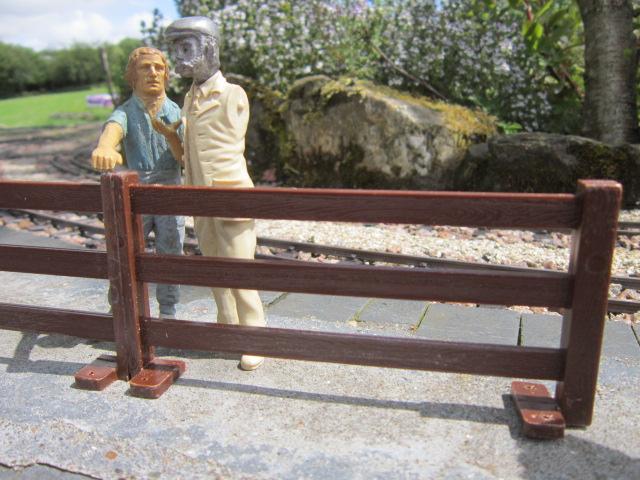
a recent trip to a charity shop unearthed some plastic fencing These were offered with a load of animals, farm and others, of a variety of scales and quality. None of them any use to me, but the ten panels of fencing came for just £1.00. Better still, after trimming the posts to angles to follow my curved track, the plastic stuck together with solvent, making a good strong join.

More to come.......
The doors have been made for the shed and fitted with a working hasp and staple from 'Model Earth'. Also expected in the post are working strap hinges from doll's house suppliers.
Another ongoing project has been the coal storage which will be in the coal yard. I have now got to the stage where a polystyrene base has been added to form the piles of coal. As before, these have been painted black and are now ready to be covered with real coal.
And there's more..........
a recent trip to a charity shop unearthed some plastic fencing These were offered with a load of animals, farm and others, of a variety of scales and quality. None of them any use to me, but the ten panels of fencing came for just £1.00. Better still, after trimming the posts to angles to follow my curved track, the plastic stuck together with solvent, making a good strong join.
More to come.......
The best things in life are free.... so why am I doing this?
-
Peter Butler
- Driver
- Posts: 5707
- Joined: Sun Sep 09, 2012 10:33 pm
- Location: West Wales
Some time back I acquired a tractor which I modified, details were included in this thread at the time. I have now found the perfect use for it by putting it in my coal yard. But..... a tractor without any implements is as good as a bath with no water!
What it needed was a loader, so I have scratch built a hydraulic loading bucket to give it a purpose.
Before....

After....

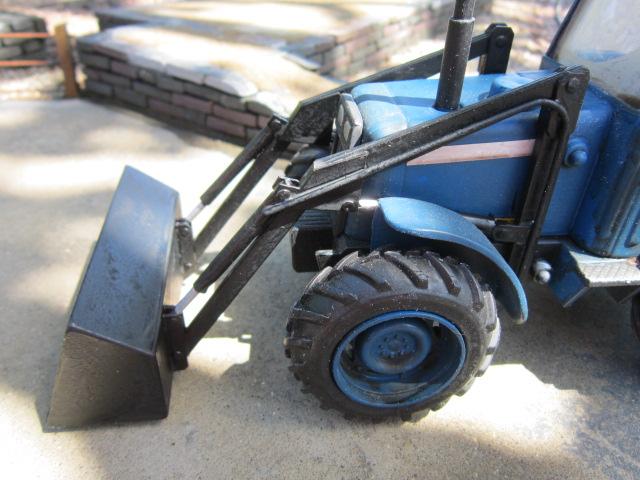
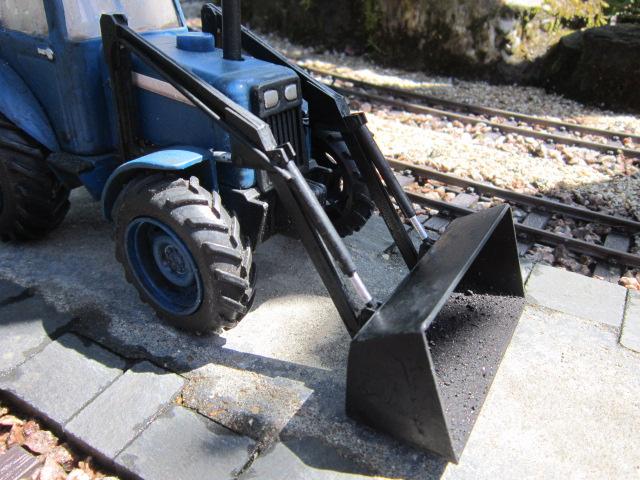
I have given it a sprinkle of coal dust in the wet paint for effect!
What it needed was a loader, so I have scratch built a hydraulic loading bucket to give it a purpose.
Before....
After....
I have given it a sprinkle of coal dust in the wet paint for effect!
The best things in life are free.... so why am I doing this?
-
ge_rik
- Administrator

- Posts: 7946
- Joined: Sun Oct 25, 2009 10:20 pm
- Location: Cheshire
- Contact:
-
Peter Butler
- Driver
- Posts: 5707
- Joined: Sun Sep 09, 2012 10:33 pm
- Location: West Wales
-
ge_rik
- Administrator
- Posts: 7946
- Joined: Sun Oct 25, 2009 10:20 pm
- Location: Cheshire
- Contact:

-
Peter Butler
- Driver
- Posts: 5707
- Joined: Sun Sep 09, 2012 10:33 pm
- Location: West Wales
A little more detail to the shed today.... The doors have been fitted with their hinges and attached to the building. The hinges are a great find and work well. They come in a gloss black finish with brass pins supplied. I have painted them dark grey matt finish which looks much better.
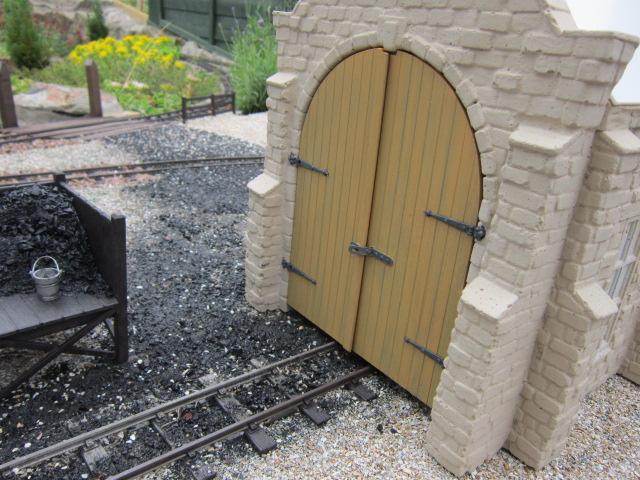
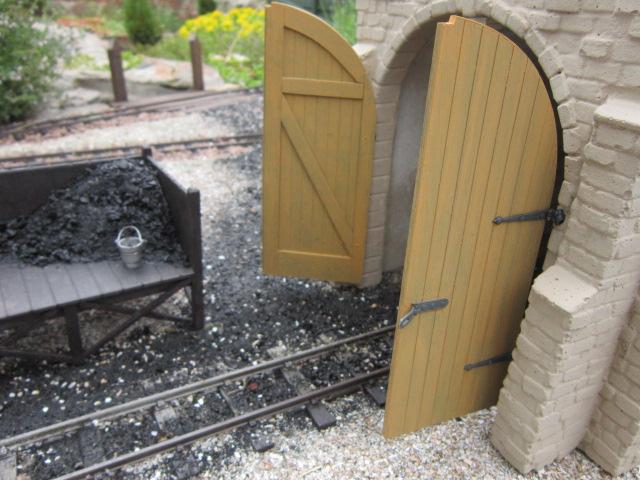
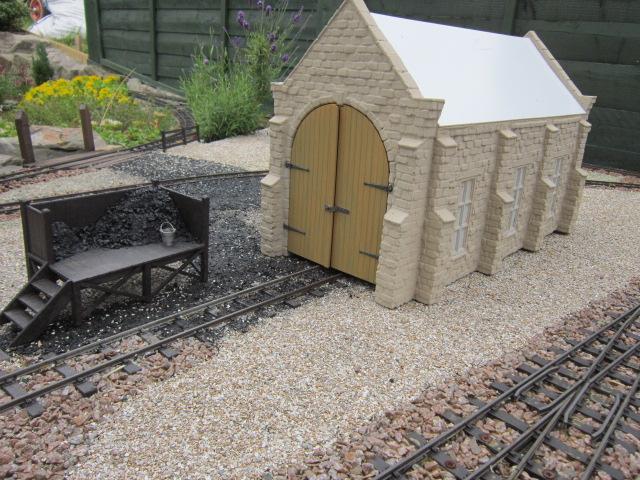
The slates are now being stuck on and painting of the shed will follow.
The slates are now being stuck on and painting of the shed will follow.
The best things in life are free.... so why am I doing this?
-
Peter Butler
- Driver
- Posts: 5707
- Joined: Sun Sep 09, 2012 10:33 pm
- Location: West Wales
Slates......
to make the slates look realistic I bought a sheet of 1mm black plastic sheet and scribed lines to the width of a slate. After this I used sandpaper to roughen the surface rubbing only in the vertical plane to represent natural run-off of water and give a matt finish.

Next I cut across the lines in strips to make one layer of slates the full length of the roof....

'V' notches were then cut at the join of each slate to give better definition between them...

And then the strips were applied to the prepared roof which already has a plasticard sheet to receive them. This make life much easier as they stay put with the solvent adhesive.

And finally, the finished roof complete wit ridge tiles....


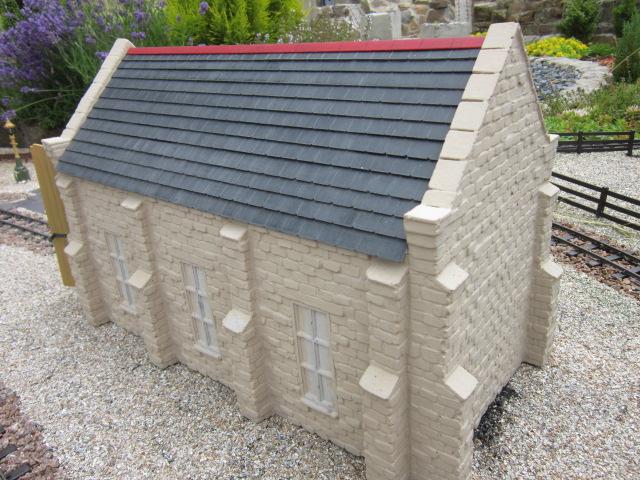
This is the easy way to apply over 650 slates and make them look like a real roof (I think!!!!)
to make the slates look realistic I bought a sheet of 1mm black plastic sheet and scribed lines to the width of a slate. After this I used sandpaper to roughen the surface rubbing only in the vertical plane to represent natural run-off of water and give a matt finish.
Next I cut across the lines in strips to make one layer of slates the full length of the roof....
'V' notches were then cut at the join of each slate to give better definition between them...
And then the strips were applied to the prepared roof which already has a plasticard sheet to receive them. This make life much easier as they stay put with the solvent adhesive.
And finally, the finished roof complete wit ridge tiles....
This is the easy way to apply over 650 slates and make them look like a real roof (I think!!!!)
The best things in life are free.... so why am I doing this?
-
bazzer42
-
ge_rik
- Administrator
- Posts: 7946
- Joined: Sun Oct 25, 2009 10:20 pm
- Location: Cheshire
- Contact:
-
Peter Butler
- Driver
- Posts: 5707
- Joined: Sun Sep 09, 2012 10:33 pm
- Location: West Wales
Thanks again guys..... please feel free to copy any of my schemes you think suitable for your needs, there is no copyright!
Rik, the fittings I use are from two sources.
1. The hasp and staple (including padlock) are 'Talisman' brass castings which are supplied from 'Model Earth' si@modelearth.net tel: 01926 490171. An illustrated price list is available although many of the items are too large, designed mainly for 7/8 scale.
2. Hinges from 'Tumdee Dollshouse Miniatures' currently advertised on eBay, item number 191605646001.
Model Earth and 'Busybodies' work closely together and information on their products are often listed on the same website. They usually appear together at exhibitions of you have an opportunity to visit.
Rik, the fittings I use are from two sources.
1. The hasp and staple (including padlock) are 'Talisman' brass castings which are supplied from 'Model Earth' si@modelearth.net tel: 01926 490171. An illustrated price list is available although many of the items are too large, designed mainly for 7/8 scale.
2. Hinges from 'Tumdee Dollshouse Miniatures' currently advertised on eBay, item number 191605646001.
Model Earth and 'Busybodies' work closely together and information on their products are often listed on the same website. They usually appear together at exhibitions of you have an opportunity to visit.
The best things in life are free.... so why am I doing this?
-
ge_rik
- Administrator
- Posts: 7946
- Joined: Sun Oct 25, 2009 10:20 pm
- Location: Cheshire
- Contact:
-
Alan P

-
Peter Butler
- Driver
- Posts: 5707
- Joined: Sun Sep 09, 2012 10:33 pm
- Location: West Wales
Thanks Alan, if I had seen that picture beforehand I might well have built in that style too. It took a while to decide what to build and working in plasticard that would have worked really well with timber clad sides on a block base. Perhaps another lineside shed is called for?
The best things in life are free.... so why am I doing this?
-
Alan P
Like most things at The Launceston Steam Railway it has the Bowman's unique style.
It's also very small so would really only suit Quarry Hunslet size locos, you would not get larger narrow gauge locos such as Russell or Lyd in there.
Your lineside hut idea is brilliant, i'd never thought of that, i don't have room for an engine shed but i might be able to fit a small hut or workshop in.
It's also very small so would really only suit Quarry Hunslet size locos, you would not get larger narrow gauge locos such as Russell or Lyd in there.
Your lineside hut idea is brilliant, i'd never thought of that, i don't have room for an engine shed but i might be able to fit a small hut or workshop in.
-
Peter Butler
- Driver
- Posts: 5707
- Joined: Sun Sep 09, 2012 10:33 pm
- Location: West Wales
The engine shed is complete!
Painting the individual stones was a chore but well worth the effort. I have tried to keep the colour scheme close to my natural local stone so it looks right in the landscape.
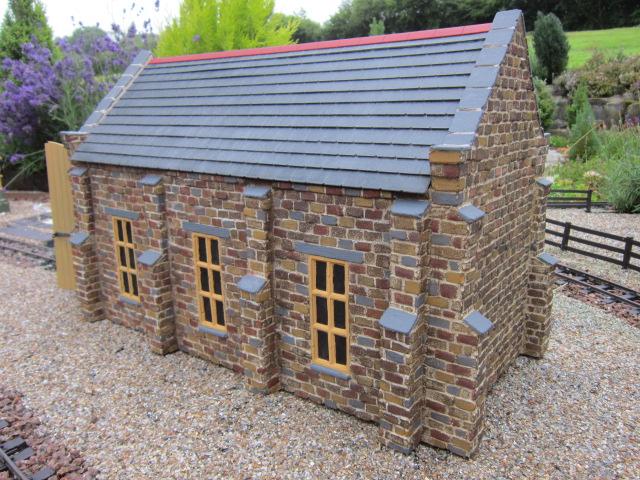


'George' seems to be comfortable in there so it might be his permanent residence?
Painting the individual stones was a chore but well worth the effort. I have tried to keep the colour scheme close to my natural local stone so it looks right in the landscape.
'George' seems to be comfortable in there so it might be his permanent residence?
The best things in life are free.... so why am I doing this?
-
Alan P
-
Peter Butler
- Driver
- Posts: 5707
- Joined: Sun Sep 09, 2012 10:33 pm
- Location: West Wales
Thanks Alan, 'George' was my very first scratch-build in 16mm. At the time my colleagues were building prototypical scale models but I have never been one for conforming! It was made to work on our exhibition layout way back in the late 70's, early 80's (?) which travelled extensively throughout Britain and into Europe. 'George' isn't based on any particular loco but I have a 'thing' about cranes for some reason????
The model is made of plasticard and driven by a Lima '0' gauge bogie unit which I must get round to converting to battery power one day!
So much to do...... I just haven't made the priority list yet!
BTW...... I have just discovered your blog (?) about the construction of your own line and I love it!!! Your buildings are a real treat and you have made everything look as though it should be there.
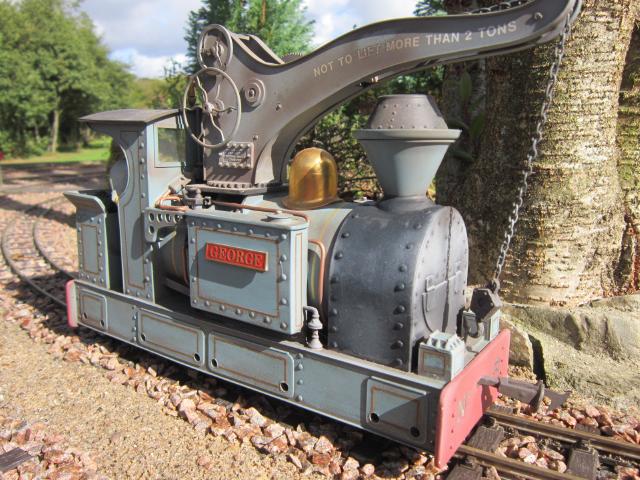
More cranes....


The model is made of plasticard and driven by a Lima '0' gauge bogie unit which I must get round to converting to battery power one day!
So much to do...... I just haven't made the priority list yet!
BTW...... I have just discovered your blog (?) about the construction of your own line and I love it!!! Your buildings are a real treat and you have made everything look as though it should be there.
More cranes....
The best things in life are free.... so why am I doing this?
-
Alan P
Fantastic, i can't believe George is made out of plasticard, the paint on the crane jib & smokebox look just like metal.
The jib alone on the middle picture looks like an impressive feet of engineering!
Thanks for the comments about my railways website. I really only started it as something to cheer me up when i was having a bad day at work!
I have since found it very useful as a kind of sanity check, i go back and look at the pictures and normally think 'why on earth did i do that!'
The jib alone on the middle picture looks like an impressive feet of engineering!
Thanks for the comments about my railways website. I really only started it as something to cheer me up when i was having a bad day at work!
I have since found it very useful as a kind of sanity check, i go back and look at the pictures and normally think 'why on earth did i do that!'
Who is online
Users browsing this forum: No registered users and 13 guests