Time to build a railway...but where?

A place for the discussion of garden railways and any garden style/scale portable and/or indoor layouts
Post Reply
kandnwlr

Post by kandnwlr » Tue Jul 22, 2014 9:54 am

Andrew:102848 wrote:
Peter Butler:102837 wrote:  The roof design is shown below with added headroom for easy access... I don't know whether there is a prototype for this but I think it adds interest to the otherwise straight line.
Here we go, on the Sand Hutton line:

Image

A lovely looking carriage Peter, looking forward to the third one very much...

Andrew

One of the few carriages also to have been used as a cricket pavilion, where I suppose the extra headroom provided by the cutouts would have been useful.

Now awaiting restoration in Skegness. You can´t make that up.

laalratty

Post by laalratty » Tue Jul 22, 2014 8:56 pm

A unique pair of coaches with lovely interiors.
I've got a RH drive MGB 1/18th scale, but mine is green and doesn't have a roof!

User avatar
Peter Butler
Driver
Driver
Posts: 5713
Joined: Sun Sep 09, 2012 10:33 pm
Location: West Wales

Post by Peter Butler » Tue Jul 22, 2014 10:29 pm

Ordinary road cars, as opposed to classic or performance cars, are becoming an obsession with me. How easy it would be to populate your garden railway with Ferraris or Lamborginis, American 'muscle cars' or vintage racers, but try to find everyday family saloons and you are in expensive territory!
I have been lucky with car boot finds recently, but ebay is out of reach!

User avatar
Peter Butler
Driver
Driver
Posts: 5713
Joined: Sun Sep 09, 2012 10:33 pm
Location: West Wales

Post by Peter Butler » Tue Jul 22, 2014 10:45 pm

kandnwlr:102844 wrote:Are you going to share a pic of how you built the roof?
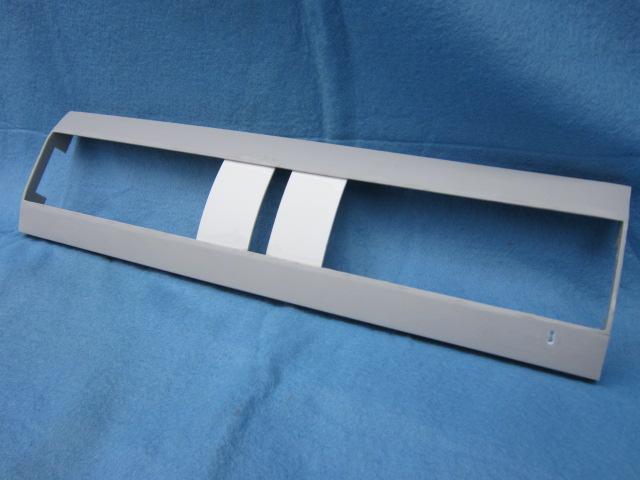
This is no secret..... the roof had to be cut roughly in half as it fitted the two passenger compartments which are now reversed. First thing to do is to fit a spacer section to maintain the width after the middle is cut. The clerestory had already been cut off beforehand and the roof can be chopped in two. Because of the extended length of this vehicle, the roof is from two models with each section being just over half of each of them and even then with a centre panel fitted to make up the total. (I now have short roof sections to complete my third coach).
Underneath the centre section I fitted a vertical, curved plasticard piece to match the roof sides. This led me to follow the curve with a cut-out giving the additional height for access to the balcony. It all happened by progression rather than design.
I only have one picture to offer and it doesn't show the whole process but I hope it helps in some way!

Image

User avatar
Peter Butler
Driver
Driver
Posts: 5713
Joined: Sun Sep 09, 2012 10:33 pm
Location: West Wales

Post by Peter Butler » Tue Jul 29, 2014 10:45 pm

Phillipy wrote.... Sooner or later, you'll be looking at them and that little voice in the back of your head will start to say, "All that track and nothing moving is such a waste. Now if I had only ...."
You are so right!!!!!
Today I fitted the siding to the disused quarry working and what a difference it has made, both to the appearance and the storage capacity.  I now have an extra 8 yards of sidings to put stock on waiting for its turn.
The light-weight 7mm (0 gauge) track will go down next alongside the SM32 to make transfer sidings.  These WILL NOT WORK!!!!!   I have decided to stick with my original plan to have disused inclines and quarry sidings as part of the 'visitor experience' and no need to operate.  Visitors should buy the guide book from the 'Visitor Centre' reasonably priced at just £5.99.

Image

Image

User avatar
Peter Butler
Driver
Driver
Posts: 5713
Joined: Sun Sep 09, 2012 10:33 pm
Location: West Wales

Post by Peter Butler » Thu Aug 14, 2014 11:28 pm

Having been given advice on this Forum about the use of SBR for sticking down ballast, I thought I must try. On a nice sunny and dry day I set about laying about 5 metres of ballast and drip fed SBR through a syringe. It looked good and I was very pleased with the appearance until....... a visit from 'Bertha'.
Luckily I was still nearby and quickly covered the area with a tarpaulin to protect the adhesive from being diluted away.

Image

After several days when 'Bertha' had given all she had, the cover came off and the ballast was still there. Better still, it was rock hard and even under subsequent heavy rain it has stayed put!

Image

Image
The ballast I'm using is horticultural grit from garden centres. Much of it is over scale, but with a little sieving the smaller pieces can be collected and they look ok to me.
I will gradually complete the whole railway (eventually) but can only work an area I know I can cover in case of rain.

User avatar
philipy
Moderator
Moderator
Posts: 6032
Joined: Sun Jan 30, 2011 3:00 pm
Location: South Northants

Post by philipy » Fri Aug 15, 2014 6:26 am

Peter Butler:103330 wrote:... and drip fed SBR through a syringe.
The end result looks very good Peter. A liberal application of diluted Tesco ( other supermarkets are available!) cheapest budget yoghurt will assist with weathering it.

A couple of quick questions if I may:
How much did you dilute the SBR? (I presume the syringe didn't have a needle on the end?).
Did you need to add any washing up liquidto allow it to wet and flow ( prior to Bertha!)
What is the trackbed material that you are sticking to?

Following the earlier discussions, I got a tub of SBR but haven't yet had time to experiment for myself, to finish ballasting the 2nd half of my line which is laid on top of roofing felt.
Philip

User avatar
Peter Butler
Driver
Driver
Posts: 5713
Joined: Sun Sep 09, 2012 10:33 pm
Location: West Wales

Post by Peter Butler » Fri Aug 15, 2014 10:14 am

Hi Philipy, I'll try to answer your questions in order....
The SBR was neat! Previously I did try to dilute it but it dissolved in the rain before long. No needle was fitted!
I didn't think of adding washing up liquid this time but in the event it wasn't neccessary. The SBR covers the ballast and bonds it in one solid mass.
Trackbed, in fact the whole of my support boards, is covered with under-slate roofing felt. It is the sort which is put onto roof supports before slates or tiles are fitted. (not the new and more expensive 'breathable' variety). Mine is is a woven texture with a waterproof bitumen coating. I use it with smooth side down leaving the weave to assist with the bond.
The SBR can vary enormously in price and I try not to be mean with it. My last delivery from an ebay supplier was only £13.98 (+post) for 5 litres which will go a long way!
Let us know how you get on with yours too.

User avatar
Peter Butler
Driver
Driver
Posts: 5713
Joined: Sun Sep 09, 2012 10:33 pm
Location: West Wales

Post by Peter Butler » Fri Aug 15, 2014 10:24 am

In addition to my previous post I forgot to say that I will be trying the yoghurt (only on the railway as it is not to my taste!). Also that there would be far too much ballast everywhere if I simply covered the roofing felt completely, so I am going to use sharp sand where the track ballast ends which should look more like ground cover or footpaths etc... ( again bonded down as I need to vacuum my railway before use to clear all of the leaves).
I'm sure the yoghurt will eventually do its job of making that look more natural too!

User avatar
Lonsdaler
Driver
Driver
Posts: 1500
Joined: Tue May 20, 2014 9:50 am
Location: North Yorkshire

Post by Lonsdaler » Fri Aug 15, 2014 10:55 am

Peter Butler:103334 wrote:Hi Philipy,  I'll try to answer your questions in order....
  The SBR was neat!   Previously I did try to dilute it but it dissolved in the rain before long.   No needle was fitted!
  I didn't think of adding washing up liquid this time but in the event it wasn't neccessary.  The SBR covers the ballast and bonds it in one solid mass.
  Trackbed, in fact the whole of my support boards, is covered with under-slate roofing felt.  It is the sort which is put onto roof supports before slates or tiles are fitted.   (not the new and more expensive 'breathable' variety).   Mine is is a woven texture with a waterproof bitumen coating.   I use it with smooth side down leaving the weave to assist with the bond.
  The SBR can vary enormously in price and I try not to be mean with it.  My last delivery from an ebay supplier was only £13.98 (+post) for 5 litres which will go a long way!
 Let us know how you get on with yours too.
It will be interesting to see how durable SBR is - I understood it to not be UV resistant, and liable to discolouration if left exposed to sunlight?

Phil
Phil

Sporadic Garden Railer who's inconsistencies know no bounds

My Line - https://gardenrails.org/forum/viewtopic ... 41&t=11077

User avatar
philipy
Moderator
Moderator
Posts: 6032
Joined: Sun Jan 30, 2011 3:00 pm
Location: South Northants

Post by philipy » Fri Aug 15, 2014 4:45 pm

Peter Butler:103335 wrote:In addition to my previous post I forgot to say that I will be trying the yoghurt (only on the railway as it is not to my taste!).  Also that there would be far too much ballast everywhere if I simply covered the roofing felt completely, so I am going to use sharp sand where the track ballast ends which should look more like ground cover or footpaths etc... ( again bonded down as I need to vacuum my railway before use to clear all of the leaves).
 I'm sure the yoghurt will eventually do its job of making that look more natural too!
Thanks Peter. I haven't opened my tub yet so don't know how viscous it is. I had imagined it would be about the same consistency as normal PVA, in which case I wouldn't think it would flow easily - we shall see! One thing I do know though is that I got it from B&Q and it was a lot more than 14quid for 5 litres!

Re the sharp sand idea, I had some chicken grit that I acquired when trying to source suitable sized ballast material and I've used that in a similar way, where the curved track goes round an angled board corner, to fill in the triangles at the outer edge.

The other material to think about, if you have a suitable place to use it, is Postcrete. It looks very similar to sharp sand but stays in place when it gets wet! I've used it as platform surface and as a built up shoulder outside the ballast in a flowerbed. To my mind it looks much like scale gravel.
Philip

User avatar
Peter Butler
Driver
Driver
Posts: 5713
Joined: Sun Sep 09, 2012 10:33 pm
Location: West Wales

Post by Peter Butler » Fri Aug 15, 2014 9:32 pm

BaBBLR:103336 wrote: It will be interesting to see how durable SBR is - I understood it to not be UV resistant, and liable to discolouration if left exposed to sunlight?

Phil
When first applied it is white in colour. After a few minutes it goes alarmingly blue! Eventually it settles down to a clear film which completely covers the ballast and leaves it with a slight sheen.
Discolouration shouldn't be a problem, particularly if yoghurt is used and a green patina settles on the line.
It is worth a try anyway as there are few alternatives outside the Rowlands Mix method, which probably wouldn't stand up to winter conditions when applied in such a thin layer on top of roof felt?

User avatar
philipy
Moderator
Moderator
Posts: 6032
Joined: Sun Jan 30, 2011 3:00 pm
Location: South Northants

Post by philipy » Sat Aug 16, 2014 7:06 am

Peter Butler:103357 wrote:there are few alternatives outside the Rowlands Mix method, which probably wouldn't stand up to winter conditions when applied in such a thin layer on top of roof felt?
That is a problem which has shown itself in a few places on the section that I've done like that.

I'm wondering if a light dusting of sieved garden compost sprinkled on top of the SBR before has set would help to dull the shine and also assist the greening? In other words, a kind of Rowlands mix variant using the glue rather than cement to hold it together?
Philip

ikcdab

Post by ikcdab » Sat Aug 16, 2014 8:45 am

I've not come across SBR before but have just found it on the b&q website. Can anyone post a link to previous discussion on how use it?

User avatar
philipy
Moderator
Moderator
Posts: 6032
Joined: Sun Jan 30, 2011 3:00 pm
Location: South Northants

Post by philipy » Sat Aug 16, 2014 12:27 pm

ikcdab:103369 wrote:I've not come across SBR before but have just found it on the b&q website. Can anyone post a link to previous discussion on how  use it?
Try http://gardenrails.myfreeforum.org/ftopic8259-30.php

It really starts about halfway down the page with a post by Andy McTractor, following a previous query.
Philip

User avatar
Peter Butler
Driver
Driver
Posts: 5713
Joined: Sun Sep 09, 2012 10:33 pm
Location: West Wales

Post by Peter Butler » Sun Aug 17, 2014 10:31 pm

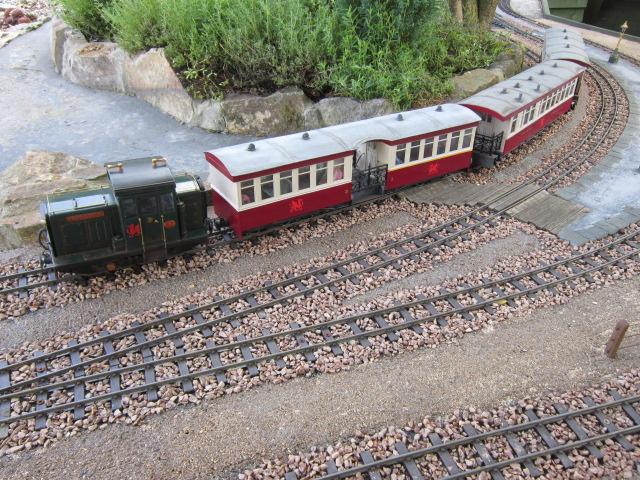
There has been a slight delay in completing my third passenger bogie carriage simply due to waiting for items to arrive in the post. Only a matter of a few days but each delivery depends on others arriving in sequence.
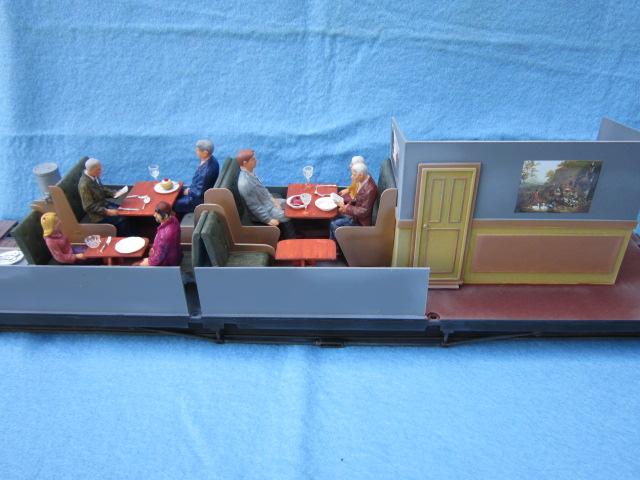
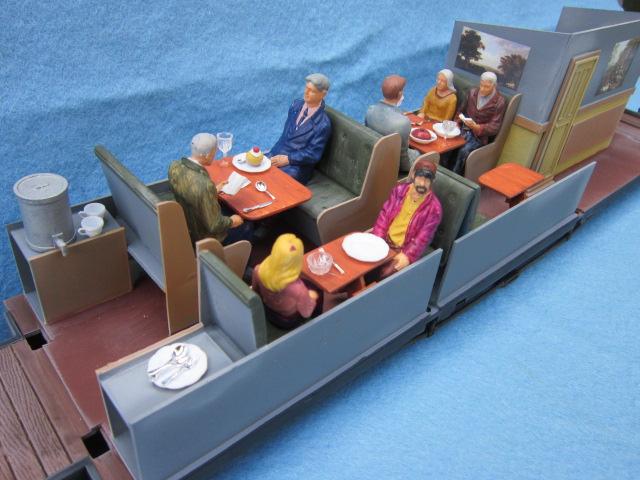
Firstly, my passengers. These are correct scale for the Bachmann coaches (1:22.5) and are a set of 15 seated figures (3x5 different) and come direct from China. I couldn't resist when I saw the name of the company..... wehonest... and have now bought from them twice! This inevitably means that each figure has an identical twin in the next carriage, or even the same one in some cases. Painting and positioning sorts that one out!
How can they send packages from China for only £1.99?
Doll's house accessories look just fine on the dining tables and centre buffers from Glendale Junction came on cue!

Image

Image

Image

Image

When the three coaches are coupled I think the look well together and will be used in service behind my 'Billy' (yet to be named). For the sake of testing and photography I used my reliable diesel outline RC loco and here are some of the pictures...

Image

Image

Image

Image

Image
You can also see the results of my ballasting in these pictures which I am very pleased with so far. It is such a time consuming process though and depends on dry weather for a long period... that is a joke here in West Wales at the moment!

Big Al

Post by Big Al » Mon Aug 18, 2014 1:13 am

Nice looking dinning car, also like the look of the ballast have still to do mine.

kandnwlr

Post by kandnwlr » Mon Aug 18, 2014 6:44 am

A most excellent set of carriages :D

User avatar
philipy
Moderator
Moderator
Posts: 6032
Joined: Sun Jan 30, 2011 3:00 pm
Location: South Northants

Post by philipy » Mon Aug 18, 2014 6:52 am

Looking good Peter, as always. I wouldn't worry about the repeat passengers, if anyone is anal enough to look that closely and complain, just tell them there are lots of twins in your part of the world!

I like the ballast, be interesting to see what happens over winter.
Philip

User avatar
Andrew
Moderator
Moderator
Posts: 3422
Joined: Tue Jul 03, 2012 1:33 pm
Location: Bristol, UK
Contact:

Post by Andrew » Mon Aug 18, 2014 10:28 am

Both carriages and ballast looking great. I particularly like the shot of the train trundling through the station, which looks fantastic, very realistic. I too shall be keeping an eye on your pioneering work with the SBR... Looking forward to seeing Billy at work with the carriages...

All the best,

Andrew.

Post Reply

Who is online

Users browsing this forum: No registered users and 5 guests