Page 13 of 187
Posted: Sun Jul 06, 2014 11:11 pm
by Peter Butler
Nice weather today.... warm sunshine with the occasional (very occasional!) few drops of rain which were at the rate of about one per square metre for about 30 seconds.... very strange!
So, just perfect to begin one of the railways features which has been on my plans almost from the start..... The disused quarry sidings!
Below is the track plan which has been shown before, but gives you the idea of what I'm trying to achieve and where it is sited.

I have used the same method of construction for this as the running lines, mainly because it is so much easier to attach track to a wood base than concrete or stone. The sidings will be laid with '0' gauge track with most sleepers removed to represent light weight rail. Points will be home-made 'stub' type for appearance only as this is not intended to operate. The scene depicts two inclines feeding several storage sidings, all of which will be semi-derelict.

This was the stage I reached yesterday. By the end of today I had laid enough stonework to create a front as well as a rear stone quarry working with the two inclines in place. I will post pictures of the current state, perhaps with some track placed to show the idea.
Posted: Mon Jul 07, 2014 11:05 pm
by Peter Butler
Compare this picture with the one above to get an idea of the plan I am trying to achieve.
The two inclines with their tracks can be seen and the storage sidings laid out to show how many I can fit into the space.
Some more track will be added on the left hand side which would have originally connected with the main line (before closure) and feeder lines at the tops of the inclines to show where the raw material came from.

I need to make another 5 or 6 stub points but have worked out a simple way to do them as they are cosmetic only.
Posted: Tue Jul 08, 2014 6:29 am
by LnBmad
Looks great! Keep up the good work
Posted: Tue Jul 08, 2014 6:40 am
by philipy
Peter Butler:102470 wrote:
I need to make another 5 or 6 stub points but have worked out a simple way to do them as they are cosmetic only.
Sooner or later, you'll be looking at them and that little voice in the back of your head will start to say, "All that track and nothing moving is such a waste. Now if I had only ...."!!
Posted: Tue Jul 08, 2014 8:27 am
by kandnwlr
No way to connect up with the main line? I´m sure you could use those sidings .....

Posted: Tue Jul 08, 2014 10:50 am
by Peter Butler
I will keep the sidings separate from the rest of the railway as I have no intention of shunting quarry stock to and fro just for the 'fun' of it.... not my style I'm afraid! Also, due to using recycled '0' gauge track, it would not cope with the flanges on the stock. I must stick with plan A and just enjoy the visual aspect.
The line is run as though it is a preserved railway sited in a worked out quarry and utilising the gallery as a passenger route. In order to maintain this illusion I must show the quarry separated from the main line.
Posted: Sun Jul 13, 2014 12:13 am
by Peter Butler
Oh no !!!!!!! you have put doubt in my mind..... I thought I knew what I was doing with the quarry sidings and then you came up with other ideas. My original plan was to have light-weight track and perhaps a few slate and rubbish wagons there with no movement, but.... you are right to point out it is wasted space with nothing going on, so, how about I join to the main line using SM32 track and have a storage siding for goods stock which I can then bring out to play?
Probably only room for two lines instead of four, but means I can have more stock out at any time.
Need more track now!

Posted: Sun Jul 13, 2014 6:27 am
by philipy

Just a thought, have you got room for a quarry interchange? Maybe a couple of short mainline sidings and a quarry line alongside to link to the bottom of the inclines?
Get the best of both worlds that way, a 'reason' to store the extra goods stock, and the scenic quarry workings as a bonus.
Looks like the castle is also coming on well in the background of that shot.
Posted: Sun Jul 13, 2014 9:10 am
by kandnwlr
I can see further doubts being sown .... but you can never have too many siding .... and it would look interesting too!

Posted: Sun Jul 13, 2014 10:23 pm
by Peter Butler
The weather here today has been wet so I spent the day working on my second Bachmann carriage. I have spent enough time looking, thinking and planning how to do the conversion to centre balcony it was about time I began.
First thing to do was cut the thing in half.... no turning back now!

I decided to fit solid ends without windows...

Next job was to cut off the clerestory from the roof.....
Two bracing pieces are fitted to prevent the width altering when that too was cut. In fact two roof sections were cut as each piece was longer than half the total length. By removing the balcony ends but adding extra in the middle the overall length is about the same as the original, but the passenger compartments are reversed and the end doors now face each other.
The floor section had to be chopped at both ends to make the new squared-off end panel fit, then the floor itself cut in half end an extension piece fitted to create the centre balcony and step.
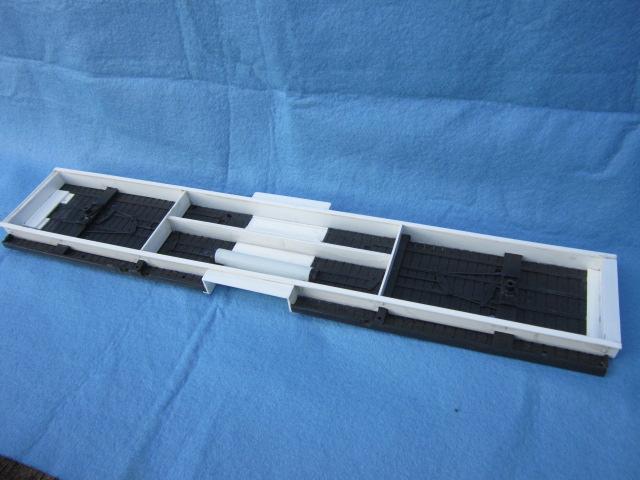

The two units put in position on the floor section to try for fit.... and they do!

And finally (for today anyway) balcony railings put in for overall effect which I must say I am very pleased with....


Posted: Mon Jul 14, 2014 10:16 pm
by jim@NAL
looking very good peter fantastic work as always where do you get all the lovely stones and rocks from and what buildings are you planning for the quarry
Posted: Mon Jul 14, 2014 10:46 pm
by Peter Butler
Thank you Jim, I'm really enjoying this one now I have started. Today I have put a 'canvas' sheet on the roof and strakes across, also fitted padded seats in the First Class compartment. There will be wooden slatted seating in the Third!
Rocks...... already here on the land. The stone is local to the area and can be very expensive to buy. The other is shale in great chunks which we dug out with the digger when cutting a path to the stream.
It is amazing how much stone is used when building these walls and I keep looking at my pile and thinking.... not enough there! There is more.
Buildings.... In the quarry I would like to put two ruined winding houses at the top of the inclines. A small 'bothy' down by the tracks and perhaps a wooden shed for the foreman, now long gone.
I have recently discovered Cain Howley Structures, a company who supplies cast concrete walling which can be cut and made into any building you want. There is a long waiting list though so I might have to be patient until next year.
I might post more pictures tomorrow.... there again I might not as a good friend from the Midlands is coming to stay for a few days and I may not be in a fit state to even spell correctly.........
Posted: Tue Jul 15, 2014 7:06 am
by kandnwlr
Excellent pics of the new carriage. Can´t wait to see what you do with the roof.
Posted: Mon Jul 21, 2014 11:15 pm
by Peter Butler
Well, back in circulation following a very pleasant few days with my pal and several bottles of red later I have managed to get back to my coach conversion.
The roof design is shown below with added headroom for easy access.

I don't know whether there is a prototype for this but I think it adds interest to the otherwise straight line. It also helps to strengthen the gap between the two passenger compartments and is strong enough to lift the coach.
A material covering to represent canvas, painted and weathered to show signs of wear complete the picture.
Seating arrangements are for First and Third class passengers. First having padded seats and wooden slat bench seating for the rest!

Coach sides are painted with rattle can acrylic paint in two colours. There is a fine vinyl stripe at waist height to define the class. Gold on the Observation, yellow on First and white on Third.
Naturally the line's logo, Red Dragon, appears on the coaches too!
Balcony railings are from dolls house fittings suitably cut down.
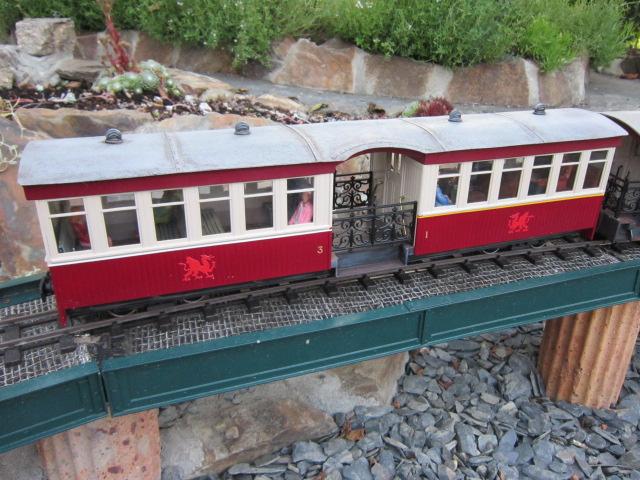

So that only leaves one coach to finish in another individual style.
Posted: Mon Jul 21, 2014 11:23 pm
by DickH
Looking very good!!
Posted: Mon Jul 21, 2014 11:23 pm
by Peter Butler
Another great find today!
A visit to a town with many antique and collectable shops had a road vehicle just right for my display. Priced at £15, I managed to get it reduced to just £12...... bargain! I probably would have given the asking price anyway as it is an unusual model I have never seen before. Made by Corgi, die cast and right hand drive (for a change).

MGB, complete and in very good clean condition.
Just found one on ebay....... boxed and mint £85.00
Posted: Tue Jul 22, 2014 7:04 am
by kandnwlr
Splendid carriages. I knew that the Corris style would come back one day, but on both sides? Very impressive!
Posted: Tue Jul 22, 2014 8:07 am
by Snailrail
What beautiful and unusual coaches. An excellent piece of work.
Posted: Tue Jul 22, 2014 8:37 am
by kandnwlr
Are you going to share a pic of how you built the roof?
Posted: Tue Jul 22, 2014 9:32 am
by Andrew
Peter Butler:102837 wrote: The roof design is shown below with added headroom for easy access... I don't know whether there is a prototype for this but I think it adds interest to the otherwise straight line.
Here we go, on the Sand Hutton line:

A lovely looking carriage Peter, looking forward to the third one very much...
Andrew