Time to build a railway...but where?

A place for the discussion of garden railways and any garden style/scale portable and/or indoor layouts
Post Reply
kandnwlr

Post by kandnwlr » Sun Jun 08, 2014 9:23 am

Peter Butler:100924 wrote:Getting 'picky' now are we???
You're right though.... I did the side walls and hubs but not the treads.   I'll put that right for you straight away...... sorry!
I´ve been meaning to build something for the cattle that I´ve bought in 1:24. Now I feel I need to move a little more quickly having see what you´ve achieved :shock: :D :)

jim@NAL
Driver
Driver
Posts: 1142
Joined: Sun Sep 23, 2012 11:01 am
Location: haverhill suffok

Post by jim@NAL » Mon Jun 09, 2014 6:57 pm

fantastic find with the tractor peter looks brilliant

User avatar
Peter Butler
Driver
Driver
Posts: 5713
Joined: Sun Sep 09, 2012 10:33 pm
Location: West Wales

Post by Peter Butler » Tue Jun 10, 2014 7:28 pm

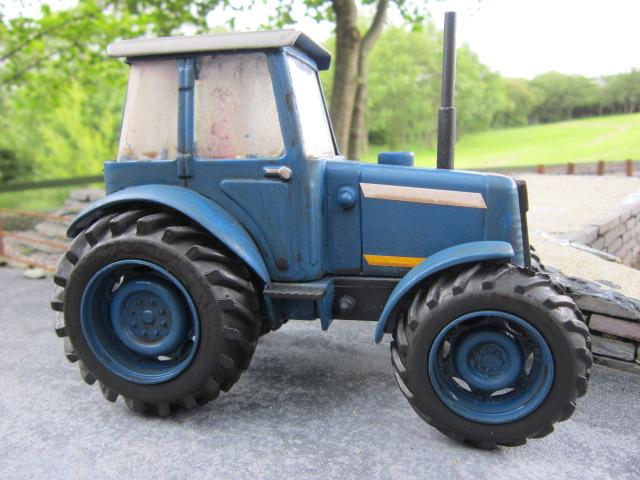
Thanks Jim, the tractor was a good find indeed and one I have been searching for during the past months. Better still, I recently did an exhibition at a vintage show and came across another tractor which, although was plastic, had a much better set of wheels and tyres.......so...... the two have become one!
Image
Image
Much grime has been splashed all over but I notice that tractors on the road tend to kick off the mud etc. from the tyres and they become fairly clean again. However, the windows are a disgrace!

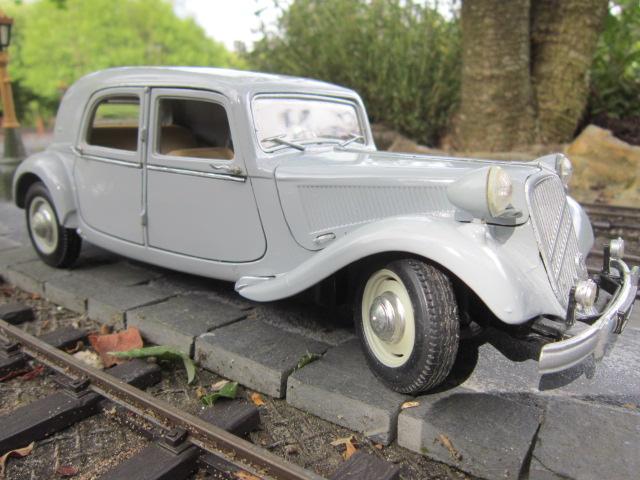
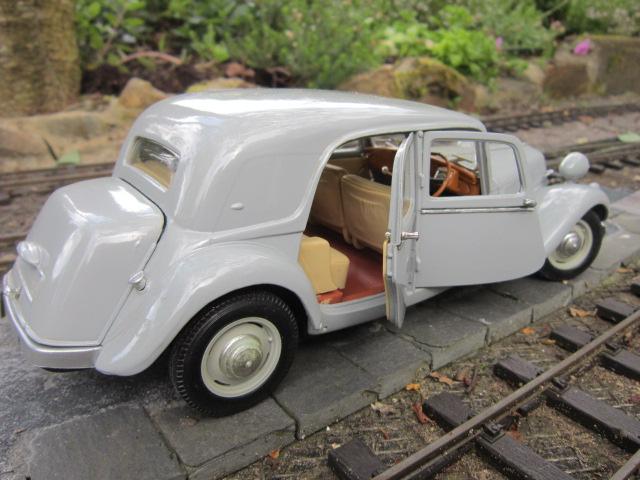
At the same show, and the same stall, I also picked up a Maisto die-cast car for just £5.00. This is a Citroen 15CV, which I can use on my roads. Ordinary cars are rare and can be expensive, in fact I have just seen this model on e-bay at nearly £50.00! Perhaps I shouldn't have modified it to right hand drive?

Image
Image
Image

kandnwlr

Post by kandnwlr » Tue Jun 10, 2014 8:13 pm

Like the car. And not easy to get hold of at and affordable price. :shock:

IrishPeter

Post by IrishPeter » Tue Jun 10, 2014 8:20 pm

Actually 1/24th scale cattle are a good idea as most modern cows are somewhat larger than their predecessors of a few decades back.

Peter in AZ

User avatar
Peter Butler
Driver
Driver
Posts: 5713
Joined: Sun Sep 09, 2012 10:33 pm
Location: West Wales

Post by Peter Butler » Thu Jun 19, 2014 5:29 pm

Question?............. If you were offered something you didn't like, would you buy three of them?
Answer...................In my case, yes!
When I saw this item I knew straight away I would never use it as it is on my railway. It is American (which I personally don't like) and, apart from being the wrong scale and gauge, perfect for modification.
So three of these arrived on my doorstep waiting their turn in the workshop.....

Image

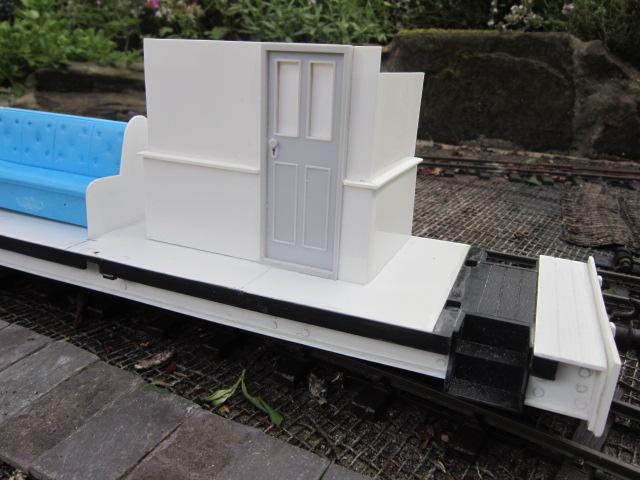
I have plenty of goods stock now and a wide selection of other types of equipment, including the Circus Train, WW2 Military items and others, but...... no passenger stock. What I need is a rake of matching coaches, a bit like this one....

Image

So with one of the coaches converted I just have two more to do, one will be a first Class Saloon and the other third, with slatted seats.
This one is an Observation Car with Guard compartment.
In order to Anglicise it I had to remove the clerestory from the roof section. The floor has been fitted with 'I' beams full length either side to lower the ride height. Extensions to the balcony and roof section to match.
Image

The padded seating came from Swift Sixteen and are made of five units end to end and back to back. They look very good and save a lot of messing about with clay or Miliput.

Image


Image
The Guard's compartment has interior fittings but it is too dark to see inside!

Image
Balcony railings are made from cut-down Doll's House fittings and look so much better than the originals supplied with the coach kit.

Image
Lettering on the sides is Lettraset and has worked out far better than I expected.
It is a fairly heavy coach with all of the resin seating and figures but runs very smoothly on metal wheels in whitemetal bogies.
Only two to go!

User avatar
Andrew
Moderator
Moderator
Posts: 3422
Joined: Tue Jul 03, 2012 1:33 pm
Location: Bristol, UK
Contact:

Post by Andrew » Thu Jun 19, 2014 6:52 pm

I really like that! Quirky and original, yet believable too. Like the railings as well.

I played about with a Bachman kit myself about 15 years ago, resulting in a carriage that was part of the main rake on my old West Kent Light Railway. I chopped a bit out of the middle, turned the ends round and then stuck it all back together, keeping the clerestory and adding a centre vestibule entrance in the style of the Corris carriages. It's not the finest model in the world, but it's got a certain something I think...

Image

All the best,

Andrew.

IrishPeter

Post by IrishPeter » Thu Jun 19, 2014 7:05 pm

I keep looking at them (Bachmann 'G' scale coaches) and thinking that they would make a good basis for a generic Irish tramcar chop, or something Southwold-ish with a bit more spicing and swearing.

Peter in AZ

laalratty

Post by laalratty » Thu Jun 19, 2014 8:43 pm

What a massive improvement, it wouldn't be easy to immediately tell what that started out like. Look forward to seeing what the others turn out like!

User avatar
Peter Butler
Driver
Driver
Posts: 5713
Joined: Sun Sep 09, 2012 10:33 pm
Location: West Wales

Post by Peter Butler » Thu Jun 19, 2014 11:30 pm

Andrew, I really like your coach with the central vestibule, an idea I am tempted to 'borrow'. The balcony ends are a bit of a pain to construct although I already have enough railings to complete all of them. Your modification is certainly different and makes another variation to the general appearance so that each unit is individual.
I think you have convinced me.......

User avatar
Andrew
Moderator
Moderator
Posts: 3422
Joined: Tue Jul 03, 2012 1:33 pm
Location: Bristol, UK
Contact:

Post by Andrew » Fri Jun 20, 2014 9:27 am

Peter Butler:101873 wrote:Andrew, I really like your coach with the central vestibule, an idea I am tempted to 'borrow'.   The balcony ends are a bit of a pain to construct although I already have enough railings to complete all of them.  Your modification is certainly different and makes another variation to the general appearance so that each unit is individual.
I think you have convinced me.......
Glad you like it Peter, borrow away! I wonder whether you could make your lovely balcony castings fit across a centre vestibule (or, more likely, make the vestibule fit the railings), a bit like old LSWR "gate" stock? Could help keep the "family" appearance?

Image

Happy modelling,

Andrew.

User avatar
Peter Butler
Driver
Driver
Posts: 5713
Joined: Sun Sep 09, 2012 10:33 pm
Location: West Wales

Post by Peter Butler » Fri Jun 20, 2014 10:53 am

That would match nicely and use up the railings I specially purchased for the job.
Today I will look at the coach body more closely and see if I can tempt it to go through a bandsaw, or something else more likely to split it in two! I'm feeling enthusiastic about the project now as I hate repeating or copying something I have already done.

User avatar
Peter Butler
Driver
Driver
Posts: 5713
Joined: Sun Sep 09, 2012 10:33 pm
Location: West Wales

Post by Peter Butler » Fri Jun 20, 2014 10:26 pm

Well, having looked at the coach with a view to make it into a centre vestibule entrance, I can see there will be some major surgery involved. The original screw fixings for the roof section to the coach sides will not line up, neither will the floor section to the sides!
The overall length of the coach will be extended to accommodate the vestibule (assuming I keep all of the original windows in place), but the balcony ends on my first Observation Car made it longer at one end anyway, causing me to relocate the bogie pivot!
None of the issues cause me any great concern and I think the end result will be worth the effort..... so on we go then!

All in good time.....

At the moment I am re-laying my balloon loop with a larger radius as some of the longer trains tend to slow down with flange friction against the rail. I think the new 6ft. radius should sort out the problem. I'm hoping to have it back in running order by the end of tomorrow afternoon, despite the fact all of the track is laid on treated timber screwed to battens and fixed to timber pegs hammered into the ground. All this takes time but it is the only way to keep my track level in the undulating ground.

User avatar
Andrew
Moderator
Moderator
Posts: 3422
Joined: Tue Jul 03, 2012 1:33 pm
Location: Bristol, UK
Contact:

Post by Andrew » Fri Jun 20, 2014 11:07 pm

When I obtained my carriage it was already minus bogies and I ended up making a new floor and mounting it on Big Big ones instead. Can't remember how I did the roof - and I can't check because I'm not entirely sure where it is! Mine ended up shorter than the original because I chopped the middle 4 windows out of each side and used 3 of them to make the ends. Plus no balconies of course...

Hope your new curves have he desired effect - I'll be looking closely at mine tomorrow...

Andrew.

User avatar
Peter Butler
Driver
Driver
Posts: 5713
Joined: Sun Sep 09, 2012 10:33 pm
Location: West Wales

Post by Peter Butler » Sat Jun 21, 2014 9:51 pm

Well I'm please to say we have a running railway again having removed the existing track on the balloon loop, lifted all of the timbers, set a trammel to follow the increased diameter, dug a new trench, re-instated new timber supports, decking, roofing felt and about 17 yards of track.
I managed to try a few runs with battery locos just to see if they fell off...... no they didn't! Tomorrow will be a full steam test with suitably heavy train to see whether it has done the trick and reduced the potential for slowing down on the curve.

User avatar
Peter Butler
Driver
Driver
Posts: 5713
Joined: Sun Sep 09, 2012 10:33 pm
Location: West Wales

Post by Peter Butler » Sun Jun 22, 2014 11:09 pm

To show what a difference it made by increasing the diameter of my balloon loop, the picture below has the old track position marked by battens against the new alignment which is a good metre wider than before.
Image
Under test with my battery loco and eight goods wagons (a heavy load) there was no noticeable drop in speed on the curve.

Image


Image

A steam test with my manually controlled Billy and various combinations of stock was sheer joy with a steady prototypical speed maintained around the circuit

Image

Image

DickH

Post by DickH » Mon Jun 23, 2014 10:00 pm

Looking good Peter, hope to see you at the show Sunday, any joy on ballasting?
Started looking at my Pendle Valley buildings - starting with the two loco sheds, water towers and coal silos first. Painting the windows is a chore - thinking of masking tape and small airbrush!!
How's the new pup?

User avatar
Peter Butler
Driver
Driver
Posts: 5713
Joined: Sun Sep 09, 2012 10:33 pm
Location: West Wales

Post by Peter Butler » Mon Jun 23, 2014 11:04 pm

Thanks Dick, railway improvements and enhancements are well in hand but no sign of ballast at the moment.
I am currently working on a building project which I hope to show soon (assuming it works) but progress is slow and much patience is essential. If it works I will post pictures of the scheme in a few days, if it fails miserably, forget I said anything about it!
P.S. Pup is fine.

kandnwlr

Post by kandnwlr » Tue Jun 24, 2014 6:28 am

That´s looking good. Waiting patiently for signs of the new project .... :D

Crackingjob

Post by Crackingjob » Tue Jun 24, 2014 10:30 pm

You want a Corris style coach a bit like the ones offered by Roy at

http://www.rail-roadmodels.co.uk/#!rolling-stock/c131c

(you may need to copy and paste link into search line I got his site on windows internet explorer as it would not load on Firefox for some reason), they are excellent card models

The line looks GREAT

Post Reply

Who is online

Users browsing this forum: No registered users and 10 guests