The (Windmill Hill) Welsh Highland Railway

A place for the discussion of garden railways and any garden style/scale portable and/or indoor layouts
Post Reply
User avatar
Andrew
Moderator
Moderator
Posts: 3422
Joined: Tue Jul 03, 2012 1:33 pm
Location: Bristol, UK
Contact:

Post by Andrew » Mon Jul 14, 2014 12:10 pm

Hello again,

The good weather has seen me finish the rebuild and relaying of the lower terminus, thus completing the line - for now at least. I laid the track on Friday evening, but the sunshine meant that I couldn't put off repainting the house on Saturday - so the first trains ran yesterday afternoon.

Here's "Margaret", my new Roundhouse Little John, assembling a train in what will be Trefechan station:

Image

The site catches the afternoon sun, and the shrubs make for nice dappled shade - even if they do try to poke your eyes out when you reach in to uncouple a loco or change the points! The headshunt for the run round loop is in the slate-lined cutting in the background. The constraints of the site meant that both the loop and headshunt were shorter than I'd hoped which will affect train lengths and operational flexibility. Oh well...

Later in the afternoon it was Russell's turn:

Image

As you can see, there's still an awful lot of landscaping to do! The bare earth in the foreground is the edge of the lawn and will be seeded in the autumn. The earth in the background is a temporary heap of construction spoil which will be leveled (ish) for a station building and some planting. Behind that is the wooden trackbed taking the mainline to Clarach, the upper terminus, which is seen here with Russell about to run round for the downhill return run:


Image

Again plenty of scenic work to do...

All in all the run went pretty well. The gradients and curves are taking some getting used to, but by the end of the run my driving was a lot smoother, apart from the odd radio glitch.

Here's Russell at rest after the run:

Image

The bare decking behind the loco is where I've started constructing the last of the planting boxes - this one will feature a tunnel mouth where the line into the lower terminus emerges from underneath the upper one. The whole lot will be clad in slate and planted to match the one behind...

That's all for now,

Andrew.

kandnwlr

Post by kandnwlr » Mon Jul 14, 2014 1:41 pm

I think that Russell Looks right at home there. Yóu´ve even got some sunshine, I think :shock:

User avatar
Andrew
Moderator
Moderator
Posts: 3422
Joined: Tue Jul 03, 2012 1:33 pm
Location: Bristol, UK
Contact:

Post by Andrew » Mon Jul 14, 2014 3:31 pm

kandnwlr:102640 wrote:I think that Russell Looks right at home there. Yóu´ve even got some sunshine, I think  :shock:
Yeah, if you squint it could be the Bryngwyn goods!

And yes, it was sunny, although the shade from the shrubs made it a little difficult to photograph - the one of Russell shunting the lower station was edited a bit because it was so shady you could barely see the loco! The sun does bring out just how grotty the Mamod guard's van's become though - it could really use a repaint although I don't know how I'd get new paint to stick to all that ingrained oil...

User avatar
Andrew
Moderator
Moderator
Posts: 3422
Joined: Tue Jul 03, 2012 1:33 pm
Location: Bristol, UK
Contact:

Post by Andrew » Mon Jul 21, 2014 4:06 pm

Hello again,

Another sunny spell has seen me out in the garden. The first job was to knock up a wooden planter/tunnel mouth:

Image

That was clad in slate, but it quickly became apparent that clearances were going to be tight - so it was out with the loco fleet for testing. Here's a view down Joy's boiler showing just how little space there is between loco and cutting/tunnel wall:

Image

I should probably have ripped it all out and started again, but all my locos just fit so I decided to go with it - the track on "Old Quarry Siding" will need slewing a little to fit my Regner Konrad, but it'll do. I'll just never be able to run VoR or WLLR stock...

Having lots of locos out I couldn't resist a quick photoshoot:


Image

Image

Once the locos were safely back in their boxes I got on with filling all the gaps in the slate cladding and pressing slate dust into the wet filler. Here we are so far - a little geologically improbable perhaps, but it'll do. Just need to fill it with earth, plant up and await natural weathering now...

Image

Cheers all,

Andrew.

Maple
Trainee Fireman
Trainee Fireman
Posts: 175
Joined: Sat Jun 29, 2013 3:17 pm
Location: Bournemouth

Post by Maple » Mon Jul 21, 2014 5:11 pm

That slate tunnel mouth looks brilliant. Very inspiring. i am thinking of going quite a lot higher with my line, how big where the slat slabs before you cut them down. More photos are defiantly needed
'Professional Bodge artist '

kandnwlr

Post by kandnwlr » Mon Jul 21, 2014 5:19 pm

Loco parade, new slate embankments and dappled sunlight. What´s there not to like :D

laalratty

Post by laalratty » Mon Jul 21, 2014 8:53 pm

That looks great, much better then I was expecting if I'm honest from the earlier descriptions!

User avatar
Andrew
Moderator
Moderator
Posts: 3422
Joined: Tue Jul 03, 2012 1:33 pm
Location: Bristol, UK
Contact:

Post by Andrew » Thu Jul 24, 2014 12:21 pm

Maple:102821 wrote:That slate tunnel mouth looks brilliant. Very inspiring. i am thinking of going quite a lot higher with my line, how big where the slat slabs before you cut them down. More photos are defiantly needed
Glad you like it! The slate tiles started out 18x18" - or they should have done. I got two separate batches at a greatly reduced price from Wickes because they were broken, had corners chipped off etc and so were no good for tiling bathrooms or whatever it is people do with them. There doesn't seem to be a particular policy, I just asked at the till. The other batch I found abandoned on a backstreet, tucked into an old recycling bin, so I did my bit to tidy up the neighbourhood. If you buy 'em new they're about £2.

The colour can vary greatly. I've tried to get grey or reddy brown stuff, avoiding the more purple shades and a yellow batch that's currently on sale in Wickes.

It's quite hard to join them - you need to match colour and strata quite carefully, I've managed it better in some places than others. I cut mine on a tile cutter and then scoop out the accumulated goop from the water reservoir beneath the blade to press into the wet filler between tiles. I think if you were to try to make something higher you'd want to layer the tiles, partly for depth, and partly because it would be very hard to hide horizontal joins as well as vertical ones.

I'll be adding another row above and below the current slate-clad section so that it hopefully looks like a hillside with the rails perched on ledges, but the trackbed will provide separation between layers.

Ideally I'd have used great big chunks of real slate, but this is the technique I ended up with for a number of factors, primarily the need to use space economically in a small garden. It'll be interesting (and possibly depressing!) to see how the technique holds up to the weather over the next few winters...

More photos when the section's complete...

All the best,

Andrew.

User avatar
Andrew
Moderator
Moderator
Posts: 3422
Joined: Tue Jul 03, 2012 1:33 pm
Location: Bristol, UK
Contact:

Post by Andrew » Thu Jul 24, 2014 12:23 pm

kandnwlr:102822 wrote:Loco parade, new slate embankments and dappled sunlight. What´s there not to like  :D
Glad you like it, thank you! I did think of the K&NWLR as I arranged the line-up - I just need a few quarry hunslets and a Decauville or two!

All the best,

Andrew.

User avatar
Andrew
Moderator
Moderator
Posts: 3422
Joined: Tue Jul 03, 2012 1:33 pm
Location: Bristol, UK
Contact:

Post by Andrew » Thu Jul 24, 2014 12:36 pm

laalratty:102831 wrote:That looks great, much better then I was expecting if I'm honest from the earlier descriptions!
Phew, I'm glad about that! Which bit did you think sounded ropey, the slate technique or the whole one-station-almost-on-top-of-another thing which is a feature of that corner?

If the former, I think it looks OK, but it was a gamble. There are bits I'd have liked to have done better, but it's not the easiest stuff to work with, and I'm very short of space. I'd really have liked more room for a slightly more natural looking tunnel mouth - it wasn't looking at all good 'til I added the filler and slate dust in the gaps, that's like a magical process that binds it all together and gives the illusion of solidity.

If the latter, so far so (quite) good on creating a kind of suspended disbelief to convice the mind that the stations aren't really next to each other. The vertical separation helps, as does the planting, but adding buildings - and those pesky trains - may shatter the illusion!

If I'm honest I have tried to squeeze too much in to a small garden. As a result siding space is woefully lacking, the lower run-round loop is too short (I'm currently re-thinking train formations) and operations can be a bit of a challenge, with points in cuttings etc. Manually operated locos running round at the lower terminus may have to run all the way through Trefechan Tunnel just to allow their drivers access to their controls so they can reverse onto their trains! Oh well, it's all good fun...

All the best,

Andrew.

kandnwlr

Post by kandnwlr » Thu Jul 24, 2014 7:53 pm

Andrew:102895 wrote:
kandnwlr:102822 wrote:Loco parade, new slate embankments and dappled sunlight. What´s there not to like  :D
Glad you like it, thank you! I did think of the K&NWLR as I arranged the line-up - I just need a few quarry hunslets and a Decauville or two!

All the best,

Andrew.

I was down in the cellar a moment ago, thinking how I could arrange the slate bits and buildings to make it look more like what I had seen on your layout! :shock:

laalratty

Post by laalratty » Thu Jul 24, 2014 8:50 pm

The thing I was a touch concerned about was the use of roof slates, where I've seen them used in the past they don't really look "natural", a reflection really on the fact that they are very flat and square. However, that section actually looks very natural to me, using the slate dust in the cement to blend it all together has probably helped. Also, the way you've cut the slate has helped, it doesn't look man made almost.

User avatar
Andrew
Moderator
Moderator
Posts: 3422
Joined: Tue Jul 03, 2012 1:33 pm
Location: Bristol, UK
Contact:

Post by Andrew » Thu Jul 24, 2014 9:29 pm

laalratty:102905 wrote:The thing I was a touch concerned about was the use of roof slates, where I've seen them used in the past they don't really look "natural", a reflection really on the fact that they are very flat and square. However, that section actually looks very natural to me, using the slate dust in the cement to blend it all together has probably helped. Also, the way you've cut the slate has helped, it doesn't look man made almost.
Ah yes, fair enough. Although there are one or two bits of roof slate (from a Victorian house in Manchester so probably yer genuine North Wales stuff) it's mostly the thicker (5-10mm?) stuff sold for kitchens and bathrooms - it's got a bit more depth. I learned about cutting it as I went along - some of the first bits I made are quite angular, but I developed a technique involving using the tile cutter to score a line in a couple of places and then break it roughly along that line over the edge of a concrete block. That way you get the cut more-or-less where you want it but it's not too regular.

I filled the new section with earth today, but planting will need to wait - we're off on hols soon and I don't want tender new plants withering in the heat...

Cheers,

Andrew.

User avatar
Andrew
Moderator
Moderator
Posts: 3422
Joined: Tue Jul 03, 2012 1:33 pm
Location: Bristol, UK
Contact:

Post by Andrew » Sun Jul 27, 2014 6:28 pm

Afternoon all,

While most of my efforts over the last few months have been focussed on getting the railway completed to a point where I can run trains, I've had some little indoor projects on the go too.

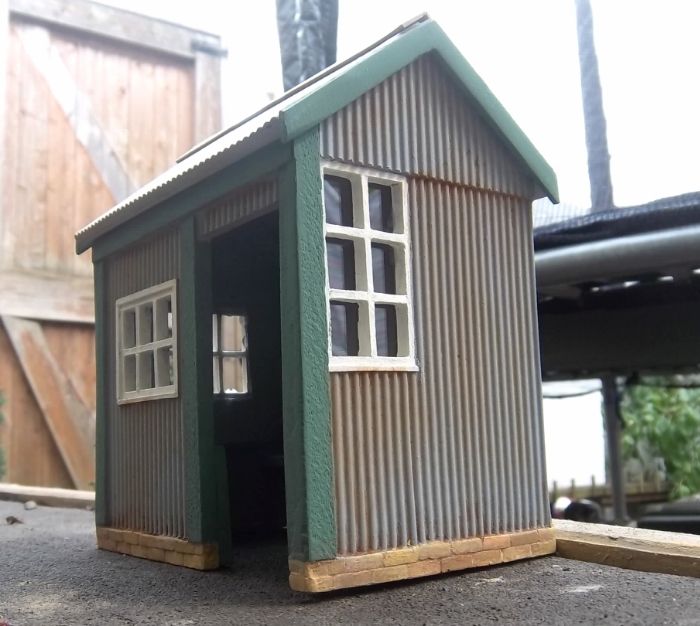
One has been a shelter for Clarach, my upper terminus. I'd hoped to scratch build a Colonel Stephens style corrugated iron shelter for this spot, but there's just no room, even for such a simple structure. Instead I put together this Pendle Valley Workshop model of the shelter at Sylfaen on the WLLR:

Image

Image

I think it looks suitably basic! It's currently awaiting a low platform, but I don't know if that will happen this year.

Here's a shot that shows how Clarach station sits on top of Trefechan Tunnel:

Image


Having got that sorted I decided that it was time to fill a gap that had been left when I moved Penlan's permanent way hut - it now acts as a sun-bed for basking spiders on the other side of the garden... Anyway, here's the gap:

Image

That clearly wasn't very attractive - something had to be done! A works train was duly assembled - including a Ffestiniog third class Ashbury 4-wheeler in which the gang rode to the site:

Image

But they had to ride back in the guard's van...

Image

Image

Image

Well, that was the plan... I couldn't actually bring myself to do it of course, so I made myself an extra Ashbury body:

Image


It may be simple, but it's my first proper Welsh Highland building - a number of Ffestiniog Ashburys ended up as lineside huts on the WHR.

Finally, although this afternoon did finally see some scenic progress on the older part of the line , my focus on completing the rest of the layout has seen the earlier bit become somewhat neglected. That's particularly noticeable where a simple plank still hasn't been turned into a proper NWNGR bridge after three or four years... Mother Nature has clearly got fed up with waiting and has taken matters into her own hands to brighten things up, with this lovely Cyclamen that I'd forgotten I'd even planted...

Image

Image

Hope you've all had a good weekend,

Andrew.

kandnwlr

Post by kandnwlr » Sun Jul 27, 2014 8:16 pm

It´s looking really good. Now I dare you to try dry stone walling :shock:

User avatar
Peter Butler
Driver
Driver
Posts: 5717
Joined: Sun Sep 09, 2012 10:33 pm
Location: West Wales

Post by Peter Butler » Sun Jul 27, 2014 10:19 pm

Contrasting the hard surface of the slate against soft planting really works here. Natures beautiful colour scheme will offer you changes throughout the year but remember to water them regularly in this heatwave..... yes, even here in traditionally wet Wales!

User avatar
Andrew
Moderator
Moderator
Posts: 3422
Joined: Tue Jul 03, 2012 1:33 pm
Location: Bristol, UK
Contact:

Post by Andrew » Sun Aug 17, 2014 6:56 pm

Hello all,

Just back from a fortnight away - I always find I'm keen to potter about the garden after a couple of weeks off so have been cutting the lawn etc as well as planting out some bits and bobs I pinched from my in-laws' house in Orkney where we've been staying. Plants have to be pretty tough up there and past refugees have done pretty well in their new, warmer, surroundings - the new arrivals have gone in around the tunnel mouth, we'll see how they do...

Image

As you can see I took the opportunity to run some trains too - and, since the plums needed harvesting, what better way to do it than by train? Russell was running well this afternoon and handled the first train:

Image

Russell fell out of favour when he stopped responding to radio (later diagnosed as a simple case of the batteries becoming dislodged after a collision with an overhanging branch) and Margaret took over for the second run, seen here ready to unload at Clarach while Russell skulks in the background...


Image

Image

Just two train-loads took care of the plum harvest (it's only a little tree and had succumbed to some sort of lurgey), but a further train may be required to bring in the apples - all 4 of them... My wife rather liked lying on the swing chair being brought fresh plums by steam train...  

This week will see a number of visitors descending on us so there may well be further trains - I need to go and dig out a couple of Faller balcony carriages for the kids to play with too...  

Cheers all,

Andrew.

kandnwlr

Post by kandnwlr » Sun Aug 17, 2014 8:08 pm

Excellent fruit train. Gives the whole layout a new economic logic  :shock:

laalratty

Post by laalratty » Sun Aug 17, 2014 8:51 pm

The new plants round the tunnel mouth look good.
I would run fruit trains on the ANLR for the apple tree, problem is the position of the tree in the garden means I can only take them further away from where they need to be!

User avatar
Gremlin
Trainee Driver
Trainee Driver
Posts: 695
Joined: Sun Feb 08, 2009 2:46 pm
Location: Kent

Post by Gremlin » Sun Aug 17, 2014 8:56 pm

like the harvest train, Russel looks very nice

Post Reply

Who is online

Users browsing this forum: No registered users and 15 guests