This is what I have produced so far. Still LOADS of work and detailing to be done, but it is getting there, I hope
Mountaineer
-
-steves-
- Administrator

- Posts: 2444
- Joined: Thu Jul 28, 2011 1:50 pm
- Location: Cambridge & Peterborough
Mountaineer
I have been asked by a couple of club members to do the Ffestiniog Mountaineer. There is only one picture of the real thing and the rest has to be pretty much guess work as I am aiming for the 1863 version.
This is what I have produced so far. Still LOADS of work and detailing to be done, but it is getting there, I hope
This is what I have produced so far. Still LOADS of work and detailing to be done, but it is getting there, I hope
- Attachments
-
- unnamed (1).jpg (494.39 KiB) Viewed 5925 times
-
- unnamed (2).jpg (498.37 KiB) Viewed 5925 times
-
- unnamed.jpg (738.24 KiB) Viewed 5925 times
The buck stops here .......
Ditton Meadow Light Railway (DMLR)
Member of Peterborough and District Association
http://peterborough.16mm.org.uk/
Ditton Meadow Light Railway (DMLR)
Member of Peterborough and District Association
http://peterborough.16mm.org.uk/

Re: Mountaineer
Looking good Steve. Odd as it may sound, I'm most impressed by those cab rear sheets and handrails
Philip
-
-steves-
- Administrator
- Posts: 2444
- Joined: Thu Jul 28, 2011 1:50 pm
- Location: Cambridge & Peterborough
Re: Mountaineer
That doesn't sound odd at all, I love the rear cab sheets and handrails on this loco, just awesome in my opinion too
The buck stops here .......
Ditton Meadow Light Railway (DMLR)
Member of Peterborough and District Association
http://peterborough.16mm.org.uk/
Ditton Meadow Light Railway (DMLR)
Member of Peterborough and District Association
http://peterborough.16mm.org.uk/
-
Trevor Thompson
- Trainee Driver

- Posts: 984
- Joined: Fri Oct 05, 2018 6:30 pm
- Location: South West Wales
Re: Mountaineer
This is very exciting!
I really like this sort of 3 D printing. It illustrates the benefits of the technology beautifully.
Looking forward to seeing this one develop.
Trevor
PS as far as I can work out these early Englands had round connecting and coupling rods as per steam boat practice.
I really like this sort of 3 D printing. It illustrates the benefits of the technology beautifully.
Looking forward to seeing this one develop.
Trevor
PS as far as I can work out these early Englands had round connecting and coupling rods as per steam boat practice.

Re: Mountaineer
That's a fascinating fact. Every day is a school dayTrevor Thompson wrote: ↑Fri Aug 06, 2021 10:10 am
PS as far as I can work out these early Englands had round connecting and coupling rods as per steam boat practice.


Rik
-
-steves-
- Administrator
- Posts: 2444
- Joined: Thu Jul 28, 2011 1:50 pm
- Location: Cambridge & Peterborough
Re: Mountaineer
Another update. I made a start on the CAD work for the tender today, it's coming along.
And yes Trevor, 3D printing just brings in another aspect of modelling, there is still a good home for my mill and lathe too
And yes Trevor, 3D printing just brings in another aspect of modelling, there is still a good home for my mill and lathe too
- IMG_20210806_175052.jpg (2.42 MiB) Viewed 5811 times
The buck stops here .......
Ditton Meadow Light Railway (DMLR)
Member of Peterborough and District Association
http://peterborough.16mm.org.uk/
Ditton Meadow Light Railway (DMLR)
Member of Peterborough and District Association
http://peterborough.16mm.org.uk/
-
Trevor Thompson
- Trainee Driver
- Posts: 984
- Joined: Fri Oct 05, 2018 6:30 pm
- Location: South West Wales
Re: Mountaineer
In case it helps:
There are a number of photos of the small England engines in their earliest incarnations in various publications:
Quite a bit in the 16mm Association guide to the Festiniog Railway - including a photo of Princess on the front cover
Boyde has a sketch of what they MIGHT have looked like which I think comes from a French Engineering Magazine of the period
Peter Johnsons book on the Festiniog Railway - the spooner Era etc has a number of photos of them including one of Palmerston on page 70
As originally built I think Princess and Prince were pretty similar and Palmerston and Mountaineer almost the same but with improvements. In other words 2 pairs, each pair slightly different.
Trevor
-
-steves-
- Administrator
- Posts: 2444
- Joined: Thu Jul 28, 2011 1:50 pm
- Location: Cambridge & Peterborough
Re: Mountaineer
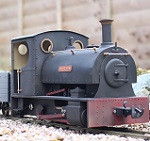
Done a lot more work on this and have a working beta model too. Still a few adjustments to be made, but definitely getting there
I have purposely not put any rivets on as it makes rubbing down far more difficult, they will be added using "1mm nail gems" and then painted.
I have purposely not put any rivets on as it makes rubbing down far more difficult, they will be added using "1mm nail gems" and then painted.
- Mountaineer 1.JPG (85.01 KiB) Viewed 5578 times
- Mountaineer 2.JPG (70.78 KiB) Viewed 5578 times
The buck stops here .......
Ditton Meadow Light Railway (DMLR)
Member of Peterborough and District Association
http://peterborough.16mm.org.uk/
Ditton Meadow Light Railway (DMLR)
Member of Peterborough and District Association
http://peterborough.16mm.org.uk/
Re: Mountaineer
Looks good, Steve. There doesn't seem to be much clearance under the loco. Not sure how she would fare on my track (if it was as 32mm).
Rik
PS I'm still plodding on with PETG. starting to get decent results though still a lot of stringing. I'm aiming to print a complete wagon and then see how it goes together.
Rik
PS I'm still plodding on with PETG. starting to get decent results though still a lot of stringing. I'm aiming to print a complete wagon and then see how it goes together.
-
-steves-
- Administrator
- Posts: 2444
- Joined: Thu Jul 28, 2011 1:50 pm
- Location: Cambridge & Peterborough
Re: Mountaineer
ge_rik wrote: ↑Wed Aug 18, 2021 3:26 pm Looks good, Steve. There doesn't seem to be much clearance under the loco. Not sure how she would fare on my track (if it was as 32mm).
Rik
PS I'm still plodding on with PETG. starting to get decent results though still a lot of stringing. I'm aiming to print a complete wagon and then see how it goes together.
There is plenty of room under the chassis, it goes over my travk just fine. It is 32mm as I couldn't fit the cylinders under the loco if I did it at. 45mm, fortunately I have track in both gauges.
I might give PETG a go in the coming months, just have to get a few loco's done in the meantime
The buck stops here .......
Ditton Meadow Light Railway (DMLR)
Member of Peterborough and District Association
http://peterborough.16mm.org.uk/
Ditton Meadow Light Railway (DMLR)
Member of Peterborough and District Association
http://peterborough.16mm.org.uk/
-
Trevor Thompson
- Trainee Driver
- Posts: 984
- Joined: Fri Oct 05, 2018 6:30 pm
- Location: South West Wales
Re: Mountaineer
That is looking very good. I particularly like the rectangular sand boxes. They look just right!
Trevor
Trevor
-
Trevor Thompson
- Trainee Driver
- Posts: 984
- Joined: Fri Oct 05, 2018 6:30 pm
- Location: South West Wales
Re: Mountaineer
How is mountaineer coming along?
Have you printed a complete loco yet?
Trevor
Have you printed a complete loco yet?
Trevor
Last edited by Trevor Thompson on Fri Dec 24, 2021 7:34 am, edited 1 time in total.
-
-steves-
- Administrator
- Posts: 2444
- Joined: Thu Jul 28, 2011 1:50 pm
- Location: Cambridge & Peterborough
Re: Mountaineer
Mountaineer is complete, other than paint. It sits here along with about 8 other loco's that also need paint and some other bits doing. I have a backlog of things to CAD, things to print, things to build and things to paint. That's without friends and family asking for various loco's to be done for them. If I had 6 months without interruption I could possibly catch up, lolTrevor Thompson wrote: ↑Thu Dec 23, 2021 9:42 am How is mountaineer coming along?
Have you printed a complete lock yet?
Trevor
The buck stops here .......
Ditton Meadow Light Railway (DMLR)
Member of Peterborough and District Association
http://peterborough.16mm.org.uk/
Ditton Meadow Light Railway (DMLR)
Member of Peterborough and District Association
http://peterborough.16mm.org.uk/
-
-steves-
- Administrator
- Posts: 2444
- Joined: Thu Jul 28, 2011 1:50 pm
- Location: Cambridge & Peterborough
Re: Mountaineer
Well a bit of an update on this, not done much on it in a while. I broke the whistle off today, hence it's in resin green 
I did the lining on this in CAD and then cut it on a vinyl cutting machine and applied it.
I did the lining on this in CAD and then cut it on a vinyl cutting machine and applied it.
- IMG-20220221-WA0003.jpg (179.82 KiB) Viewed 4024 times
- IMG-20220221-WA0002.jpg (216.85 KiB) Viewed 4024 times
- IMG-20220221-WA0001.jpg (128.64 KiB) Viewed 4024 times
- IMG-20220221-WA0000.jpg (128.57 KiB) Viewed 4024 times
- FB_IMG_1645462425459.jpg (374.92 KiB) Viewed 4024 times
- FB_IMG_1645462417044.jpg (369.18 KiB) Viewed 4024 times
The buck stops here .......
Ditton Meadow Light Railway (DMLR)
Member of Peterborough and District Association
http://peterborough.16mm.org.uk/
Ditton Meadow Light Railway (DMLR)
Member of Peterborough and District Association
http://peterborough.16mm.org.uk/
-
Peter Butler

- Driver

- Posts: 5253
- Joined: Sun Sep 09, 2012 10:33 pm
- Location: West Wales
Re: Mountaineer
Love the lining Steve, makes such a difference.
The best things in life are free.... so why am I doing this?
Re: Mountaineer
Ooh thats very nice Steve. Love the lining. Do you have your own vinyl cutting m/c or do you go outside for it?
Philip
-
Trevor Thompson
- Trainee Driver
- Posts: 984
- Joined: Fri Oct 05, 2018 6:30 pm
- Location: South West Wales
Re: Mountaineer
That lining is incredible!
You will have to provide more information on how you achieved that. Is it another CNC machine to buy?
Trevor
You will have to provide more information on how you achieved that. Is it another CNC machine to buy?
Trevor
Re: Mountaineer
My questions are as above ......
ie How d'you do that then?
Rik
ie How d'you do that then?
Rik
-
-steves-
- Administrator
- Posts: 2444
- Joined: Thu Jul 28, 2011 1:50 pm
- Location: Cambridge & Peterborough
Re: Mountaineer
How to do that......
Get yourself a vinyl cutter, fortunately my wife has one called a "Cricut Maker 3". There are just cheaper ones out there for just cutting vinyl, but her one has all the bells and whistles on it, in this instance, the bells and whistles are not required, how odd for a loco hey!
Design your lines in CAD, preferably using the side of your loco as a template for the size, shape, etc.
Export as an SVG file which can be used for cutting, it only exports what is touching the build plate as it's a 2D image.
(Extra bit. I had to use Inkscape to change the colour of the lines as it seemed to export white on white, not very useful, resave the svg file)
Upload file into Cricut Design Space (that's specially used by Cricut machines, but there are other vinyl cutting programs out there which will do the same job)
Print the file onto whatever vinyl colour you like. Very carefully pick out the bits you DON'T need and discard. Put the remaining lines onto transfer tape (like Sellotape but in a much bigger, less sticky way)
Place on model in the exact right place, then extremely carefully remove transfer tape leaving the lines on the model. (sounds easier than it actually is).
Varnish with appropriate varnish to ensure nothing lifts and is smoother.
The pictures in my previous post show the latter part of this process once the lines are printed and applied.
Hope that helps explain the process??
The buck stops here .......
Ditton Meadow Light Railway (DMLR)
Member of Peterborough and District Association
http://peterborough.16mm.org.uk/
Ditton Meadow Light Railway (DMLR)
Member of Peterborough and District Association
http://peterborough.16mm.org.uk/
-
Trevor Thompson
- Trainee Driver
- Posts: 984
- Joined: Fri Oct 05, 2018 6:30 pm
- Location: South West Wales
Re: Mountaineer
Wow - that is worth looking into.
The lining is far better than I can do by hand.
I particularly like the way the quarter circles in the corners are so perfect.
It looks as though the complex lining on Corris railway coaches (for example) - with all the intersecting celtic curls might be possible this way.
Trevor
The lining is far better than I can do by hand.
I particularly like the way the quarter circles in the corners are so perfect.
It looks as though the complex lining on Corris railway coaches (for example) - with all the intersecting celtic curls might be possible this way.
Trevor
Who is online
Users browsing this forum: No registered users and 3 guests