Roundhouse Katie Kit build
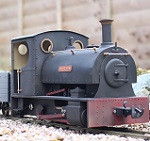
Somewhere in lockdown 1, having saved a lot of time from not having to commute, I decided I needed a hobby / something to do. After messing about with an MSS meths fired loco kit for a bit, it became clear a bigger project was needed. Money saved on commuting was therefore directed to a Roundhouse Katie kit.
The TLDR is it's a lot of fun, and extremely satisfying, to build your own loco. I think as long as you have a reasonable level of diy skill (I'd never done anything like this before) and can follow instructions + are willing to 'give things a go', its not particularly difficult.
Starting points is to screw the frames together - very easy, every part seems (to my untrained eye) beautifully machined and accurate. Tip: Get yourself a small jar with a lid to keep screws, small parts (and tools etc.) safe as you take them out of the bags they come in.
(creating this first post with the picture attachments took longer than I planned - more to come in the next few days)
I'm creating this thread to show some of the work involved for anyone else considering this step, as well as somewhere others can ask for help. I read quite a bit on this forum during the build for pointers / tips on the various things involved.The TLDR is it's a lot of fun, and extremely satisfying, to build your own loco. I think as long as you have a reasonable level of diy skill (I'd never done anything like this before) and can follow instructions + are willing to 'give things a go', its not particularly difficult.
Starting points is to screw the frames together - very easy, every part seems (to my untrained eye) beautifully machined and accurate. Tip: Get yourself a small jar with a lid to keep screws, small parts (and tools etc.) safe as you take them out of the bags they come in.
(creating this first post with the picture attachments took longer than I planned - more to come in the next few days)
Last edited by Chris_AS on Wed Jul 21, 2021 8:52 am, edited 1 time in total.
Re: Roundhouse Katie Kit build
Looking forward to seeing how this progresses, my first (only thus far) live steamer was a roundhouse kit build and I thoroughly enjoyed the process!
-
- Trainee Fireman
- Posts: 115
- Joined: Tue Oct 13, 2020 9:51 pm
Re: Roundhouse Katie Kit build
I was thinking of adding a Roundhouse kit build to my ever growing list of projects, looking forward to seeing how your build progresses!
Re: Roundhouse Katie Kit build
I built one of these some time ago. It's very easy and straightforward except for one small detail. The return crank needs to be set at 45 deg and then pinned in position. I wasn't brave emough at first to drill and pin the crank pin so just relied on doing up the clamp screw as tight as possible. All worked fine at first but it gradually moved, I think because I used it a few times to turn the wheels. Once it moves out of 45deg the valve timing goes to pot. Eventually I tried drilling the crank pin as per instructions to fit the supplied roll pin, but the drill wandered when it hit the crank pin and upset the 45 deg again so I gave up. It would be helpful if Roundhouse sold this part pre drilled and/or with return crank fitted. I will be intersted to see how you get on with this. Everything else is a piece of cake.
Re: Roundhouse Katie Kit build
Completely agree Steve. That was easily the worst / most difficult part of it. At the very least the return crank itself could be pre-drilled by Roundhouse so the drilling would be limited to putting a drill bit through the pin. I managed to do one side, but broke a couple of drill bits doing so and lost confidence to do the other side. Ended up as you did with just tightening the screw on the other side, and added a little glue to the nut for good measure.steveh99 wrote: ↑Wed Jul 21, 2021 8:19 pm I built one of these some time ago. It's very easy and straightforward except for one small detail. The return crank needs to be set at 45 deg and then pinned in position. I wasn't brave emough at first to drill and pin the crank pin so just relied on doing up the clamp screw as tight as possible. All worked fine at first but it gradually moved, I think because I used it a few times to turn the wheels. Once it moves out of 45deg the valve timing goes to pot. Eventually I tried drilling the crank pin as per instructions to fit the supplied roll pin, but the drill wandered when it hit the crank pin and upset the 45 deg again so I gave up. It would be helpful if Roundhouse sold this part pre drilled and/or with return crank fitted. I will be intersted to see how you get on with this. Everything else is a piece of cake.
Re: Roundhouse Katie Kit build
The painting starts early on in the build - really once the frame is together you'll need to start on this.
I also started on the body kit at this point so I could do most of the painting all together. Roundhouse have made the folding of the body parts very simple, and at the risk of repeating myself, quality of the parts is high. A little soldering is required for the tabs that hold the servo bracket in place. I followed the painting method described here (http://www.gardenrailwayclub.com/worksh ... e-easy-way). My tips here are to prepare well and spray in the shortest bursts you can manage. And then don't touch for longer than you think (everyone makes this mistake at least once I guess!). Blu tack is really useful to shield the places you don't want paint to go (axle bearings, boiler openings etc.)
Here's some parts heading into the oven - wait until your significant other has gone out for this bit
-
- Trainee Fireman
- Posts: 116
- Joined: Mon Mar 26, 2012 4:00 am
- Location: Wodonga, Vic. Land of Oz
Re: Roundhouse Katie Kit build
2 tricks to try on the return crank
Use a saw to continue the slot onto the other side of the crank pin opening, this allows the crank to tighten down harder without distorting the shape of the crank pin hole and with less force from the nut/bolt.
Substitute the Roundhouse nut and bolt with a stainless Allen key style bolt. These are hard to find ( I think you need 2.5mm, but check) but they are out there. The Allen key is easier to use and ensure the bolt bites down to the correct position, because once the standard Roundhouse slot goes badly out of parallel the gripping force on the pin diminishes.
Tim
- -steves-
- Administrator
- Posts: 2445
- Joined: Thu Jul 28, 2011 1:50 pm
- Location: Cambridge & Peterborough
Re: Roundhouse Katie Kit build
I cheated when I built my Katie, I done everything except the pinning. For this, I went back to Roundhouse, presented them with my work of art ( ) and they for a small sum of money, they timed, drilled and pinned it for me. It is SUPER smooth and I am glad I let them do that part, it's a one chance thing to get right
The buck stops here .......
Ditton Meadow Light Railway (DMLR)
Member of Peterborough and District Association
http://peterborough.16mm.org.uk/
Ditton Meadow Light Railway (DMLR)
Member of Peterborough and District Association
http://peterborough.16mm.org.uk/
Re: Roundhouse Katie Kit build
Haha - I'm keeping that idea for if I do another one (likely to be a Lady Anne).-steves- wrote: ↑Thu Jul 22, 2021 10:08 am I cheated when I built my Katie, I done everything except the pinning. For this, I went back to Roundhouse, presented them with my work of art ( ) and they for a small sum of money, they timed, drilled and pinned it for me. It is SUPER smooth and I am glad I let them do that part, it's a one chance thing to get right
- Old Man Aaron
- Trainee Driver
- Posts: 820
- Joined: Wed Oct 19, 2016 11:08 am
- Location: Sunshine Coast QLD, Australia
Re: Roundhouse Katie Kit build
Had to do the same on my Fowler kit, couldn't even do initial rough timing setup before that. Those M2.5 screws are easy to find (and cheap) on Evilbay.11thHour wrote: ↑Thu Jul 22, 2021 6:17 am 2 tricks to try on the return crank
Use a saw to continue the slot onto the other side of the crank pin opening, this allows the crank to tighten down harder without distorting the shape of the crank pin hole and with less force from the nut/bolt.
Substitute the Roundhouse nut and bolt with a stainless Allen key style bolt. These are hard to find ( I think you need 2.5mm, but check) but they are out there. The Allen key is easier to use and ensure the bolt bites down to the correct position, because once the standard Roundhouse slot goes badly out of parallel the gripping force on the pin diminishes.
Tim
Nice to see some painted wheels, Chris! Cylinders are just as easy to do at this stage - just don't use paint that needs the oven to cure, or you'll melt the o-ring seals. Looking forward to seeing the loco come together.
Regards,
Aaron - Scum Class Works
Re: Roundhouse Katie Kit build
A satisfying early win is fitting the decoration to the smokebox. I was really pleased with the look here. Used BBQ paint.
- -steves-
- Administrator
- Posts: 2445
- Joined: Thu Jul 28, 2011 1:50 pm
- Location: Cambridge & Peterborough
Re: Roundhouse Katie Kit build
Looks absolutely great
The buck stops here .......
Ditton Meadow Light Railway (DMLR)
Member of Peterborough and District Association
http://peterborough.16mm.org.uk/
Ditton Meadow Light Railway (DMLR)
Member of Peterborough and District Association
http://peterborough.16mm.org.uk/
Re: Roundhouse Katie Kit build
I added the running boards available from locoworks, and used the Lady Anne shape for the front buffer (U-shape rather than oval). I like the look of the boards but for the price I must admit I was expecting slightly thicker brass than you get - they feel a bit flimsy in the hand although that is obviously much less noticeable once they are fitted. Cylinder covers and buffer overlays were also added for cosmetic reasons.
Putting together the coupling rods and bits was straightforward by just following the instructions closely. A little work with the needle files and everything was running very smoothly. Extremely satisfying to push up and down a length of peco track at this point!
Bending the steam exhaust pipes was tricky for me as you don't have a guide for the shape and they have a tendency to come unscrewed from the cylinder whilst trying to manipulate them. Got close enough at this point and then managed to rig up a system with an automatic tyre pump to get it running on air.
Re: Roundhouse Katie Kit build
Cylinder covers and running boards on.
At this point there was an incident in the works and the chassis got bent (by falling off the table ). After completely despairing for a few hours / overnight, I took the whole project apart. Basically back to the start...
I assume there are better / more refined ways to do this, but by alternately pressing the bent frame in a vice and hitting with a rubber hammer against a hard flat surface, I managed to straighten it back into line.
No pictures of that bit as it was too traumatic!
Then it was onto installing the servos for the RC and thinking about bending all the pipework on the footplate!
Re: Roundhouse Katie Kit build
Bending the pipework was daunting, but ultimately surprisingly straightforward and satisfying.
And with that all done, how could I resist!! After emptying what looked like half a boiler of water at first, she ran beautifully on the second firing.
Re: Roundhouse Katie Kit build
I added a summerlands chuffer at this point but neglected to take any pictures. Then on to the bodywork!
Re: Roundhouse Katie Kit build
And here she is finished, in the summer sun!*
And running on my brother's line
* I have since added a slomo, custom nameplates, doors, backsheet and a driver ----- photo / video to come!
And running on my brother's line
* I have since added a slomo, custom nameplates, doors, backsheet and a driver ----- photo / video to come!
Re: Roundhouse Katie Kit build
Here we go.
I named her 'Esme' - after a character from my favourite books (the Discworld series by Terry Pratchett) and also as a pun - the name stems from the French word for 'to esteem'.
I hope this thread was of use / entertainment to someone. I had great fun building Esme...just need a permanent track for her
- Old Man Aaron
- Trainee Driver
- Posts: 820
- Joined: Wed Oct 19, 2016 11:08 am
- Location: Sunshine Coast QLD, Australia
Re: Roundhouse Katie Kit build
Runs as well as it looks, fine work, sir. All black is a very dignified and straightforward livery, I must say.
Regards,
Aaron - Scum Class Works
Re: Roundhouse Katie Kit build
Wow!! That slow running is really impressive ..... and no sign of a Slomo ....
Rik
Rik
Who is online
Users browsing this forum: No registered users and 0 guests