

Hi Greg
£18! Wow!
That compares with £130 for one of my set-ups. ie Deltang receiver/controller (£40), Deltang tx (£35), MLS card (£50), speaker (£5).
I'm going to have to explore making my own gear as I dodder more into my dotage. I particularly like the idea of tinkering around to create sounds, though don't have an oscilloscope so might have to go down the digitised route.
Rik
Building a freelance diesel for push-up duty
Re: Building a freelance diesel for push-up duty
My thinking too, based on my experiments with my railmotor, https://gardenrails.org/forum/viewtopic ... 37&t=10095tom_tom_go wrote: ↑Thu Feb 28, 2019 7:49 am Couldn't you use one MP3 player rather than multiple sound cards?
The problem is to find a way of masking the 1sec gap between tracks. I'd also like to use a Picaxe or Arduino to do the switching automatically rather than having to do it manually.
Rik
-
tom_tom_go

- Driver

- Posts: 4824
- Joined: Wed Feb 23, 2011 3:08 am
- Location: Kent, UK
- Contact:
Re: Building a freelance diesel for push-up duty
That looks useful - I like the way you can select different tracks by connecting one of the pins to ground with different values of resistor. I like things kept simple.tom_tom_go wrote: ↑Thu Feb 28, 2019 8:20 am This was mentioned on the forum MP3 wise:
https://www.dfrobot.com/wiki/index.php/ ... KU:DFR0299
Sorry, Greg, hijacking your thread. Will start another one.
Rik
-
gregh
- Trainee Driver

- Posts: 574
- Joined: Sun Apr 01, 2018 5:44 am
- Location: Sydney, Australia
- Contact:
Re: Building a freelance diesel for push-up duty
Just a bit more info here on why I need a ‘push-up’ loco.
Trains heading from Sandstone to Melaleuca, face a grade of 1:38, but trains leaving Melaleuca heading ‘home’ to Termite (my indoor storage) face grades up to 1:25 for about 30 metres. (When I built it I was hoping for easier grades but I got tired of chiselling through the solid rock.) This means that fully loaded trains arriving at Melaleuca from Sandstone will be overloaded if they continue. So trains must either:-
use a larger loco
split the load and leave some wagons at Melaleuca for a later train,
Add a second loco on the front, or
use a push-up loco
The section shown as 1:39 grade includes the big ‘horseshoe trestle’ curve where the line turns back on itself on a 1m radius curve, so it is really more like equivalent to 1:25.
The loads that my larger locos can haul are actually limited by this sharp curve, not the grade – long trains are likely to ‘stringline’ where the weight of the train pulling across the curve causes the wagons to tip inwards. (I use hook and chain coupling so they never come apart in a derailment !)
Stringlining can be partly overcome by assisting in the rear. ie using a loco at the rear to push.
I have set up ‘notional’ loads for my locos based on a 4-wheel wagon= ‘1’ and a bogie wagon=’2’ and divided my locos into four ‘load classes’. This is summarised in this Load Table. (Most of my locos can actually haul lots more than their ‘rated load’ but my rules make my operating more fun.)
From experience, I have set the max load around the sharp curve at ‘16’ ie 16, 4-wheelers or 8 bogie wagons. From the table it can then be seen that attaching a push-up loco at Melaleuca allows any train arriving from Sandstone to continue to Termite. Smaller trains can use an additional loco on the front if that is preferred.
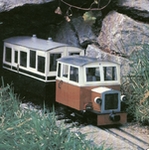
In this video my ‘small’ Garratt has brought 8 bogie wagons (=16 ‘loads’) up to Melaleuca, but is only ‘allowed’ to take 12 from there to Termite.
So my new #15 pushup loco is brought in to help. Because I use chain couplings, I can tell how many wagons are being hauled by the front loco (chains stretched out) and how many are being pushed by the helper (wagons ‘closed up’). The pushup loco is not coupled to the train and to operate the train I set the Garratt at full speed (which is pretty slow) and then adjust the speed of the pushup to be pushing 2 or 3 bogie wagons. The train is moving at a scale 25 kph.
Trains heading from Sandstone to Melaleuca, face a grade of 1:38, but trains leaving Melaleuca heading ‘home’ to Termite (my indoor storage) face grades up to 1:25 for about 30 metres. (When I built it I was hoping for easier grades but I got tired of chiselling through the solid rock.) This means that fully loaded trains arriving at Melaleuca from Sandstone will be overloaded if they continue. So trains must either:-
use a larger loco
split the load and leave some wagons at Melaleuca for a later train,
Add a second loco on the front, or
use a push-up loco
- lineProfileSands to Termite.gif (14.46 KiB) Viewed 5111 times
The loads that my larger locos can haul are actually limited by this sharp curve, not the grade – long trains are likely to ‘stringline’ where the weight of the train pulling across the curve causes the wagons to tip inwards. (I use hook and chain coupling so they never come apart in a derailment !)
Stringlining can be partly overcome by assisting in the rear. ie using a loco at the rear to push.
I have set up ‘notional’ loads for my locos based on a 4-wheel wagon= ‘1’ and a bogie wagon=’2’ and divided my locos into four ‘load classes’. This is summarised in this Load Table. (Most of my locos can actually haul lots more than their ‘rated load’ but my rules make my operating more fun.)
- load table 2019.jpg (118.44 KiB) Viewed 5111 times
In this video my ‘small’ Garratt has brought 8 bogie wagons (=16 ‘loads’) up to Melaleuca, but is only ‘allowed’ to take 12 from there to Termite.
So my new #15 pushup loco is brought in to help. Because I use chain couplings, I can tell how many wagons are being hauled by the front loco (chains stretched out) and how many are being pushed by the helper (wagons ‘closed up’). The pushup loco is not coupled to the train and to operate the train I set the Garratt at full speed (which is pretty slow) and then adjust the speed of the pushup to be pushing 2 or 3 bogie wagons. The train is moving at a scale 25 kph.
Greg from downunder.
The Sandstone & Termite's website: https://members.optusnet.com.au/satr/satr.htm
The Sandstone & Termite's website: https://members.optusnet.com.au/satr/satr.htm
Re: Building a freelance diesel for push-up duty
Fantastic. Love the use of a banker to assist big trains up the gradient.
Ian
Re: Building a freelance diesel for push-up duty
Nicely explained video, Greg. Good to see the little loco in action.
Rik
Rik
Re: Building a freelance diesel for push-up duty
I love this build. It's far better then those shop bought ones....
ROD
Life is so easy when I run my trains.


https://gardenrails.org/forum/viewtopic ... 41&t=11364
https://www.youtube.com/@fairywoodlightrailway
Life is so easy when I run my trains.


https://gardenrails.org/forum/viewtopic ... 41&t=11364
https://www.youtube.com/@fairywoodlightrailway
Who is online
Users browsing this forum: No registered users and 0 guests