Time to build a railway...but where?

A place for the discussion of garden railways and any garden style/scale portable and/or indoor layouts
Post Reply
User avatar
Peter Butler
Driver
Driver
Posts: 5713
Joined: Sun Sep 09, 2012 10:33 pm
Location: West Wales

Post by Peter Butler » Thu Oct 02, 2014 10:22 pm

jim@NAL:104573 wrote:looking good peter how did you get the platic card to look like wood ???.how's the castle going ???
Many thanks for the response.....
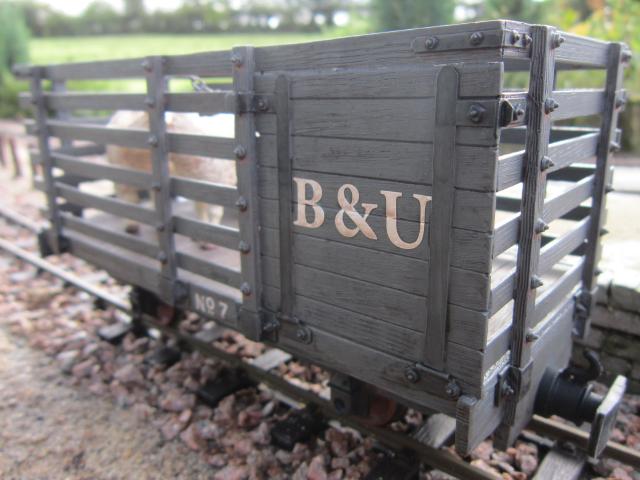
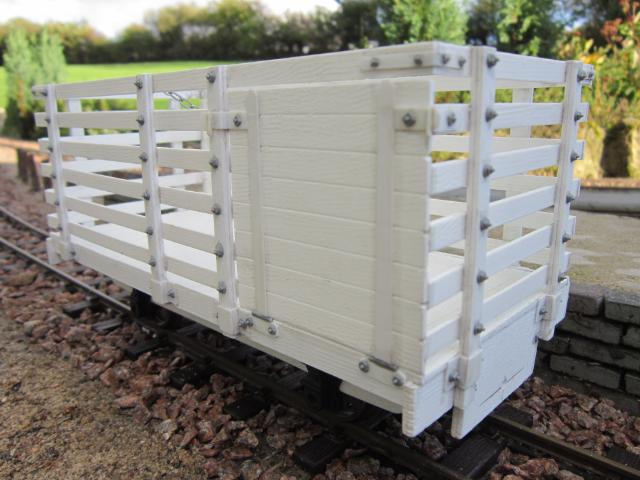
The plastic card/wood effect is simple, just take a razor saw and scrape it on the surface and edges of the card in the direction of grain, then smooth off the shavings with fine sandpaper. Also, remember to show end grain on exposed edges. I have used this method on previous models and find it gives a very convincing result. I think it looks more convincing than wood itself, particularly in this scale.
As for the castle.... it has come to a temporary halt while I try to work out how to construct connecting walls between the towers. It will be completed eventually but now the weather is becoming more unpredictable I am prepared to wait until I can be sure of the correct conditions to work.
User avatar
Peter Butler
Driver
Driver
Posts: 5713
Joined: Sun Sep 09, 2012 10:33 pm
Location: West Wales

Post by Peter Butler » Thu Oct 02, 2014 10:34 pm

McRuss:104569 wrote:Hello,

what dimensions did you use for the plastic profiles?

Markus
Interesting question....... I usually don't use much in the way of measurements as I tend to construct by eye....... if it looks right, it is right!
In this case though I did have a drawing to work from so I looked at the size of my model sheep and calculated the dimensions and the number of slats which made up each side of the wagon and came up with the result. The card is 1.5mm thick and each slat is a scale five inches, which I use a 16mm/ft. scale rule to measure. That should show my complete disregard for measuring instruments!!!

User avatar
Peter Butler
Driver
Driver
Posts: 5713
Joined: Sun Sep 09, 2012 10:33 pm
Location: West Wales

Post by Peter Butler » Sat Oct 04, 2014 9:56 pm

Much more progress to report on the sheep wagon. As you will recall, my order for bolt heads was confirmed on Thursday and despite the advice that orders can take up to 21 days, those good people at Cambrian managed to deliver this morning! All are now fitted to the wagon....
Image

As the weather has been so nice today, I also managed to spray a coat of grey primer...
Image

Image

Then a wash of brown acrylic paint to cover the floor boards which are also made to look like wood grain using the same method of scraping and sanding.
Image

I have fitted a chain across the centre of the wagon as I'm sure I have seen this done somewhere in the past, although not shown on the drawing I copied from. I think this was used to stop the sides flexing too much as they are only held in metal sockets on the sides of the flat truck? Anyway, it adds to the detail!

User avatar
Peter Butler
Driver
Driver
Posts: 5713
Joined: Sun Sep 09, 2012 10:33 pm
Location: West Wales

Post by Peter Butler » Sun Oct 05, 2014 12:13 pm

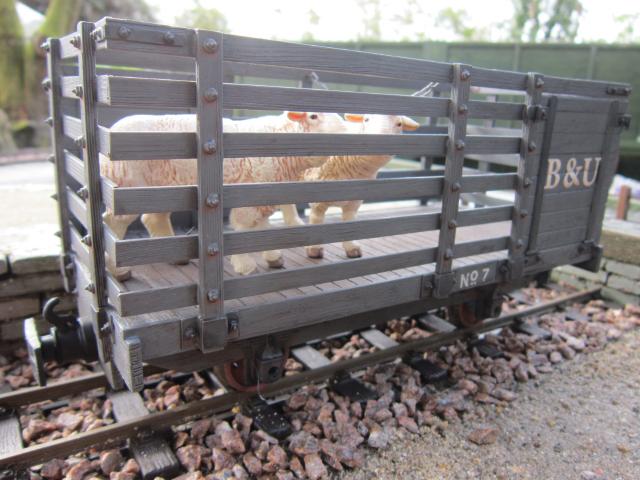
Weathered, lightly rusted around the metal fittings, lettered and matt varnished and 'passengers' installed. I think another sheep is required to fill in the gap so that will be bought tomorrow. Other than that, job done!

Image
Image

Big Al

Post by Big Al » Sun Oct 05, 2014 7:45 pm

That looks great I do like the bolt heads and wood effect.

User avatar
Dr. Bond of the DVLR
Retired Director
Retired Director
Posts: 4529
Joined: Tue Jun 09, 2009 9:43 pm
Location: Suffolk
Contact:

Post by Dr. Bond of the DVLR » Sun Oct 05, 2014 9:53 pm

Looking good - will you be modeling the sheep leavings with more miliput?
Image
The railway which people forgot
(to build)

User avatar
Peter Butler
Driver
Driver
Posts: 5713
Joined: Sun Sep 09, 2012 10:33 pm
Location: West Wales

Post by Peter Butler » Sun Oct 05, 2014 10:07 pm

I am tempted, Mr Bond!
If you are familiar with the things sheep leave behind, you will know they are very small, dark and round. If they can be seen inside the wagon I might try but the effort might not be appreciated?

Big Jim

Post by Big Jim » Sun Oct 05, 2014 10:55 pm

Tempted as I am to make some comment about travelling knocking shops, I will refrain.

What was the prototype you based it on. Trallee and Dingle by any chance?

User avatar
Peter Butler
Driver
Driver
Posts: 5713
Joined: Sun Sep 09, 2012 10:33 pm
Location: West Wales

Post by Peter Butler » Mon Oct 06, 2014 8:05 pm

Big Jim, in answer to your question, this is the picture I printed off the 'net which formed the basis of my sheep wagon. I have no idea where it came from or what it is based on!
Image
The third sheep has now been installed and the job is complete.

Next project...... I was just bored yesterday so looked in my bits box and came up with slate wagon axle boxes and curly spoked wheels. This is the result...

Image
Today I added lettering and weathering which I will show tomorrow.

User avatar
paullad1984
Fireman
Fireman
Posts: 272
Joined: Sat Mar 09, 2013 11:18 am
Location: United Kingdom

Post by paullad1984 » Mon Oct 06, 2014 9:14 pm

Accucraft "Welshpool & Llanfair" sheep wagon.

User avatar
Peter Butler
Driver
Driver
Posts: 5713
Joined: Sun Sep 09, 2012 10:33 pm
Location: West Wales

Post by Peter Butler » Mon Oct 06, 2014 9:20 pm

paullad1984:104657 wrote:Accucraft "Welshpool & Llanfair" sheep wagon.
I have the Welshpool and Llanfair book in which there is only one photograph of their sheep wagon and no drawing. The illustration I used is a very loose interpretation of that but I can see the influence.

User avatar
Peter Butler
Driver
Driver
Posts: 5713
Joined: Sun Sep 09, 2012 10:33 pm
Location: West Wales

Post by Peter Butler » Tue Oct 07, 2014 9:28 pm

Final touches to the equipment truck...
Image

Now on to the next project.
I received a gift on Monday from a fellow Forum member. This is a road vehicle to add to my visitors car park in keeping with the rest.

Image
It is the yellow 'Beetle'
All of my other cars have now been converted to RHD and this will be no exception. To do this I first have to dismantle the vehicle..
Image

Image

Image

Having got this far I thought I might change the colour as my memories of the earlier 'Beetles' was them being.......
Image
Orange!
Image
The inside has been altered to suit too... upholstery is now cream, not grey, and carpets are brown, not grey!

Dash has been rebuilt to move instruments and steering wheel over but not yet installed as the Milliput takes a while to set.

User avatar
Dr. Bond of the DVLR
Retired Director
Retired Director
Posts: 4529
Joined: Tue Jun 09, 2009 9:43 pm
Location: Suffolk
Contact:

Post by Dr. Bond of the DVLR » Tue Oct 07, 2014 9:45 pm

Tool wagon looks the buisness, does the number 41 reflect how many wagons you have built?
Image
The railway which people forgot
(to build)

User avatar
Peter Butler
Driver
Driver
Posts: 5713
Joined: Sun Sep 09, 2012 10:33 pm
Location: West Wales

Post by Peter Butler » Tue Oct 07, 2014 10:12 pm

Mr. Bond of the DVLR:104689 wrote:Tool wagon looks the buisness, does the number 41 reflect how many wagons you have built?
Not quite!
I haven't made a list of my stock and don't number them in sequence.
There are probably 20-30 items of goods stock, several of them in purpose made boxes, so I tend to forget they are there.
Prototype vehicles on preserved railways might have random numbers as some could be brought in from elsewhere and others from the original line scrapped. Perhaps one day I will make a stock list?

jim@NAL
Driver
Driver
Posts: 1142
Joined: Sun Sep 23, 2012 11:01 am
Location: haverhill suffok

Post by jim@NAL » Wed Oct 08, 2014 7:12 pm

love the colour of the beetle peter

User avatar
Peter Butler
Driver
Driver
Posts: 5713
Joined: Sun Sep 09, 2012 10:33 pm
Location: West Wales

Post by Peter Butler » Tue Oct 14, 2014 2:24 pm

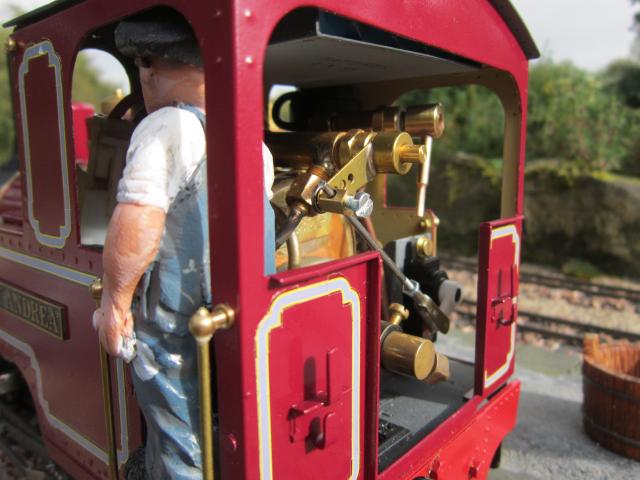
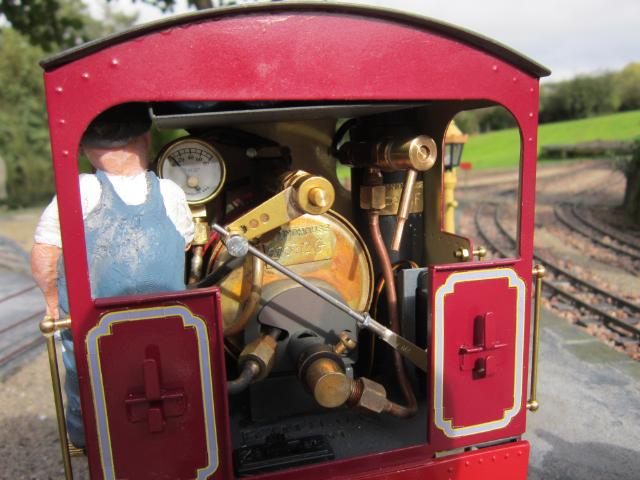
My new gas lever, as offered by 'Gremlin' on this Forum, arrived this morning. I couldn't wait to fit and test it so here are some pictures of it in situ.....

Image

Image

Image

Of the two types available I chose the round handle which looks just right. The setting is so much easier when you can see the position of the lever. I managed to reduce the gas flow gradually and now have an idea where the lever should be positioned for maximum running time. Although this has been my first running session using the lever I got just under 35 minutes from my 'Billy' which is better than before but still room for improvement with practice.
Many thanks to you Gremlin for a brilliant addition to an outstanding product from Roundhouse.

User avatar
Dannypenguin
Trainee Driver
Trainee Driver
Posts: 632
Joined: Tue Feb 26, 2013 9:57 am
Location: Forest of Dean, UK
Contact:

Post by Dannypenguin » Tue Oct 14, 2014 2:44 pm

Peter Butler:104653 wrote: Next project......  I was just bored yesterday so looked in my bits box and came up with slate wagon axle boxes and curly spoked wheels.  This is the result...

Image
 Today I added lettering and weathering which I will show tomorrow.
Would you like to come to my railway and get bored? ;)
Dan

Visit the PFLR website - http://poultonfarmlightrailway.webs.com/
Dean Forest Railway Society website - http://dfrsociety.org/

User avatar
Gremlin
Trainee Driver
Trainee Driver
Posts: 695
Joined: Sun Feb 08, 2009 2:46 pm
Location: Kent

Post by Gremlin » Tue Oct 14, 2014 7:46 pm

glad it arrived quickly and you are happy, hope you fine tune for a longer run, I've managed 50 mins out of my Katie with a gas lever fitted. :D

User avatar
Peter Butler
Driver
Driver
Posts: 5713
Joined: Sun Sep 09, 2012 10:33 pm
Location: West Wales

Post by Peter Butler » Fri Oct 24, 2014 9:52 pm

As winter is rapidly approaching and outdoor work is becoming less appealing I have decided to begin some structures to place on my railway.
The line is built in such a way I can run both 16mm stock and my 'Emetts' but with different scale (and appearance) to suit the occasion. None of my structures are intended to be left outdoors, with the exception of the castle, so I can use a variety of materials and give more detail to their build.
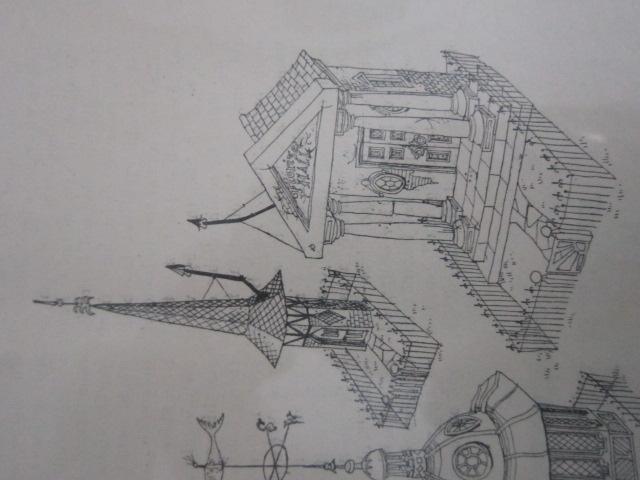
The first is taken from a sketch by Emett which I saw on display at the recent exhibition in Birmingham.

Image
This is the only drawing so I have to use a certain amount of imagination..
Image
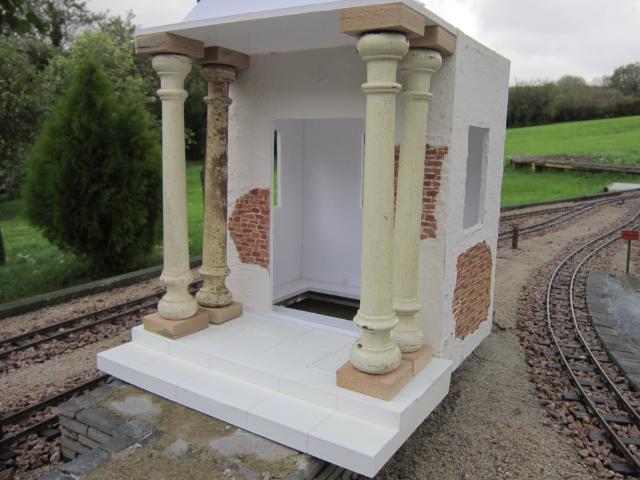
It is made from foam board which is light weight but quite rigid, especially when it is glued and braced.
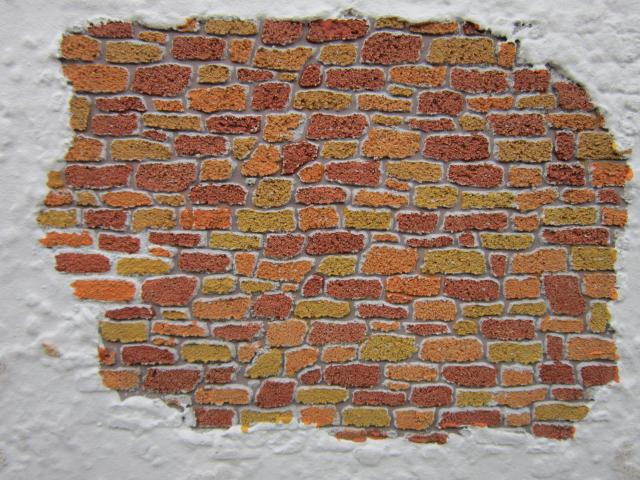
The drawing shows an upmarket frontage built onto a very humble house, clearly past its best with render falling away from the stonework beneath. I have created this effect with a stencil and paste mix which I mentioned on this thread about a year ago but never got time to use until now.
Image
The stones are then picked out individually with acrylic paint..
Image
More soon showing the windows installed and columns fitted.

User avatar
philipy
Moderator
Moderator
Posts: 6028
Joined: Sun Jan 30, 2011 3:00 pm
Location: South Northants

Post by philipy » Sat Oct 25, 2014 6:29 am

I like that Peter. Thanks for showing us, I think I might have to try the stencil system myself.
Philip

Post Reply

Who is online

Users browsing this forum: No registered users and 30 guests