

Very nice Greg, thanks. I particularky like the perfect 'majestic' speed of the diesel in the video,
Just out of interest, the only times I've personally ever seen sugar cane being transported was in Egypt and there it is moved still green, so I was surprised to see the loads in your pictures apparently in the dried state, but I assume this is how it is done in your part of the world? Dried in the field presumably?
Sandstone and Termite
Re: Sandstone and Termite
Philip
-
gregh
- Trainee Driver

- Posts: 570
- Joined: Sun Apr 01, 2018 5:44 am
- Location: Sydney, Australia
- Contact:
Re: Sandstone and Termite
Interesting that you say that Philip. I wondered the same thing, but a search for Australian cane railways images on the web, shows the cut cane is brown, but not quite the same as Mark's which are broom straws. (maybe we need to wait for GAP to tells us - he lives in sugar cane country. The nearest cane to me is 500miles away)philipy wrote: ↑Sun Sep 20, 2020 6:16 am Very nice Greg, thanks. I particularky like the perfect 'majestic' speed of the diesel in the video,
Just out of interest, the only times I've personally ever seen sugar cane being transported was in Egypt and there it is moved still green, so I was surprised to see the loads in your pictures apparently in the dried state, but I assume this is how it is done in your part of the world? Dried in the field presumably?
Greg from downunder.
The Sandstone & Termite's website: https://members.optusnet.com.au/satr/satr.htm
The Sandstone & Termite's website: https://members.optusnet.com.au/satr/satr.htm

Re: Sandstone and Termite
Love your Hartland Mack Greg, especially the colour.
ROD
Life is so easy when I run my trains.


https://gardenrails.org/forum/viewtopic ... 41&t=11364
https://www.youtube.com/@fairywoodlightrailway
Life is so easy when I run my trains.


https://gardenrails.org/forum/viewtopic ... 41&t=11364
https://www.youtube.com/@fairywoodlightrailway
-
gregh
- Trainee Driver
- Posts: 570
- Joined: Sun Apr 01, 2018 5:44 am
- Location: Sydney, Australia
- Contact:
Re: Sandstone and Termite
More BORING maintenance work.
The reversing loops inside the train room are controlled by an automatic turnout. Light dependent resistors between the rails detect the trains and set the turnout accordingly. This was my first attempt at remote control and I used a couple of 'on-hand' chunky solenoids. A Picaxe controls the energisation of each solenoid. Over the years the mounting wood has rotted so I had to replace. The solenoids are 30V, 2A so I used big transistors to drive them - only energised for a second - mounted in that little plastic box.
Pretty ugly but it works.
The LDR shown here is to detect a train over the turnout so as not to move them while 'occupied'.
(That's a piece of clear plastic in the tunnel forming the slide up 'door' to the outside.)
Next job was the lifting bridge over the doorway to the train room.
It is still the same 2x2" wood frame from 1994, although starting to rot. The original in 1994 had a fibro top and it lasted till 2013 when it had cracked so much I replaced it with Masonite - not a good idea. It only lasted 7 years. So I now have used two, 1.5mm thicknesses of styrene for the top, well painted. (original aluminium track still OK) One thing I did right in the original was to mount the track at the 2 ends on fixed, flat aluminium plates,(not the fibro / masonite) so I didn't have to touch them and the track lines up at both ends.
Most of time the bridge is folded back so the underside gets all the sun and rain and that caused the masonite to rot. So now I have also covered the underside with corrflute. Here's the composite pic showing it open and closed.
Note the safety 'gate' at the left end. When running trains, it swings over/along the bridge so the bridge then cannot be lifted without putting the gate back across the track.
The reversing loops inside the train room are controlled by an automatic turnout. Light dependent resistors between the rails detect the trains and set the turnout accordingly. This was my first attempt at remote control and I used a couple of 'on-hand' chunky solenoids. A Picaxe controls the energisation of each solenoid. Over the years the mounting wood has rotted so I had to replace. The solenoids are 30V, 2A so I used big transistors to drive them - only energised for a second - mounted in that little plastic box.
Pretty ugly but it works.
- turnout control caption.jpg (137.3 KiB) Viewed 8149 times
(That's a piece of clear plastic in the tunnel forming the slide up 'door' to the outside.)
Next job was the lifting bridge over the doorway to the train room.
It is still the same 2x2" wood frame from 1994, although starting to rot. The original in 1994 had a fibro top and it lasted till 2013 when it had cracked so much I replaced it with Masonite - not a good idea. It only lasted 7 years. So I now have used two, 1.5mm thicknesses of styrene for the top, well painted. (original aluminium track still OK) One thing I did right in the original was to mount the track at the 2 ends on fixed, flat aluminium plates,(not the fibro / masonite) so I didn't have to touch them and the track lines up at both ends.
Most of time the bridge is folded back so the underside gets all the sun and rain and that caused the masonite to rot. So now I have also covered the underside with corrflute. Here's the composite pic showing it open and closed.
- bridge open and closed.jpg (196.93 KiB) Viewed 8149 times
Greg from downunder.
The Sandstone & Termite's website: https://members.optusnet.com.au/satr/satr.htm
The Sandstone & Termite's website: https://members.optusnet.com.au/satr/satr.htm

Re: Sandstone and Termite
That point at the entrance to the reverse loop looks interesting, Greg. Scratchbuilt?
Rik
Rik
Re: Sandstone and Termite
Great job Greg.
ROD
Life is so easy when I run my trains.
https://gardenrails.org/forum/viewtopic ... 41&t=11364
https://www.youtube.com/@fairywoodlightrailway
Life is so easy when I run my trains.
https://gardenrails.org/forum/viewtopic ... 41&t=11364
https://www.youtube.com/@fairywoodlightrailway
-
gregh
- Trainee Driver
- Posts: 570
- Joined: Sun Apr 01, 2018 5:44 am
- Location: Sydney, Australia
- Contact:
Re: Sandstone and Termite
Thanks Rod and Rik.
Yes that was my first scratchbuilt turnout. I could only buy some "O" gauge rail at the time, so used the 'old' copper clad board method from HO days. (all the old track power wiring is still in place!)
- DSCN1938.JPG (154.02 KiB) Viewed 7965 times
You may be alluding to the 'funny' guard rails at the entrance to the turnout. They were the solution to the fact I didn't allow enough clearance as is this pic. I could have resoldered the moving rail, but chose this simpler method. (It's a recurring problem even with turnouts I make these days - some people never learn!)
- DSCN1939 c.jpg (350.77 KiB) Viewed 7965 times
Greg from downunder.
The Sandstone & Termite's website: https://members.optusnet.com.au/satr/satr.htm
The Sandstone & Termite's website: https://members.optusnet.com.au/satr/satr.htm
Re: Sandstone and Termite
Your'e not the only one Greg....I seem to make mistakes all the time..... 

ROD
Life is so easy when I run my trains.
https://gardenrails.org/forum/viewtopic ... 41&t=11364
https://www.youtube.com/@fairywoodlightrailway
Life is so easy when I run my trains.
https://gardenrails.org/forum/viewtopic ... 41&t=11364
https://www.youtube.com/@fairywoodlightrailway
Re: Sandstone and Termite
Nifty!
Rik
Rik
-
gregh
- Trainee Driver
- Posts: 570
- Joined: Sun Apr 01, 2018 5:44 am
- Location: Sydney, Australia
- Contact:
Re: Sandstone and Termite
and now the next exciting episode of my maintenance.
How come that for every job I do, I find another two????
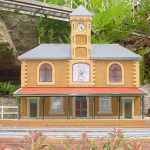
While leveling the 4 parallel tracks at Sandstone, I noticed that the left end of the platform had sunk (I sometimes step on it, and it's just a piece of 2" thick Hebel.)
And the track had buckled up due to expansion. The result was a platform almost at ground level.
The main problem is that in front of the building the track must be level, but at the left end the track height is fixed by the big sandstone ledge. So that 2' length of platform has to be on a grade.
So I reduced the rail lengths by 3mm to allow expansion, did some 'horrible' vertical bending of the track to accommodate the two grade changes. Then dug up the platform and raised it. And repainted it all with oxides mixed with water. I also repaired and painted the fences. Here's the result
and the overall view.
Then while running a test train for the platform, I had a derailment on one of my concrete path crossings. I have 6 crossings. The earlier ones (c. 1995) are my aluminium bar rails in slotted wooden sleepers, covered in concrete.
But now I notice that the concrete over the sleepers has broken and the sleepers rotted so the track is under gauge. I'm not going to rip them up!!!
So as a start, on the worst crossing, I made some aluminium 45mm spacers to temporarily hold the rails at gauge, then used pure cement (no sand) to fill between the rails up to 3mm below rail tops.
You can see here..
I only did half the crossing and will wait for summer weather to test the conc strength before I do the other crossings.
And if you look at the top of the left pic you can see the timber crib wall. And guess what? It's rotten and falling apart, so watch for the next installment on repairing it.
How come that for every job I do, I find another two????
While leveling the 4 parallel tracks at Sandstone, I noticed that the left end of the platform had sunk (I sometimes step on it, and it's just a piece of 2" thick Hebel.)
And the track had buckled up due to expansion. The result was a platform almost at ground level.
- DSCN1937.JPG (283.4 KiB) Viewed 7783 times
The main problem is that in front of the building the track must be level, but at the left end the track height is fixed by the big sandstone ledge. So that 2' length of platform has to be on a grade.
So I reduced the rail lengths by 3mm to allow expansion, did some 'horrible' vertical bending of the track to accommodate the two grade changes. Then dug up the platform and raised it. And repainted it all with oxides mixed with water. I also repaired and painted the fences. Here's the result
- DSCN1940.JPG (272.6 KiB) Viewed 7783 times
- DSCN1948.JPG (281.62 KiB) Viewed 7783 times
Then while running a test train for the platform, I had a derailment on one of my concrete path crossings. I have 6 crossings. The earlier ones (c. 1995) are my aluminium bar rails in slotted wooden sleepers, covered in concrete.
But now I notice that the concrete over the sleepers has broken and the sleepers rotted so the track is under gauge. I'm not going to rip them up!!!
So as a start, on the worst crossing, I made some aluminium 45mm spacers to temporarily hold the rails at gauge, then used pure cement (no sand) to fill between the rails up to 3mm below rail tops.
You can see here..
- before and after comp.jpg (178.07 KiB) Viewed 7783 times
And if you look at the top of the left pic you can see the timber crib wall. And guess what? It's rotten and falling apart, so watch for the next installment on repairing it.
Greg from downunder.
The Sandstone & Termite's website: https://members.optusnet.com.au/satr/satr.htm
The Sandstone & Termite's website: https://members.optusnet.com.au/satr/satr.htm
Re: Sandstone and Termite
Really nice job on the platform Greg. Love the colour of the stone....
ROD
Life is so easy when I run my trains.
https://gardenrails.org/forum/viewtopic ... 41&t=11364
https://www.youtube.com/@fairywoodlightrailway
Life is so easy when I run my trains.
https://gardenrails.org/forum/viewtopic ... 41&t=11364
https://www.youtube.com/@fairywoodlightrailway
-
gregh
- Trainee Driver
- Posts: 570
- Joined: Sun Apr 01, 2018 5:44 am
- Location: Sydney, Australia
- Contact:
Re: Sandstone and Termite
Would you believe the official name of the colour I use is "Sandstone" !!
Greg from downunder.
The Sandstone & Termite's website: https://members.optusnet.com.au/satr/satr.htm
The Sandstone & Termite's website: https://members.optusnet.com.au/satr/satr.htm
Re: Sandstone and Termite
Very smart, Greg. Something which rarely seems to be covered in posts is general maintenance, but it's something we all have to engage in constantly. Maybe you've started a trend?
Rik
Rik
Re: Sandstone and Termite
ROD
Life is so easy when I run my trains.
https://gardenrails.org/forum/viewtopic ... 41&t=11364
https://www.youtube.com/@fairywoodlightrailway
Life is so easy when I run my trains.
https://gardenrails.org/forum/viewtopic ... 41&t=11364
https://www.youtube.com/@fairywoodlightrailway
-
gregh
- Trainee Driver
- Posts: 570
- Joined: Sun Apr 01, 2018 5:44 am
- Location: Sydney, Australia
- Contact:
Re: Sandstone and Termite
I don't know if it will start a trend. We all seem to enjoy reading about new builds. BUT since I am not building anything new, all I can offer is the maintenance work.
Greg from downunder.
The Sandstone & Termite's website: https://members.optusnet.com.au/satr/satr.htm
The Sandstone & Termite's website: https://members.optusnet.com.au/satr/satr.htm
-
Old Man Aaron

- Trainee Driver
- Posts: 807
- Joined: Wed Oct 19, 2016 11:08 am
- Location: Sunshine Coast QLD, Australia
Re: Sandstone and Termite
Certainly interesting, nevertheless. I'm looking forward to seeing more, as and when it happens. It's a bit like seeing those videos on Youtube, wherein some old object, tool or machine is fully restored - we get to see the repairs and improvements, without the chore and drudgery of actually doing the work!
Regards,
Aaron - Scum Class Works
Aaron - Scum Class Works
-
gregh
- Trainee Driver
- Posts: 570
- Joined: Sun Apr 01, 2018 5:44 am
- Location: Sydney, Australia
- Contact:
Re: Sandstone and Termite
As mentioned in my last post, the crib wall along Maple Jn is made from treated pine 2"x1"x1/4", the same wood I use for my sleepers.
I built it in 2006 but now it is starting to rot. Virtually impossible to replace individual 'slats' as they are nailed together, one above the other.
This shows the problem.
I decided to just fill in between all the slats with concrete, hoping that will extend its life by 10 years or so.
I lifted the track in front (coal loader siding) to allow easier access. I coloured the concrete with brown oxide and left the slats sticking out by 1/2" or so to keep the crib look.
Here's a closeup
The siding also had many rotten sleepers, so I replaced a few - just enough to hold in gauge. I will then concrete the whole track in. As it is an 'industrial' siding I figure covering all the sleepers almost up to rail top will look prototypical enough. This has not been done yet due to bad weather.
I built it in 2006 but now it is starting to rot. Virtually impossible to replace individual 'slats' as they are nailed together, one above the other.
This shows the problem.
- before1.JPG (277.97 KiB) Viewed 7401 times
I decided to just fill in between all the slats with concrete, hoping that will extend its life by 10 years or so.
I lifted the track in front (coal loader siding) to allow easier access. I coloured the concrete with brown oxide and left the slats sticking out by 1/2" or so to keep the crib look.
Here's a closeup
- partdone1.JPG (219.26 KiB) Viewed 7401 times
The siding also had many rotten sleepers, so I replaced a few - just enough to hold in gauge. I will then concrete the whole track in. As it is an 'industrial' siding I figure covering all the sleepers almost up to rail top will look prototypical enough. This has not been done yet due to bad weather.
- finished2.JPG (272.05 KiB) Viewed 7401 times
Greg from downunder.
The Sandstone & Termite's website: https://members.optusnet.com.au/satr/satr.htm
The Sandstone & Termite's website: https://members.optusnet.com.au/satr/satr.htm
Re: Sandstone and Termite
Sounds and looks like a really effective repair, Greg. Fingers crossed for the next ten years.
Rik
Rik
-
gregh
- Trainee Driver
- Posts: 570
- Joined: Sun Apr 01, 2018 5:44 am
- Location: Sydney, Australia
- Contact:
Re: Sandstone and Termite
This next job wasn't even on the list of things to do, but many derailments forced me into it.
The first bit of track I laid back in 1994 was to get through the wall of my train room and across the concrete ramp just outside. The ramp is on a 1:5 grade!
I was using 3x12mm aluminium bar rail in timber sleepers . I covered the whole track across the path with concrete.
This is the 'now' picture. The concrete has cracked and exposed the sleepers which have rotted away. You can see some unsuccessful attempts to repair the track gauge with silicone and Builders Bog.
And this is the piece of track from the path to the wall on a steel channel. You notice I put many electrical wire in the path crossing as I was using track power and I allowed plenty for future needs.
So it was out with the hammer and chisel and rip it up!
I also had to replace about 3' of track adjacent to the concrete where I had used old Aristo plastic sleepers-they had disintegrated in the sun!
So the 4' path crossing finished up needing about 12' of track replaced.
For the concrete buried track I used copper-clad PCB board soldered under the brass rails at about 6" spacing and timber sleepers/steel nails for the rest.
This pic shows the track in place before concreting.
Now to wait for a few fine days to do the concreting.
The first bit of track I laid back in 1994 was to get through the wall of my train room and across the concrete ramp just outside. The ramp is on a 1:5 grade!
I was using 3x12mm aluminium bar rail in timber sleepers . I covered the whole track across the path with concrete.
This is the 'now' picture. The concrete has cracked and exposed the sleepers which have rotted away. You can see some unsuccessful attempts to repair the track gauge with silicone and Builders Bog.
- before1.JPG (120.39 KiB) Viewed 7102 times
And this is the piece of track from the path to the wall on a steel channel. You notice I put many electrical wire in the path crossing as I was using track power and I allowed plenty for future needs.
- before3.JPG (296.33 KiB) Viewed 7102 times
So it was out with the hammer and chisel and rip it up!
I also had to replace about 3' of track adjacent to the concrete where I had used old Aristo plastic sleepers-they had disintegrated in the sun!
- aristo track.JPG (124.67 KiB) Viewed 7102 times
So the 4' path crossing finished up needing about 12' of track replaced.
For the concrete buried track I used copper-clad PCB board soldered under the brass rails at about 6" spacing and timber sleepers/steel nails for the rest.
This pic shows the track in place before concreting.
- before conc1 capt.jpg (235.09 KiB) Viewed 7102 times
Now to wait for a few fine days to do the concreting.
Greg from downunder.
The Sandstone & Termite's website: https://members.optusnet.com.au/satr/satr.htm
The Sandstone & Termite's website: https://members.optusnet.com.au/satr/satr.htm
Re: Sandstone and Termite
The amount of track maintenance can get out of hand it seems Greg. I must admit I haven't given it much thought on how much work would be needed to repair track. Then the heat from the sun is considerably hotter and a lot more fierce I would imagine in Aus. But that's not to say we Northern Hemisphere people have our own problems also with weather.
Thank you Greg on another interesting thread ...
Thank you Greg on another interesting thread ...
ROD
Life is so easy when I run my trains.
https://gardenrails.org/forum/viewtopic ... 41&t=11364
https://www.youtube.com/@fairywoodlightrailway
Life is so easy when I run my trains.
https://gardenrails.org/forum/viewtopic ... 41&t=11364
https://www.youtube.com/@fairywoodlightrailway
Who is online
Users browsing this forum: No registered users and 3 guests